- White Chocolate: Use a quality bar—not chips—for better melting and smooth texture.
- Flour: All-purpose flour works best to give you structure without toughening the cookies.
- Baking Powder: Helps the cookies rise just enough for tenderness.
- Salt: Balances sweetness and enhances the chocolate flavor.
- Butter (Room Temp): Softened, not melted—this ensures a smooth, fluffy dough.
- Sugar: Adds sweetness and helps with browning—use regular granulated sugar.
- Egg: Binds the dough, giving it moisture and structure.
- Vanilla Extract: Adds warmth and depth to the cookie flavor.
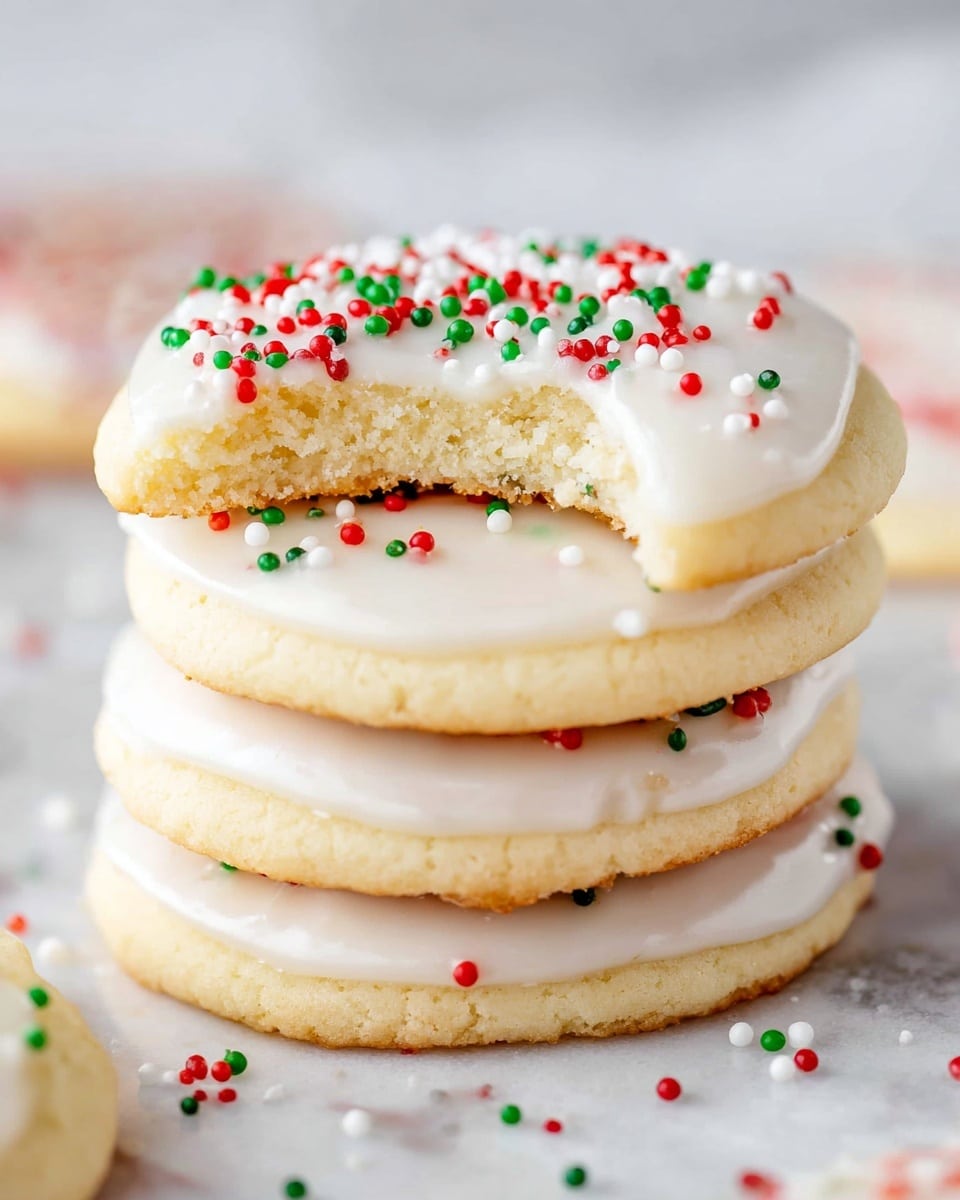
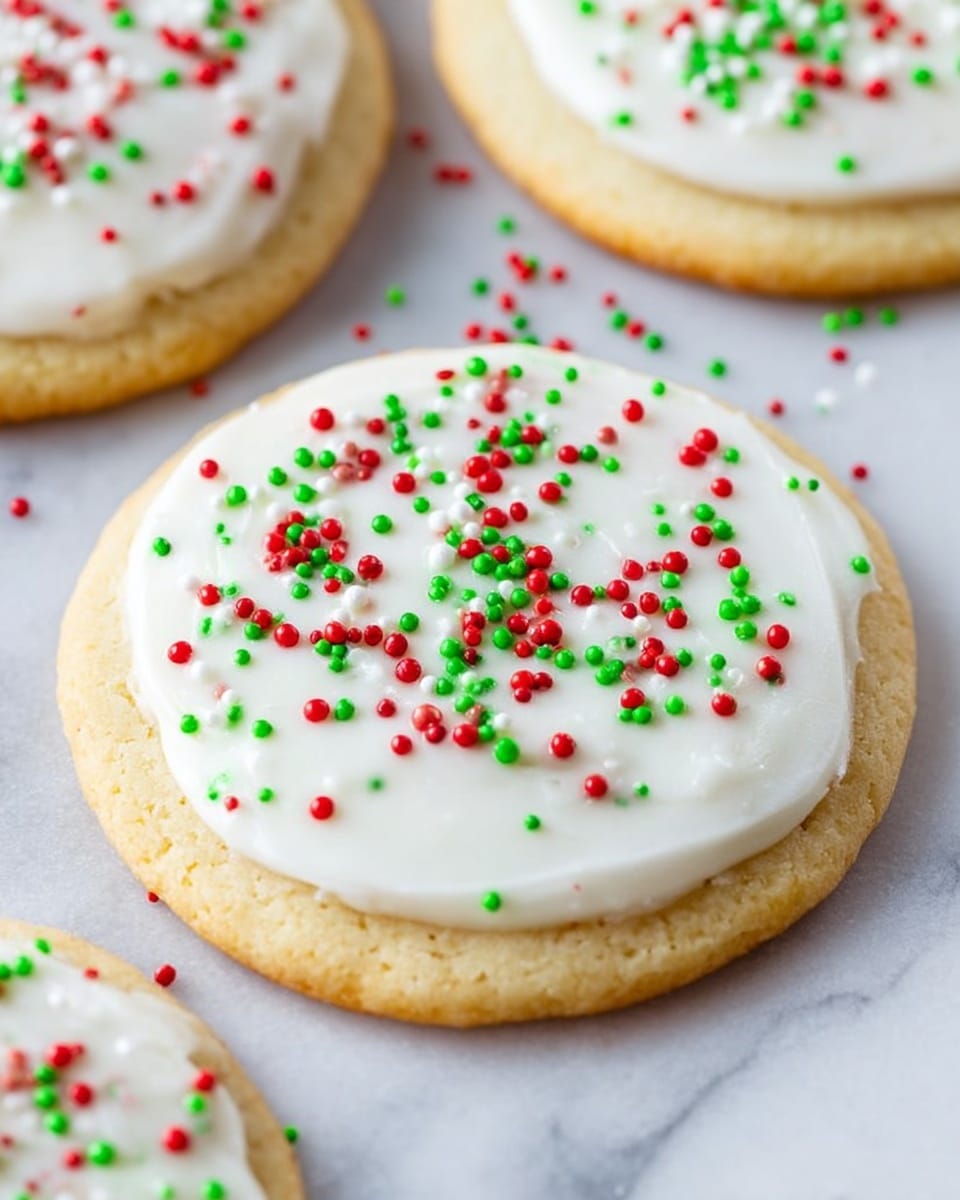
- Sprinkles: Optional, but they add a festive pop and texture on top of the icing.
- Powdered Sugar: For that smooth royal icing texture.
- Corn Syrup: Helps give the royal icing the perfect glossy finish and stretch.
- Peppermint Extract: Adds a refreshing holiday flavor to your icing.
- Water (Room Temp): Adjust to get the right consistency in your royal icing.
Note: Exact ingredients and measurements are listed in the recipe card below.
Variations
I love to tailor this White Chocolate Sugar Cookies with Peppermint Royal Icing Recipe depending on the occasion or dietary needs. You can easily swap in gluten-free flour blends or experiment with different extracts to mix up the flavor.
- Gluten-Free Version: Use your favorite gluten-free 1:1 baking flour. I tried Bob’s Red Mill and was so happy with the texture.
- Almond Extract Addition: Sometimes I add almond extract along with vanilla to the dough for a nutty twist that pairs beautifully with peppermint icing.
- Vegan Adaptation: I’ve experimented by replacing butter with vegan margarine and egg with flaxseed egg, but the texture is a bit softer—still delicious though!
- Colorful Icing: For a party, add gel food coloring to the peppermint royal icing for fun pastel or vibrant shades.
How to Make White Chocolate Sugar Cookies with Peppermint Royal Icing Recipe
Step 1: Melt the White Chocolate
Start by chopping your white chocolate into small chunks—it melts more evenly this way. Microwave it in 30-second bursts, stirring each time, until it’s silky smooth. Let it cool to room temp so it doesn’t scramble the butter when combined.
Step 2: Mix the Dry Ingredients
Whisk together the flour, baking powder, and salt in a separate bowl. This ensures your leavening is evenly distributed and creates a tender crumb in the finished cookies.
Step 3: Cream Butter and Sugar
Using a stand mixer, beat the room temperature butter and sugar on medium speed for about 3 to 4 minutes. You’re aiming for a light, fluffy texture that helps create a soft cookie.
Step 4: Add Egg and Vanilla
Scrape down the bowl, then add the egg and vanilla extract. Beat again until just combined so the dough holds moisture and flavor without overmixing.
Step 5: Incorporate Melted White Chocolate
Pour the cooled melted white chocolate into your butter mixture and blend carefully until smooth and uniform. This step is where the magic really starts happening!
Step 6: Combine with Dry Ingredients
Gradually add the dry mixture and mix on low speed just until the dough comes together. Stop mixing as soon as it forms a ball to avoid tough cookies.
Step 7: Chill the Dough
Divide the dough in half, wrap each in plastic, and gently pat them into disks. Refrigerate for at least 1 hour or overnight if you have the patience—this step makes rolling and cutting so much easier.
Step 8: Roll and Cut
Preheat your oven to 350°F and line baking sheets with parchment paper. Lightly dust your clean surface and rolling pin with powdered sugar, then roll each dough disk to about ½-inch thick. Use your favorite cookie cutters to shape cookies and transfer them to the baking sheet.
Step 9: Bake and Cool
Bake for 10-12 minutes—the edges should just start to turn golden but the centers will still be soft. Cool on the baking sheet for a few minutes, then move to wire racks so they cool completely before icing.
Step 10: Make the Peppermint Royal Icing
In a bowl, combine powdered sugar, corn syrup, peppermint extract, and 2 tablespoons of water. Mix until smooth and glossy. Add extra water a little at a time if it’s too thick—you want the consistency where the icing leaves a ribbon on the surface before melting back in.
Step 11: Decorate the Cookies
Fill a piping bag fitted with a small round tip and outline or flood the cookies with icing. Add sprinkles immediately if you like. Let them dry fully before stacking or packaging, which usually takes 2-4 hours.
Pro Tips for Making White Chocolate Sugar Cookies with Peppermint Royal Icing Recipe
- Use Room Temperature Butter: This gives you the fluffiest dough and prevents greasy layering or tough texture.
- Don’t Overmix Dough: Mix until everything just comes together to keep your cookies tender and light.
- Chill Dough Well: Patting into disks and chilling makes rolling so much easier and prevents spreading when baking.
- Consistent Icing Consistency: If your royal icing is too runny or thick, it won’t decorate neatly—adjust water gradually for perfect flow.
How to Serve White Chocolate Sugar Cookies with Peppermint Royal Icing Recipe
Garnishes
I love topping these cookies with crushed candy canes or festive holiday sprinkles for extra crunch and color. A light dusting of edible shimmer dust also adds a magical sparkle that makes these cookies shine in any cookie tray.
Side Dishes
Pair these cookies with warm drinks like peppermint hot chocolate, chai tea, or a classic cup of coffee. I’ve found that a simple glass of cold milk is also unbeatable for dipping—especially with kids around.
Creative Ways to Present
For gift giving or parties, I like to layer the cookies in festive tins separated by parchment paper, or arrange them on a holiday-themed platter tied with a big red ribbon. You could even create a cookie pop display by inserting sticks before baking for a fun, interactive presentation.
Make Ahead and Storage
Storing Leftovers
I usually place leftover cookies in an airtight container with layers of parchment paper in between to keep the icing from sticking. Stored this way at room temperature, they stay fresh for about 4-5 days with perfect texture and flavor.
Freezing
If I make a big batch, I freeze the baked and fully iced cookies on a tray first, then transfer them to airtight freezer bags. When thawed, they taste just as delicious—just be sure to let them come to room temperature before serving to regain their softness.
Reheating
Reheating these cookies isn’t usually necessary, but if you prefer a warm cookie, I pop one in the microwave for about 10 seconds. It softens perfectly without melting the icing too much—just keep an eye on it!
FAQs
-
Can I substitute white chocolate chips for the white chocolate bar?
You can use white chocolate chips, but bars tend to melt smoother without seizing. If you use chips, melt them slowly in short bursts and stir to avoid clumping. The flavor won’t differ much, but texture might be slightly less uniform.
-
How do I store decorated sugar cookies to prevent smudging?
Let the royal icing dry completely (about 2-4 hours). Store cookies in a single layer or separate stacked layers with parchment or wax paper inside an airtight container. Avoid stacking while icing is wet to keep decorations intact.
-
Can I prepare the dough in advance?
Absolutely! The dough stores beautifully in the fridge for up to 24 hours, or you can freeze it for up to 3 months. Just thaw in the fridge overnight before rolling and baking for best results.
-
What if my royal icing is too thick or too runny?
If the icing feels too thick, add a few drops of room temperature water until it flows smoothly. If it’s too runny, mix in more powdered sugar little by little until you hit the consistency where it ribbons when lifted but then melts back slowly.
Final Thoughts
Making these White Chocolate Sugar Cookies with Peppermint Royal Icing Recipe has become one of my favorite holiday traditions because it blends nostalgia with a fresh twist that everyone adores. I hope you give this recipe a try and experience the joy of sharing buttery, white chocolate-rich cookies decorated with that irresistible hint of peppermint. Trust me, your family, friends, and coworkers will keep asking for more—just like mine do every year!
I absolutely love how white chocolate adds such a creamy, luxe touch to the classic sugar cookie. When I first tried making these White Chocolate Sugar Cookies with Peppermint Royal Icing Recipe, I was hooked immediately—the rich buttery dough combined with melted white chocolate makes every bite melt in your mouth. The peppermint royal icing adds that festive zing and a beautiful glossy finish that’s perfect for the holidays or any winter celebration.
This recipe works wonderfully for gifting, cookie swaps, or just a cozy afternoon treat with a cup of hot cocoa. You’ll find that once you try this White Chocolate Sugar Cookies with Peppermint Royal Icing Recipe, it quickly becomes a seasonal go-to because the flavors are perfectly balanced and the texture has a delightful tender snap. Plus, decorating with peppermint icing and sprinkles makes it so much fun for the whole family to get involved.
Why You’ll Love This Recipe
- Decadent Flavor: The folded-in white chocolate makes these cookies uniquely rich and buttery.
- Festive Peppermint Twist: The royal icing with peppermint extract brings a fresh, seasonal brightness that pairs perfectly.
- Perfect Texture: Soft with just enough snap, these cookies hold their shape well and decorate beautifully.
- Family-Friendly Fun: Decorating these cookies is a joyful project for kids and adults alike.

Ingredients You’ll Need
These ingredients come together to build rich cookie dough that’s balanced with a hint of peppermint in the icing—a true holiday delight. When picking your white chocolate, I recommend using good quality baking chocolate bars for the best melt and flavor.
- White Chocolate: Use a quality bar—not chips—for better melting and smooth texture.
- Flour: All-purpose flour works best to give you structure without toughening the cookies.
- Baking Powder: Helps the cookies rise just enough for tenderness.
- Salt: Balances sweetness and enhances the chocolate flavor.
- Butter (Room Temp): Softened, not melted—this ensures a smooth, fluffy dough.
- Sugar: Adds sweetness and helps with browning—use regular granulated sugar.
- Egg: Binds the dough, giving it moisture and structure.
- Vanilla Extract: Adds warmth and depth to the cookie flavor.
- Sprinkles: Optional, but they add a festive pop and texture on top of the icing.
- Powdered Sugar: For that smooth royal icing texture.
- Corn Syrup: Helps give the royal icing the perfect glossy finish and stretch.
- Peppermint Extract: Adds a refreshing holiday flavor to your icing.
- Water (Room Temp): Adjust to get the right consistency in your royal icing.
Note: Exact ingredients and measurements are listed in the recipe card below.
Variations
I love to tailor this White Chocolate Sugar Cookies with Peppermint Royal Icing Recipe depending on the occasion or dietary needs. You can easily swap in gluten-free flour blends or experiment with different extracts to mix up the flavor.
- Gluten-Free Version: Use your favorite gluten-free 1:1 baking flour. I tried Bob’s Red Mill and was so happy with the texture.
- Almond Extract Addition: Sometimes I add almond extract along with vanilla to the dough for a nutty twist that pairs beautifully with peppermint icing.
- Vegan Adaptation: I’ve experimented by replacing butter with vegan margarine and egg with flaxseed egg, but the texture is a bit softer—still delicious though!
- Colorful Icing: For a party, add gel food coloring to the peppermint royal icing for fun pastel or vibrant shades.
How to Make White Chocolate Sugar Cookies with Peppermint Royal Icing Recipe
Step 1: Melt the White Chocolate
Start by chopping your white chocolate into small chunks—it melts more evenly this way. Microwave it in 30-second bursts, stirring each time, until it’s silky smooth. Let it cool to room temp so it doesn’t scramble the butter when combined.
Step 2: Mix the Dry Ingredients
Whisk together the flour, baking powder, and salt in a separate bowl. This ensures your leavening is evenly distributed and creates a tender crumb in the finished cookies.
Step 3: Cream Butter and Sugar
Using a stand mixer, beat the room temperature butter and sugar on medium speed for about 3 to 4 minutes. You’re aiming for a light, fluffy texture that helps create a soft cookie.
Step 4: Add Egg and Vanilla
Scrape down the bowl, then add the egg and vanilla extract. Beat again until just combined so the dough holds moisture and flavor without overmixing.
Step 5: Incorporate Melted White Chocolate
Pour the cooled melted white chocolate into your butter mixture and blend carefully until smooth and uniform. This step is where the magic really starts happening!
Step 6: Combine with Dry Ingredients
Gradually add the dry mixture and mix on low speed just until the dough comes together. Stop mixing as soon as it forms a ball to avoid tough cookies.
Step 7: Chill the Dough
Divide the dough in half, wrap each in plastic, and gently pat them into disks. Refrigerate for at least 1 hour or overnight if you have the patience—this step makes rolling and cutting so much easier.
Step 8: Roll and Cut
Preheat your oven to 350°F and line baking sheets with parchment paper. Lightly dust your clean surface and rolling pin with powdered sugar, then roll each dough disk to about ½-inch thick. Use your favorite cookie cutters to shape cookies and transfer them to the baking sheet.
Step 9: Bake and Cool
Bake for 10-12 minutes—the edges should just start to turn golden but the centers will still be soft. Cool on the baking sheet for a few minutes, then move to wire racks so they cool completely before icing.
Step 10: Make the Peppermint Royal Icing
In a bowl, combine powdered sugar, corn syrup, peppermint extract, and 2 tablespoons of water. Mix until smooth and glossy. Add extra water a little at a time if it’s too thick—you want the consistency where the icing leaves a ribbon on the surface before melting back in.
Step 11: Decorate the Cookies
Fill a piping bag fitted with a small round tip and outline or flood the cookies with icing. Add sprinkles immediately if you like. Let them dry fully before stacking or packaging, which usually takes 2-4 hours.
Pro Tips for Making White Chocolate Sugar Cookies with Peppermint Royal Icing Recipe
- Use Room Temperature Butter: This gives you the fluffiest dough and prevents greasy layering or tough texture.
- Don’t Overmix Dough: Mix until everything just comes together to keep your cookies tender and light.
- Chill Dough Well: Patting into disks and chilling makes rolling so much easier and prevents spreading when baking.
- Consistent Icing Consistency: If your royal icing is too runny or thick, it won’t decorate neatly—adjust water gradually for perfect flow.
How to Serve White Chocolate Sugar Cookies with Peppermint Royal Icing Recipe
Garnishes
I love topping these cookies with crushed candy canes or festive holiday sprinkles for extra crunch and color. A light dusting of edible shimmer dust also adds a magical sparkle that makes these cookies shine in any cookie tray.
Side Dishes
Pair these cookies with warm drinks like peppermint hot chocolate, chai tea, or a classic cup of coffee. I’ve found that a simple glass of cold milk is also unbeatable for dipping—especially with kids around.
Creative Ways to Present
For gift giving or parties, I like to layer the cookies in festive tins separated by parchment paper, or arrange them on a holiday-themed platter tied with a big red ribbon. You could even create a cookie pop display by inserting sticks before baking for a fun, interactive presentation.
Make Ahead and Storage
Storing Leftovers
I usually place leftover cookies in an airtight container with layers of parchment paper in between to keep the icing from sticking. Stored this way at room temperature, they stay fresh for about 4-5 days with perfect texture and flavor.
Freezing
If I make a big batch, I freeze the baked and fully iced cookies on a tray first, then transfer them to airtight freezer bags. When thawed, they taste just as delicious—just be sure to let them come to room temperature before serving to regain their softness.
Reheating
Reheating these cookies isn’t usually necessary, but if you prefer a warm cookie, I pop one in the microwave for about 10 seconds. It softens perfectly without melting the icing too much—just keep an eye on it!
FAQs
-
Can I substitute white chocolate chips for the white chocolate bar?
You can use white chocolate chips, but bars tend to melt smoother without seizing. If you use chips, melt them slowly in short bursts and stir to avoid clumping. The flavor won’t differ much, but texture might be slightly less uniform.
-
How do I store decorated sugar cookies to prevent smudging?
Let the royal icing dry completely (about 2-4 hours). Store cookies in a single layer or separate stacked layers with parchment or wax paper inside an airtight container. Avoid stacking while icing is wet to keep decorations intact.
-
Can I prepare the dough in advance?
Absolutely! The dough stores beautifully in the fridge for up to 24 hours, or you can freeze it for up to 3 months. Just thaw in the fridge overnight before rolling and baking for best results.
-
What if my royal icing is too thick or too runny?
If the icing feels too thick, add a few drops of room temperature water until it flows smoothly. If it’s too runny, mix in more powdered sugar little by little until you hit the consistency where it ribbons when lifted but then melts back slowly.
Final Thoughts
Making these White Chocolate Sugar Cookies with Peppermint Royal Icing Recipe has become one of my favorite holiday traditions because it blends nostalgia with a fresh twist that everyone adores. I hope you give this recipe a try and experience the joy of sharing buttery, white chocolate-rich cookies decorated with that irresistible hint of peppermint. Trust me, your family, friends, and coworkers will keep asking for more—just like mine do every year!