- All-purpose flour: Foundation for your flaky dough, choose fresh for best results.
- Granulated sugar: Adds a hint of sweetness to balance the spices and pumpkin.
- Kosher salt: Enhances all the flavors in the crust and filling.
- Unsalted butter: Keep it cold; it’s what makes the crust tender and flaky.
- White vinegar: A little acidity tenderizes the dough without altering flavor.
- Ice-cold water: Helps bind the dough just right without toughening it.
- Pumpkin puree: Use pure pumpkin, not canned pie filling, for authentic taste.
- Dark brown sugar: Adds depth and a slight molasses note to the filling.
- Ground cinnamon, ginger, allspice, nutmeg: Perfect warming spices for that classic pumpkin flavor.
- Pure vanilla extract: Rounds out the filling with a sweet aromatic touch.
- Cream cheese: Makes the filling luxuriously smooth and rich.
- Large egg yolks: Adds richness and helps bind the filling.
- Egg (for brushing): Gives the pies a gorgeous golden shine when baked.
Note: Exact ingredients and measurements are listed in the recipe card below.
Variations
I love how versatile this Pumpkin Hand Pies Recipe is. Over time, I’ve tweaked the spices and fillings to match the mood or occasion, and you might find your own favorite spin too. Don’t be afraid to experiment!
- Spice it up: I sometimes add a pinch of cayenne or swap out allspice for cardamom to give the filling a subtle twist that surprises guests.
- Dairy-free version: Try using coconut cream cheese and vegan butter to make these hand pies suitable for dairy-free diets; they still come out deliciously rich.
- Savory pumpkin: Occasionally, I leave out the sugar and add herbs like sage or thyme to the filling for a savory take perfect for fall brunch.
- Mini hand pies: Making smaller pies is a fun way to serve them at parties—you’ll get more portions and they’re just as tasty.
How to Make Pumpkin Hand Pies Recipe
Step 1: Create the flaky dough
Grab your food processor and combine the flour, granulated sugar, and 1 1/2 teaspoons of kosher salt. If your processor is smaller, split the batch like I do; it keeps everything manageable. Pulse in the cold butter until it resembles coarse crumbs—that’s key for flaky layers later! Keep everything cold by not overworking the dough.
Step 2: Bring the dough together and chill
Next, add the vinegar and ice-cold water little by little, pulsing just until the dough holds together when squeezed. This step feels a bit delicate but resist adding too much water at once—you want crumbly, not sticky dough. Shape the dough into three disks, wrap in plastic, and pop them in the fridge for at least an hour. Trust me, the chill time makes rolling so much easier.
Step 3: Cook and cool the pumpkin filling
While the dough chills, whisk together the pumpkin, brown sugar, spices, and remaining salt in a saucepan. Cook over medium heat for 6-8 minutes to thicken and bring out the flavors. Once off heat, stir in vanilla and cream cheese until smooth, then mix in the egg yolks. Let the filling cool completely—warm filling will wilt your dough, so patience pays off here!
Step 4: Roll, cut, and prepare for assembly
Preheat your oven to 375°F. Roll out one disk at a time on a lightly floured surface to about 1/8-inch thickness. Using a 3½-inch pumpkin-shaped cutter (or a round one if you want), cut out 28 shapes total. Set aside half without slits and cut 3 vertical slits in the other half—these vent the pies while baking. Keep your cutouts in the fridge while you work to keep everything firm.
Step 5: Assemble your hand pies
Place seven “bottom” cutouts on a parchment-lined baking sheet. Spoon about 2 tablespoons of the cooled pumpkin filling in the center of each, leaving a half-inch border. Using a pastry brush, lightly wet the edges with beaten egg—this is your glue. Top each with a vented “lid,” then press the edges with a fork to seal. This helps make sure your pies stay beautifully intact while baking.
Step 6: Brush and bake your pies to golden perfection
Brush the tops generously with the remaining beaten egg to get that irresistible golden sheen. Bake the pies for about 23-25 minutes until they’re puffed and golden brown. They’ll smell incredible—get ready! Cool them slightly before digging in so the filling sets nicely.
Pro Tips for Making Pumpkin Hand Pies Recipe
- Keep everything cold: Chilling your butter, water, and dough makes rolling easier and produces flakier crusts.
- Don’t overfill the pies: Adding too much filling can cause leaks; two tablespoons is just right for a clean seal.
- Use a fork to seal edges: This simple step secures your pies and prevents filling from oozing out during baking.
- Let the filling cool: Hot filling softens the dough and makes assembly tricky; patience here ensures the best results.
How to Serve Pumpkin Hand Pies Recipe
Garnishes
I like to dust my Pumpkin Hand Pies lightly with powdered sugar for a pretty, cozy look. Sometimes, a drizzle of caramel sauce or a dollop of whipped cream on the side adds that extra touch of indulgence that my family swoons over. A sprinkle of chopped toasted pecans can also bring a nice crunch if you’re feeling fancy.
Side Dishes
These hand pies pair wonderfully with a hot cup of spiced chai or strong coffee to balance their sweetness. For brunch, I often serve them alongside fresh fruit or a light green salad to add some freshness to the table. They also make a perfect dessert after a cozy soup or chili.
Creative Ways to Present
For holiday parties, I’ve arranged Pumpkin Hand Pies in a festive pumpkin-shaped basket lined with autumn leaves—it’s such an inviting centerpiece! You can also stack them with doilies between layers to make them look like a rustic cake. Wrapping individual pies in parchment tied with twine is a lovely way to give them as gifts or party favors.
Make Ahead and Storage
Storing Leftovers
I recommend storing any leftover Pumpkin Hand Pies in an airtight container at room temperature for up to 2 days. If you want to keep them fresh longer, refrigeration works well but can slightly change the texture of the crust. To avoid sogginess, reheat gently before serving.
Freezing
I’ve had great success freezing unbaked hand pies after assembly. Freeze them on a tray until firm, then wrap individually and store in a freezer bag for up to 3 months. When you want to bake, just place them directly on a baking sheet and add a few extra minutes to the baking time—super convenient for busy days!
Reheating
To reheat, I preheat the oven to 350°F and bake my hand pies for about 10 minutes until warmed through and the crust comes back to life. Avoid microwave reheating because it makes the crust soft quickly. This little extra step is totally worth it for that fresh-baked taste.
FAQs
-
Can I use homemade pumpkin puree for this Pumpkin Hand Pies Recipe?
Yes! Homemade pumpkin puree works beautifully. Just make sure it’s cooked and well-drained so your filling isn’t too watery. You might want to cook the filling a bit longer to evaporate excess moisture before adding the cream cheese and egg yolks.
-
Can I make the dough by hand instead of using a food processor?
Absolutely! Use a pastry cutter or two knives to cut the butter into the flour mixture until it resembles coarse crumbs. Just be sure to work quickly and keep your ingredients cold to maintain flakiness.
-
How do I prevent the filling from leaking out during baking?
Don’t overfill the pies and make sure to brush the edges with beaten egg before sealing tightly with a fork. Chilling the dough and filling before assembling also helps keep everything firm and in place.
-
Can I make these pies ahead of time for a party?
Yes! You can prepare and assemble the pies up to two days in advance and keep them refrigerated until baking day. Or freeze them unbaked for longer storage and simply bake right from frozen, adding some extra baking time.
Final Thoughts
When I first tried this Pumpkin Hand Pies Recipe, I was blown away by how simple yet special it felt to share these little pockets of fall flavor with those I love. I hope you’ll find that same joy in each flaky bite. They’re perfect for cozy mornings, festive gatherings, or whenever you crave a warm seasonal treat. Give this recipe a try—you’ll be so glad you did!
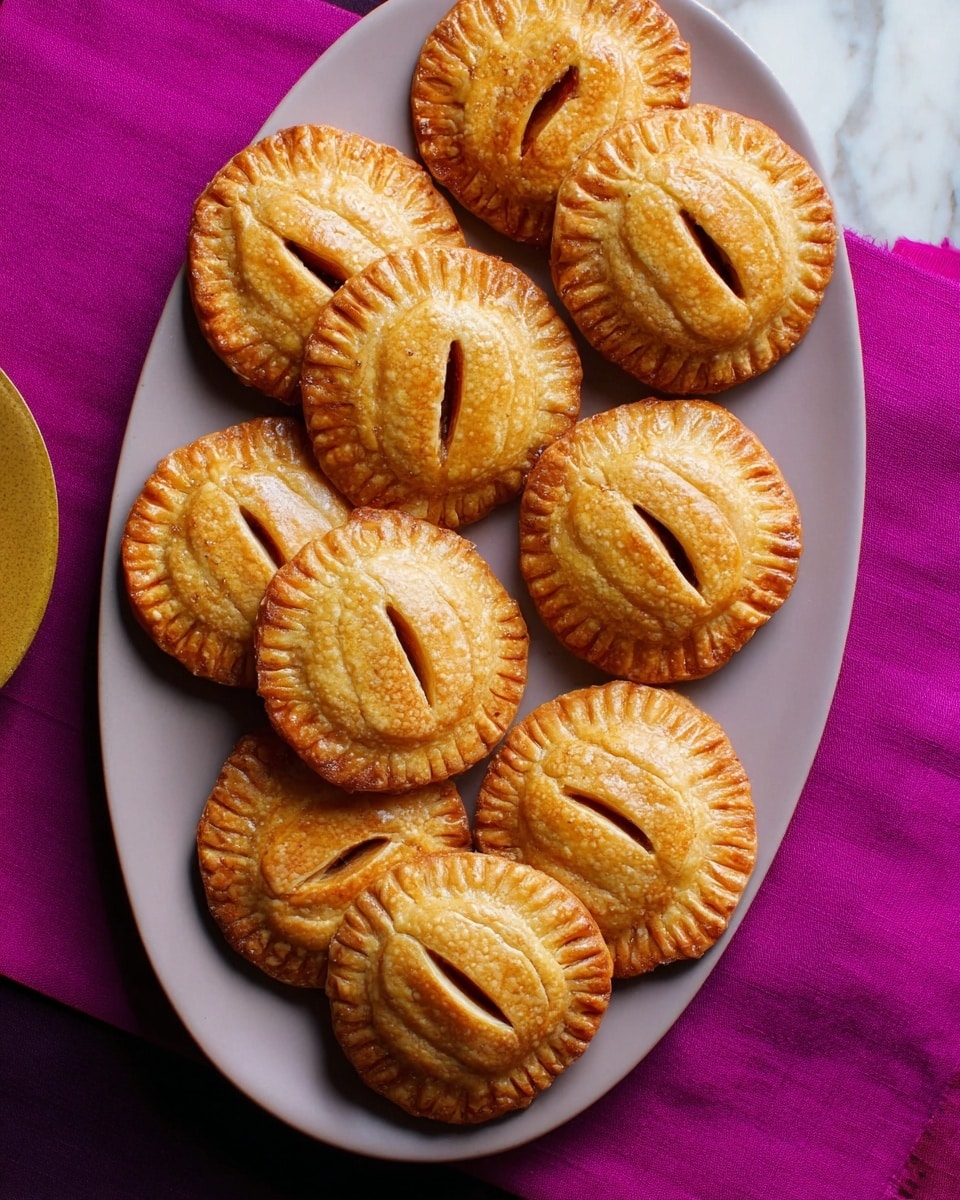
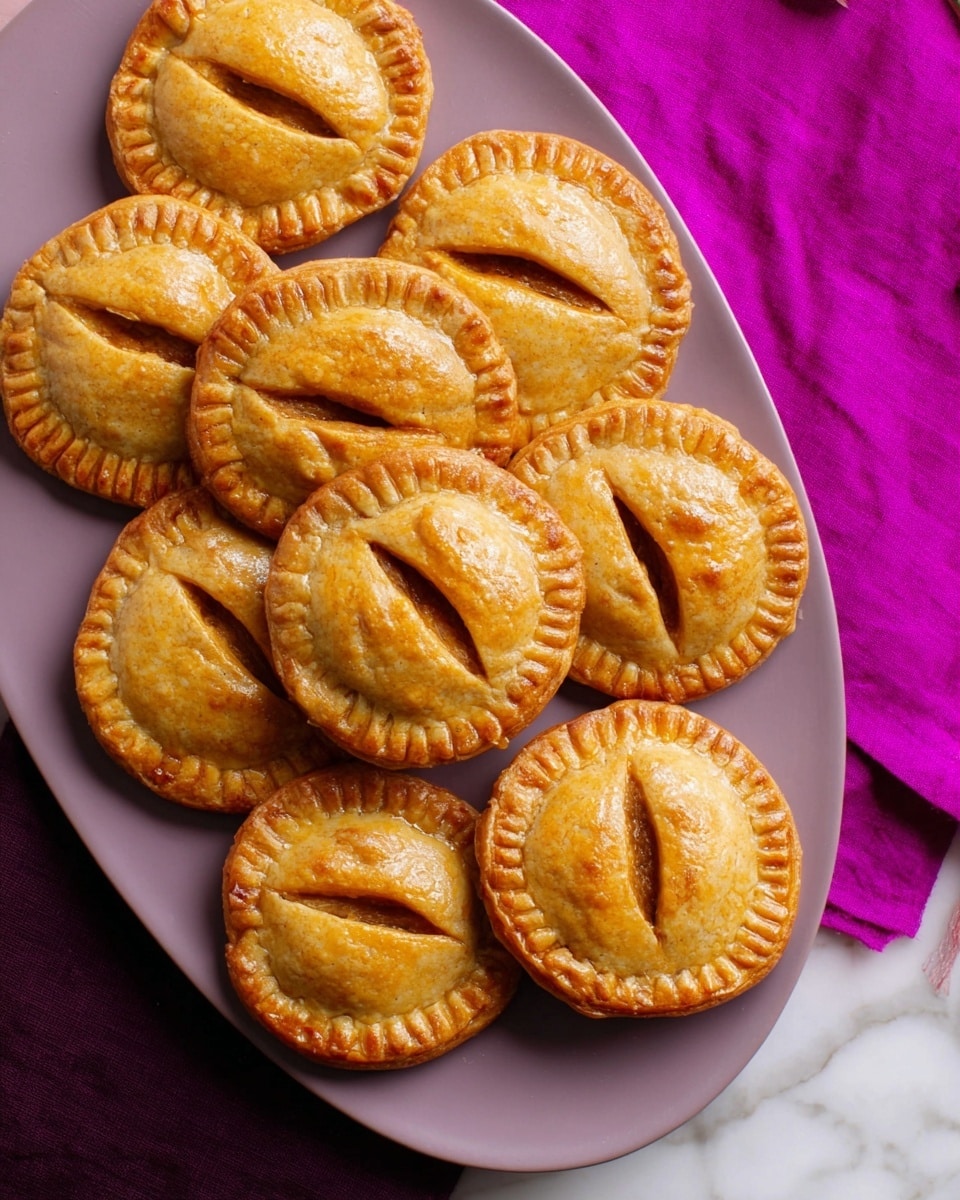
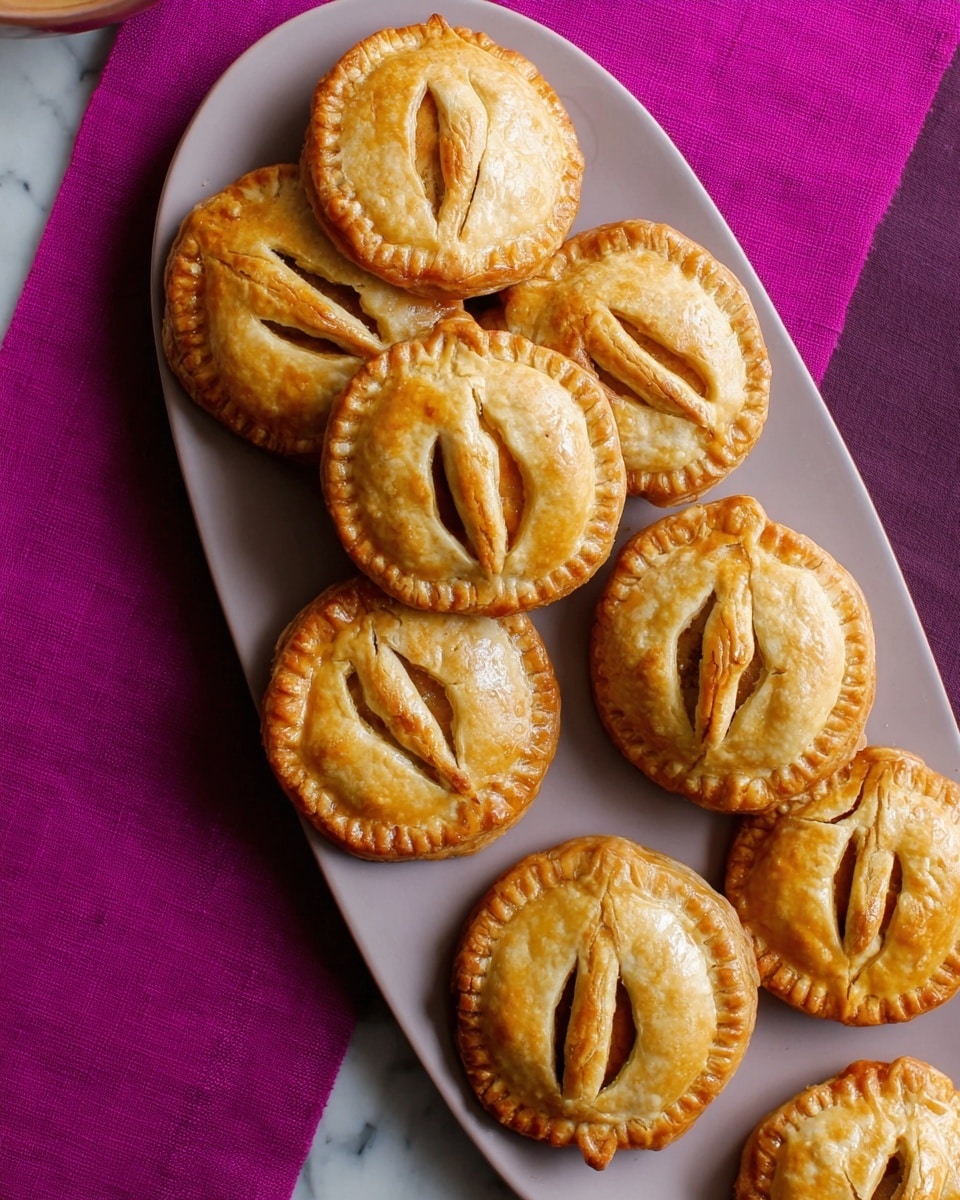
I absolutely love this Pumpkin Hand Pies Recipe because it perfectly captures that cozy fall feeling in every single bite. The flaky, buttery crust paired with the spiced pumpkin filling is like a little autumn festival you can hold in your hand. Whether you’re making this for a holiday gathering or just a casual weekend treat, these pies always bring smiles around the kitchen table.
What I find especially wonderful about this Pumpkin Hand Pies Recipe is how portable and perfect they are as snacks or desserts. You don’t need a fork or plate—just grab one and enjoy! Plus, the balance of cream cheese and warming spices gives the filling a richness and depth that keeps my family coming back for more.
Why You’ll Love This Recipe
- Perfect hand-held size: These pies are crafted just right to enjoy anywhere, making them a great on-the-go dessert or snack.
- Flaky, buttery crust: The crust comes out tender and flaky every time, thanks to the cold butter and careful handling.
- Rich spiced pumpkin filling: With cream cheese and warming spices, this filling hits the sweet and savory notes perfectly.
- Make ahead friendly: You can prep the dough and filling in advance, which makes your baking day so much easier.
Ingredients You’ll Need
Each ingredient in this Pumpkin Hand Pies Recipe plays an important role, from the flaky crust to the creamy pumpkin filling. When you shop, look for good quality butter and canned pumpkin puree (not pumpkin pie filling) for the best flavor and texture.
- All-purpose flour: Foundation for your flaky dough, choose fresh for best results.
- Granulated sugar: Adds a hint of sweetness to balance the spices and pumpkin.
- Kosher salt: Enhances all the flavors in the crust and filling.
- Unsalted butter: Keep it cold; it’s what makes the crust tender and flaky.
- White vinegar: A little acidity tenderizes the dough without altering flavor.
- Ice-cold water: Helps bind the dough just right without toughening it.
- Pumpkin puree: Use pure pumpkin, not canned pie filling, for authentic taste.
- Dark brown sugar: Adds depth and a slight molasses note to the filling.
- Ground cinnamon, ginger, allspice, nutmeg: Perfect warming spices for that classic pumpkin flavor.
- Pure vanilla extract: Rounds out the filling with a sweet aromatic touch.
- Cream cheese: Makes the filling luxuriously smooth and rich.
- Large egg yolks: Adds richness and helps bind the filling.
- Egg (for brushing): Gives the pies a gorgeous golden shine when baked.
Note: Exact ingredients and measurements are listed in the recipe card below.
Variations
I love how versatile this Pumpkin Hand Pies Recipe is. Over time, I’ve tweaked the spices and fillings to match the mood or occasion, and you might find your own favorite spin too. Don’t be afraid to experiment!
- Spice it up: I sometimes add a pinch of cayenne or swap out allspice for cardamom to give the filling a subtle twist that surprises guests.
- Dairy-free version: Try using coconut cream cheese and vegan butter to make these hand pies suitable for dairy-free diets; they still come out deliciously rich.
- Savory pumpkin: Occasionally, I leave out the sugar and add herbs like sage or thyme to the filling for a savory take perfect for fall brunch.
- Mini hand pies: Making smaller pies is a fun way to serve them at parties—you’ll get more portions and they’re just as tasty.
How to Make Pumpkin Hand Pies Recipe
Step 1: Create the flaky dough
Grab your food processor and combine the flour, granulated sugar, and 1 1/2 teaspoons of kosher salt. If your processor is smaller, split the batch like I do; it keeps everything manageable. Pulse in the cold butter until it resembles coarse crumbs—that’s key for flaky layers later! Keep everything cold by not overworking the dough.
Step 2: Bring the dough together and chill
Next, add the vinegar and ice-cold water little by little, pulsing just until the dough holds together when squeezed. This step feels a bit delicate but resist adding too much water at once—you want crumbly, not sticky dough. Shape the dough into three disks, wrap in plastic, and pop them in the fridge for at least an hour. Trust me, the chill time makes rolling so much easier.
Step 3: Cook and cool the pumpkin filling
While the dough chills, whisk together the pumpkin, brown sugar, spices, and remaining salt in a saucepan. Cook over medium heat for 6-8 minutes to thicken and bring out the flavors. Once off heat, stir in vanilla and cream cheese until smooth, then mix in the egg yolks. Let the filling cool completely—warm filling will wilt your dough, so patience pays off here!
Step 4: Roll, cut, and prepare for assembly
Preheat your oven to 375°F. Roll out one disk at a time on a lightly floured surface to about 1/8-inch thickness. Using a 3½-inch pumpkin-shaped cutter (or a round one if you want), cut out 28 shapes total. Set aside half without slits and cut 3 vertical slits in the other half—these vent the pies while baking. Keep your cutouts in the fridge while you work to keep everything firm.
Step 5: Assemble your hand pies
Place seven “bottom” cutouts on a parchment-lined baking sheet. Spoon about 2 tablespoons of the cooled pumpkin filling in the center of each, leaving a half-inch border. Using a pastry brush, lightly wet the edges with beaten egg—this is your glue. Top each with a vented “lid,” then press the edges with a fork to seal. This helps make sure your pies stay beautifully intact while baking.
Step 6: Brush and bake your pies to golden perfection
Brush the tops generously with the remaining beaten egg to get that irresistible golden sheen. Bake the pies for about 23-25 minutes until they’re puffed and golden brown. They’ll smell incredible—get ready! Cool them slightly before digging in so the filling sets nicely.
Pro Tips for Making Pumpkin Hand Pies Recipe
- Keep everything cold: Chilling your butter, water, and dough makes rolling easier and produces flakier crusts.
- Don’t overfill the pies: Adding too much filling can cause leaks; two tablespoons is just right for a clean seal.
- Use a fork to seal edges: This simple step secures your pies and prevents filling from oozing out during baking.
- Let the filling cool: Hot filling softens the dough and makes assembly tricky; patience here ensures the best results.
How to Serve Pumpkin Hand Pies Recipe
Garnishes
I like to dust my Pumpkin Hand Pies lightly with powdered sugar for a pretty, cozy look. Sometimes, a drizzle of caramel sauce or a dollop of whipped cream on the side adds that extra touch of indulgence that my family swoons over. A sprinkle of chopped toasted pecans can also bring a nice crunch if you’re feeling fancy.
Side Dishes
These hand pies pair wonderfully with a hot cup of spiced chai or strong coffee to balance their sweetness. For brunch, I often serve them alongside fresh fruit or a light green salad to add some freshness to the table. They also make a perfect dessert after a cozy soup or chili.
Creative Ways to Present
For holiday parties, I’ve arranged Pumpkin Hand Pies in a festive pumpkin-shaped basket lined with autumn leaves—it’s such an inviting centerpiece! You can also stack them with doilies between layers to make them look like a rustic cake. Wrapping individual pies in parchment tied with twine is a lovely way to give them as gifts or party favors.
Make Ahead and Storage
Storing Leftovers
I recommend storing any leftover Pumpkin Hand Pies in an airtight container at room temperature for up to 2 days. If you want to keep them fresh longer, refrigeration works well but can slightly change the texture of the crust. To avoid sogginess, reheat gently before serving.
Freezing
I’ve had great success freezing unbaked hand pies after assembly. Freeze them on a tray until firm, then wrap individually and store in a freezer bag for up to 3 months. When you want to bake, just place them directly on a baking sheet and add a few extra minutes to the baking time—super convenient for busy days!
Reheating
To reheat, I preheat the oven to 350°F and bake my hand pies for about 10 minutes until warmed through and the crust comes back to life. Avoid microwave reheating because it makes the crust soft quickly. This little extra step is totally worth it for that fresh-baked taste.
FAQs
-
Can I use homemade pumpkin puree for this Pumpkin Hand Pies Recipe?
Yes! Homemade pumpkin puree works beautifully. Just make sure it’s cooked and well-drained so your filling isn’t too watery. You might want to cook the filling a bit longer to evaporate excess moisture before adding the cream cheese and egg yolks.
-
Can I make the dough by hand instead of using a food processor?
Absolutely! Use a pastry cutter or two knives to cut the butter into the flour mixture until it resembles coarse crumbs. Just be sure to work quickly and keep your ingredients cold to maintain flakiness.
-
How do I prevent the filling from leaking out during baking?
Don’t overfill the pies and make sure to brush the edges with beaten egg before sealing tightly with a fork. Chilling the dough and filling before assembling also helps keep everything firm and in place.
-
Can I make these pies ahead of time for a party?
Yes! You can prepare and assemble the pies up to two days in advance and keep them refrigerated until baking day. Or freeze them unbaked for longer storage and simply bake right from frozen, adding some extra baking time.
Final Thoughts
When I first tried this Pumpkin Hand Pies Recipe, I was blown away by how simple yet special it felt to share these little pockets of fall flavor with those I love. I hope you’ll find that same joy in each flaky bite. They’re perfect for cozy mornings, festive gatherings, or whenever you crave a warm seasonal treat. Give this recipe a try—you’ll be so glad you did!