
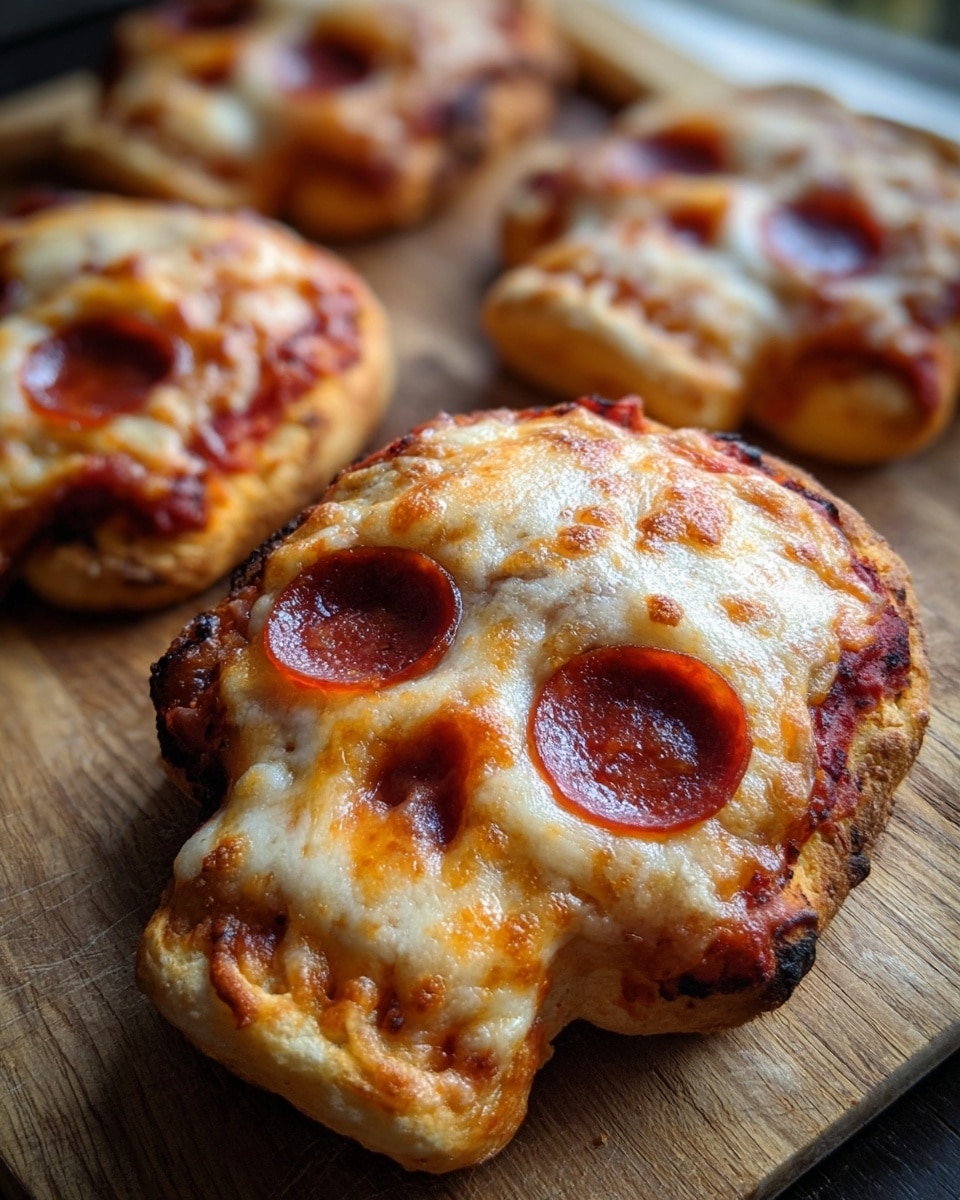
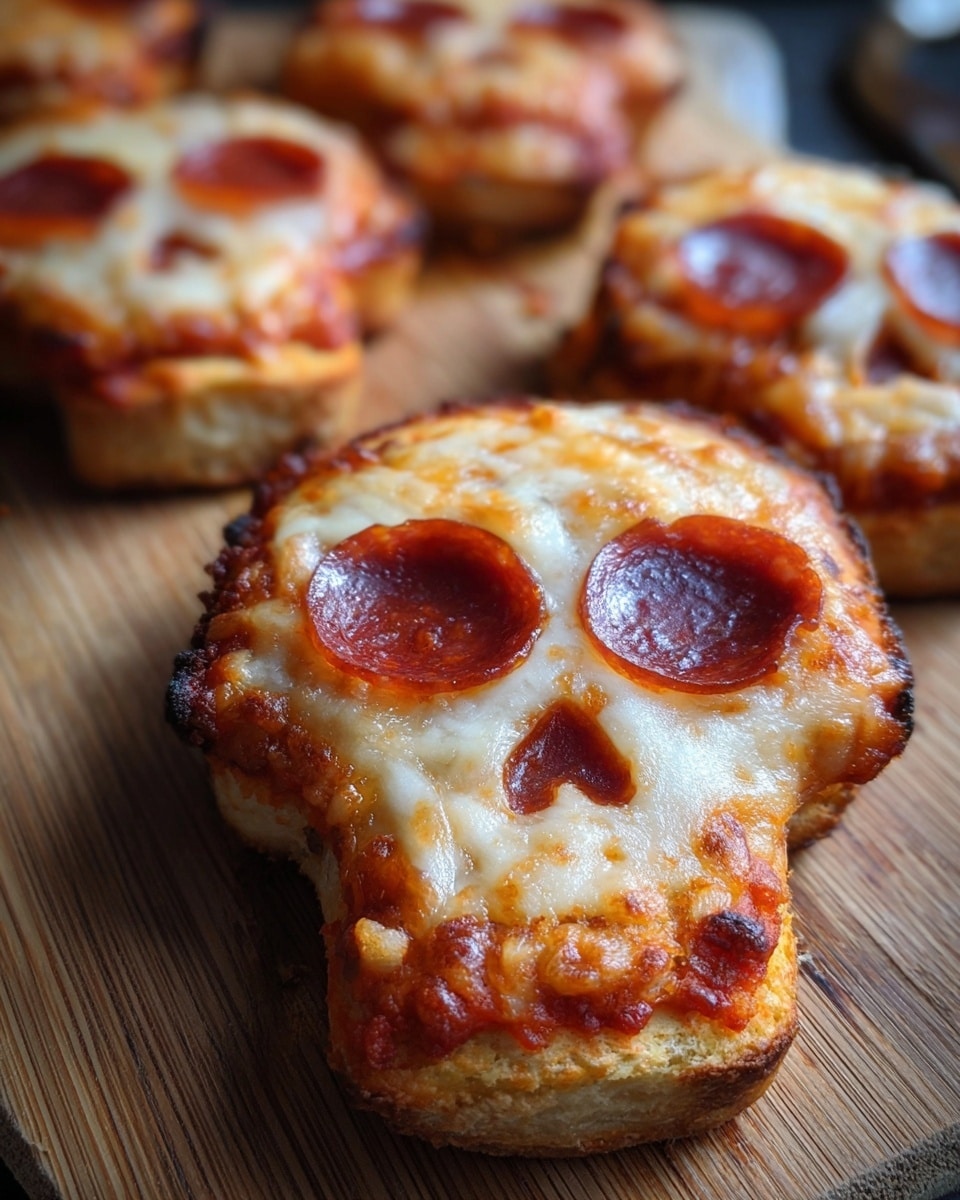
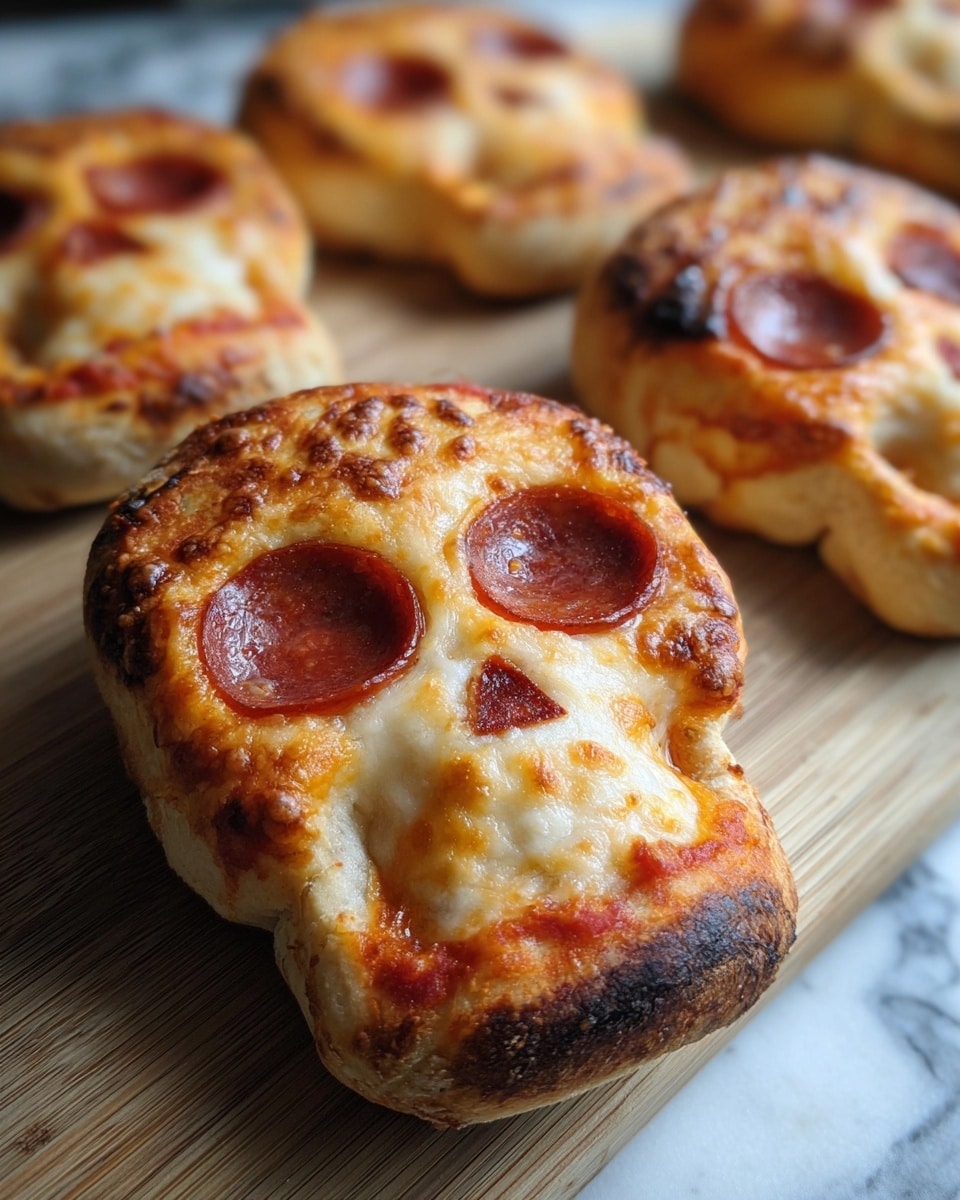
Okay, friend, let me tell you about one of my all-time favorite Halloween bakes: Pizza Skulls! This Pizza Skulls: Spooky Halloween Treats Recipe is such a fun twist on everyone’s beloved pizza, but with a playful, creepy-cool skull shape that totally steals the show at any spooky gathering. I love this recipe because it’s approachable, tasty, and gets everyone in the Halloween spirit faster than you can say “trick or treat.”
What’s really great is how versatile these pizza skulls are — they work perfectly as party appetizers or even a festive family dinner. I discovered this trick a few Halloweens ago when I wanted to serve something both kid-friendly and impressive without spending hours in the kitchen. You’ll find that once you get the dough right, you’re halfway there to a seriously memorable spooky treat!
Why You’ll Love This Recipe
- Fun & Festive Presentation: These pizza skulls bring a spooky touch that kids and adults can’t resist during Halloween.
- Simple Homemade Dough: You’ll appreciate how easy it is to make your own dough—no weird ingredients needed!
- Customizable Toppings: From classic pepperoni to olives, you can tailor the fillings to suit your crowd’s favorites.
- Great Make-Ahead Option: You can prep the dough and assemble ahead of time, so party day is stress-free.
Ingredients You’ll Need
For this Pizza Skulls: Spooky Halloween Treats Recipe, I keep it simple with classic pizza ingredients that come together beautifully. You’ll want fresh yeast and basic pantry staples — nothing complicated, but quality makes a difference.
- All-purpose flour: The backbone of your dough; I recommend sifted for a lighter crust.
- Active dry yeast: Makes your dough rise perfectly; fresh yeast works wonders if you can find it.
- Warm water: Crucial for activating the yeast; don’t make it too hot or it kills the yeast.
- Sugar: Feeds the yeast and helps with browning; a little goes a long way.
- Salt: Adds flavor depth to your crust—never skip it!
- Olive oil: Gives the dough richness and tenderness.
- Pizza sauce: Use your favorite store-bought or homemade sauce for that tangy kick.
- Shredded mozzarella cheese: Melts beautifully for gooey, cheesy goodness.
- Pepperoni slices: Classic topping — adds spice and texture.
- Black olives, sliced: They add an eerie dark contrast perfect for those spooky skull eyes.
Note: Exact ingredients and measurements are listed in the recipe card below.
Variations
One of my favorite things about this Pizza Skulls: Spooky Halloween Treats Recipe is how you can make it your own! I’ve tried swapping toppings depending on what’s in the fridge or what my guests prefer, and it always turns out great.
- Vegetarian option: Swap pepperoni for sautéed mushrooms and bell peppers—I did this for a friend’s party and nobody missed the meat!
- Gluten-free twist: Use a gluten-free flour blend for the dough; just be sure to adjust liquid amounts slightly, which I learned the hard way by starting with less water.
- Extra cheesy: I love mixing mozzarella with a little sharp cheddar for an extra flavorful melt—definitely worth a try if you’re a cheese fan.
- Spicy touch: Add crushed red pepper flakes to the sauce or on top before baking for a kick your guests will remember.
How to Make Pizza Skulls: Spooky Halloween Treats Recipe
Step 1: Activate Your Yeast
Start by mixing your warm water, sugar, and active dry yeast in a bowl. I always double-check the water temperature — too hot can kill the yeast, but just warm enough wakes it up nicely. Let it sit for about 5 minutes until it’s bubbly and foamy on top. That’s how you know your yeast is alive and kicking!
Step 2: Mix and Knead the Dough
In a larger bowl, combine your flour and salt, then drizzle in olive oil. Slowly add your yeast mixture and stir until it starts coming together. Then comes the fun part — knead it on a lightly floured surface until the dough turns smooth and elastic, which usually takes about 8-10 minutes. I like to knead just enough so the dough springs back when poked. If it’s sticky, sprinkle on a little more flour, but be careful not to add too much or it’ll turn dense.
Step 3: Let the Dough Rise
Pop your dough into a lightly oiled bowl, cover with a clean kitchen towel or plastic wrap, and set it somewhere warm. I usually preheat my oven for a bit, then turn it off and let the dough rise inside—it works like a charm. After 30 minutes, the dough should have doubled in size and feel pillowy. This step is crucial for that soft, airy crust you’re aiming for.
Step 4: Shape Your Spooky Skulls
Roll out your dough into about a 1/4-inch thickness on a floured surface. Then grab a skull-shaped cookie cutter — if you don’t have one, I’ve sometimes freehanded the shapes with a sharp knife, which works okay too! Cut out as many skulls as you can, usually about 12. Place half of them on a baking sheet lined with parchment.
Step 5: Add Toppings and Seal
Spoon on a little pizza sauce onto each skull base, then sprinkle with shredded mozzarella, followed by pepperoni slices and black olive “eyes.” Top each with another skull dough piece and press around the edges to seal — I lightly crimp mine with a fork for a neat finish. This keeps all the melty goodness nicely tucked inside. Just make sure the edges are sealed tight, or you might get sauce leaks during baking.
Step 6: Bake Until Golden
Pop your skulls into a preheated oven at 375°F (190°C) and bake for about 20-25 minutes. You’ll know they’re done when the crust turns golden brown and the cheese inside is bubbling away. I recommend keeping an eye after 20 minutes so they don’t overbrown. The smell alone is worth the wait!
Pro Tips for Making Pizza Skulls: Spooky Halloween Treats Recipe
- Perfect Yeast Activation: Always test your yeast with warm water and sugar to ensure it’s active before mixing into your dough.
- Seal Those Edges Well: Press the dough edges firmly or use a fork to crimp so no sauce escapes during baking.
- Avoid Overflouring: Add just enough flour during kneading to keep dough manageable but still soft and airy.
- Use Parchment Paper: It helps prevent sticking and makes cleanup a breeze—trust me, I learned this the hard way!
How to Serve Pizza Skulls: Spooky Halloween Treats Recipe
Garnishes
I love topping my pizza skulls with a sprinkle of fresh chopped parsley or basil after they come out of the oven—it adds a nice pop of color and freshness that balances the rich cheese. Sometimes I even dust a little smoked paprika for an extra touch of smoky depth. For that extra spooky vibe, I’ve used edible black sesame seeds as “stitches” on the dough edges!
Side Dishes
Since Pizza Skulls are pretty filling, I typically pair them with a light side salad—something like a crisp arugula with lemon vinaigrette works wonders. Roasted seasonal veggies or a simple garlic bread stick also complement these spooky treats perfectly. My family loves adding a bowl of marinara on the side for extra dipping fun.
Creative Ways to Present
For Halloween parties, I like to arrange these pizza skulls on a large platter surrounded by “bloody” roasted red pepper dips and plastic spider decorations for maximum impact. One year, I placed them on a bed of shredded iceberg lettuce to look like a spooky graveyard—it got the kids giggling! You can get super creative with colors by using different veggie toppings to give each skull its own personality.
Make Ahead and Storage
Storing Leftovers
I always store leftover pizza skulls in an airtight container in the fridge, layering parchment paper between them if needed. They stay soft and tasty for up to 3 days. When I get hungry after a busy Halloween day, these little guys still hit the spot!
Freezing
If you want to prep ahead, I recommend freezing the assembled, uncooked pizza skulls on a baking sheet first, then transferring them to a freezer-safe bag. This trick helps keep their shape intact. When I’ve done this, they thaw and bake just like fresh ones—so convenient for busy party prep.
Reheating
For reheating, I pop my pizza skulls in a preheated oven at 350°F (175°C) for about 10-12 minutes to get the crust crisp and cheese melty again. Microwaving works for speed but often yields a soggy crust, so I avoid it when possible.
FAQs
-
Can I use store-bought pizza dough for this Pizza Skulls: Spooky Halloween Treats Recipe?
Absolutely! Using store-bought dough can save you time, especially if you’re short on prepping earlier. Just make sure to roll it out evenly and handle gently while cutting the skull shapes to avoid tearing.
-
How do I make skull shapes without a cookie cutter?
If you don’t have a skull cookie cutter, no worries! I sometimes draw a skull shape on parchment paper, cut it out, and use it as a stencil to cut around the dough with a knife. It’s a bit more labor-intensive but works fine for a one-time bake.
-
Can I make these vegan?
Yes! Swap the mozzarella for a good vegan cheese alternative and opt for toppings like veggies or plant-based pepperoni. Make sure your dough recipe doesn’t include any dairy or honey, and you’re good to go.
-
What’s the best way to seal the pizza skulls so they don’t leak?
The best way is to pinch the edges firmly together and then press with a fork around the perimeter. This seals the filling inside and prevents sauce from oozing out during baking. Avoid overfilling to reduce leaks, too.
Final Thoughts
This Pizza Skulls: Spooky Halloween Treats Recipe has become my go-to for creating not just a meal, but an Instagram-worthy, conversation-starting Halloween hit. I absolutely love how these treats bring a little extra magic (and mischief) to the table, whether it’s a kids’ party or a grown-up soirée. Give them a try—you’ll enjoy the process as much as the delighted smiles when everyone takes a bite of these spooky, cheesy masterpieces!
PrintPizza Skulls: Spooky Halloween Treats Recipe

Delight in these spooky and delicious Pizza Skulls, perfect for Halloween celebrations. This recipe combines a homemade pizza dough filled with classic pizza toppings—sauce, mozzarella, pepperoni, and black olives—shaped into fun skull designs for an unforgettable festive treat. Baked to golden perfection, these hand-held pizzas are both playful and satisfying.
- Prep Time: 15 minutes
- Cook Time: 25 minutes
- Total Time: 55 minutes
- Yield: 12 pizza skulls
- Category: Appetizer
- Method: Baking
- Cuisine: Italian-American
Ingredients
For the Dough
- 2 cups all-purpose flour
- 1 packet active dry yeast
- 1 cup warm water
- 1 teaspoon sugar
- 1 teaspoon salt
- 1 tablespoon olive oil
For the Filling and Topping
- 1 cup pizza sauce
- 1 1/2 cups shredded mozzarella cheese
- 1/2 cup pepperoni slices
- 1/4 cup black olives, sliced
Instructions
- Preheat Oven: Preheat your oven to 375°F (190°C) to ensure it’s at the perfect temperature for baking the pizza skulls.
- Activate Yeast: In a bowl, combine warm water, sugar, and yeast. Let the mixture sit for 5 minutes until it becomes frothy, indicating the yeast is active.
- Mix Dough Ingredients: In a separate large bowl, combine the all-purpose flour, salt, and olive oil.
- Form Dough: Add the yeast mixture to the flour mixture and knead the dough until it is smooth and elastic, about 8-10 minutes.
- Let Dough Rise: Cover the dough and let it rise in a warm spot for 30 minutes, allowing it to double in size.
- Shape Dough: Roll out the risen dough on a floured surface and cut into skull shapes using a skull-shaped cookie cutter.
- Assemble Pizza Skulls: Place half of the skull-shaped dough on a baking sheet. Spread pizza sauce evenly over them, followed by mozzarella cheese, pepperoni slices, and sliced black olives.
- Seal Skulls: Cover the topped skulls with the remaining dough skulls, pressing the edges firmly to seal in the filling completely.
- Bake: Bake in the preheated oven for 20-25 minutes or until the pizza skulls are golden brown and cooked through.
Notes
- Ensure the water is warm but not hot to avoid killing the yeast.
- Use a well-floured surface to prevent the dough from sticking while rolling.
- Press the edges firmly to avoid filling leakage during baking.
- Customize toppings to your preference for varied flavors.
- Let the pizza skulls cool slightly before serving to avoid burns.


