
Let me tell you, this Monster Wraps Recipe is an absolute game-changer when it comes to fun, easy meals that bring a big smile to the table. I love this recipe because it turns something as simple as a wrap into a playful, spooky masterpiece without any fuss. Whether you’re making lunch for the kids, prepping a quick snack for a party, or just want to add some whimsy to dinnertime, these monster wraps deliver every time.
You’ll find that the best part about this Monster Wraps Recipe is how customizable it is. You can use any sandwich filling you love, making it perfect for picky eaters or your favorite flavor combos. Plus, the creative garnishes like olives for eyes and nori or cheese for hair really make this wrap pop — trust me, my family goes crazy for them!
Why You’ll Love This Recipe
- Super Easy Prep: You can whip these monster wraps up in under 10 minutes, perfect for busy days.
- Kid-Approved Fun: The fun “monster” theme makes eating healthy wraps exciting for kids and adults alike.
- Fully Customizable: Use any sandwich filling or cheese you have on hand — no one will ever guess they’re flexible.
- Great for Parties: These wraps double as cute finger foods for Halloween or themed get-togethers.
Ingredients You’ll Need
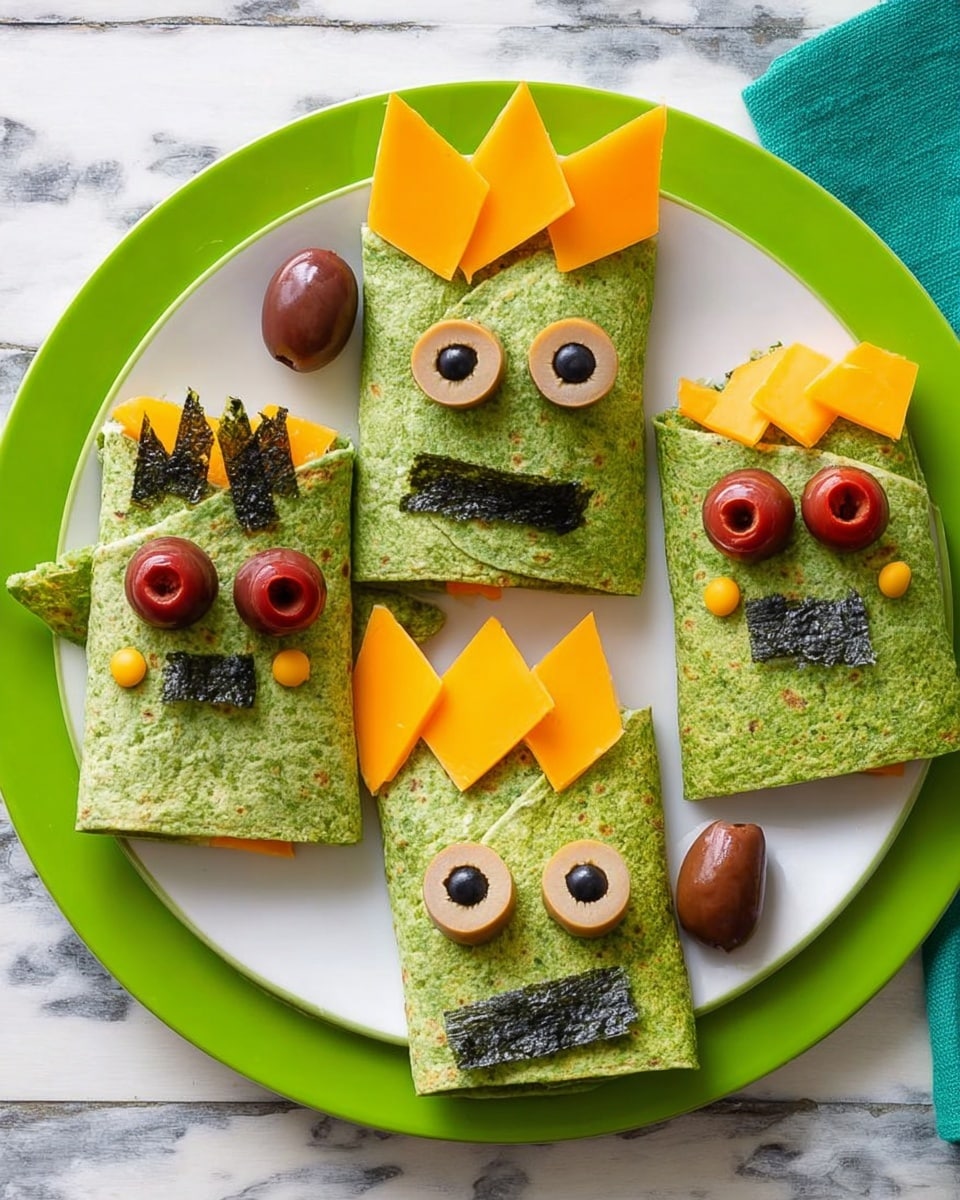
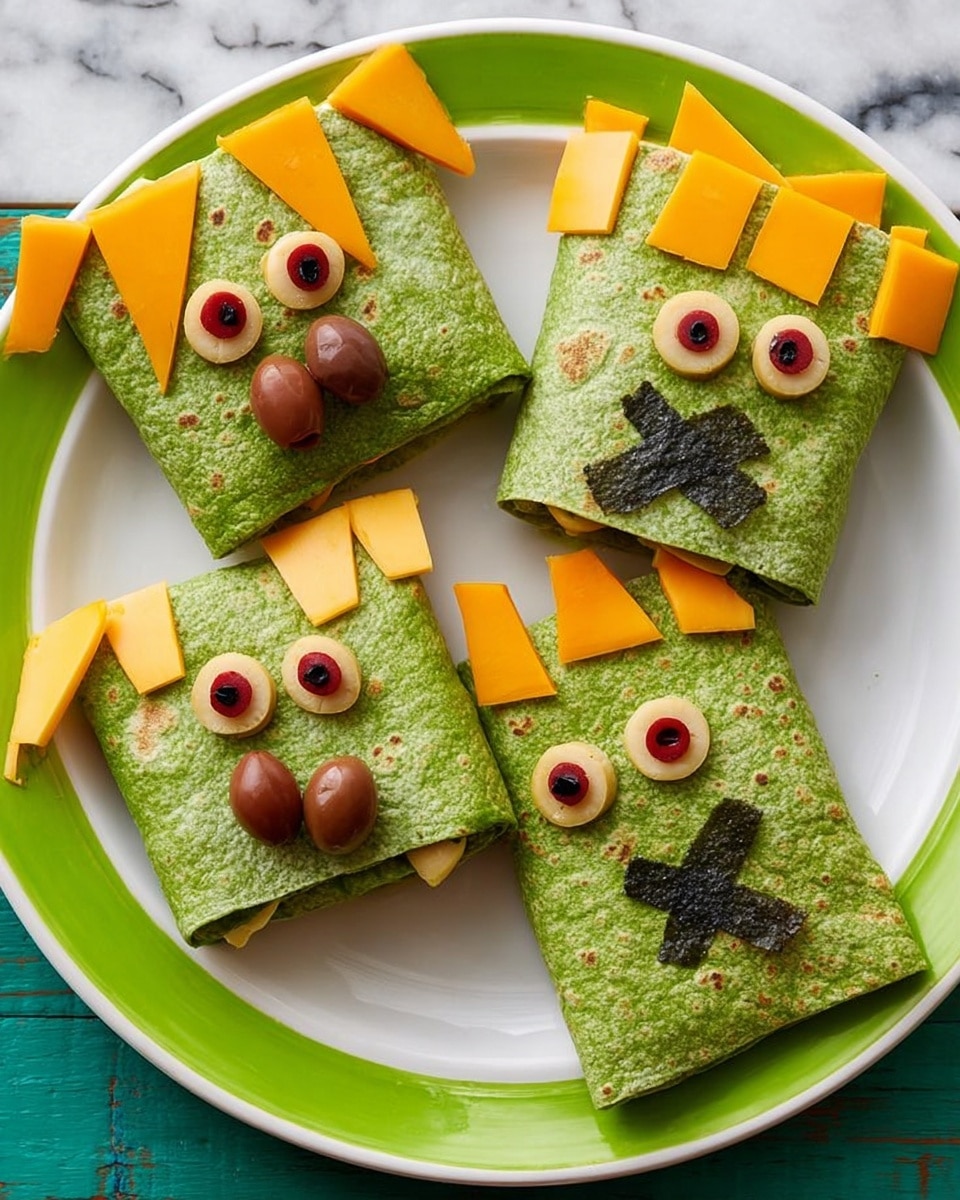
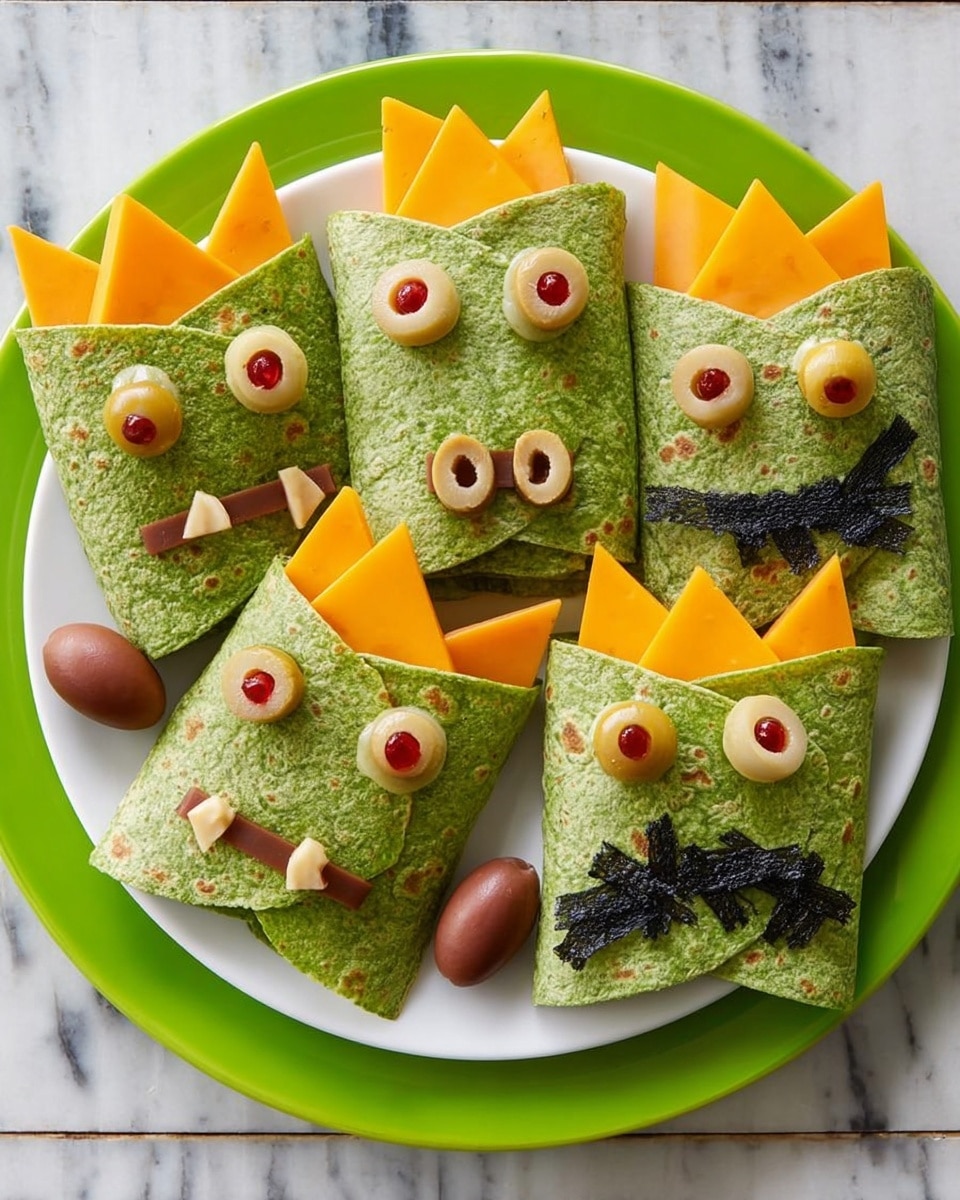
Picking the right ingredients helps make these Monster Wraps not only tasty but visually striking. The wraps, fillings, and those quirky garnishes like olives and cornichons work perfectly together to create that fun monstrous look.
- Large spinach wraps: I love spinach wraps for a bit of color and mild flavor; they hold up well without cracking.
- Favorite sandwich filling: Use anything from turkey, ham, or grilled veggies to something creamy like chicken salad — your call!
- Sliced Cheddar cheese and/or nori (seaweed wraps): These create great “hair” for your monster and can add a splash of color or texture.
- Sliced pimiento-stuffed olives: Perfect for making the eyes pop with a bit of saltiness and healthful fats.
- Whole olives: Use these as Frankenstein’s “bolts” for an extra fun touch.
- Cornichon pickles: The small ones are great for eyebrows and nose details, adding crunch and tang.
Note: Exact ingredients and measurements are listed in the recipe card below.
Variations
I like to switch things up with this Monster Wraps Recipe depending on the season or who I’m feeding. Feel free to get creative and make it your own — that’s part of the fun!
- Vegetarian Version: I swapped out meat fillings for grilled mushrooms and hummus once, and honestly, it was just as good and surprisingly filling.
- Spicy Kick: Adding a little sriracha mayo or chipotle spread inside the wrap gave a smoky heat that my spouse can’t get enough of.
- Seasonal Greens: Try arugula or kale wraps when spinach wraps aren’t available; they add a nice bite and some extra nutrients.
- Allergy-Friendly: Use gluten-free wraps and dairy-free cheese options to keep everyone happy and included.
How to Make Monster Wraps Recipe
Step 1: Load and Roll Your Wrap
Start by spreading your favorite sandwich filling evenly over the large spinach wrap. Don’t overload it; you want just enough so it rolls easily without bursting. Then, roll it tightly like a burrito—you’ll get a neat cylinder that holds everything in place. Pro tip: roll it snug but not so tight the filling squishes out when you take a bite.
Step 2: Cut and Create Monster Features
Take slices of Cheddar cheese or nori and cut triangle shapes to use as “hair.” Place these on one half of the wrap. Then cut the remaining half of your cheese or nori slice into long strips that form the monster’s mouth. For the eyebrows, take the smallest cornichons and slice them in half lengthwise; use a thin slice for the nose. Top it all off with those sliced pimiento-stuffed olives for eyes — they really bring the monster to life!
Step 3: Add the Final “Bolts” Touch
Use toothpicks to secure whole olives or small cornichons on each side of the wrap to mimic Frankenstein’s bolts. This step makes the wrap look like a true monster and adds a bit of charm that will have people asking for seconds. Just be sure to warn your guests about the toothpicks!
Pro Tips for Making Monster Wraps Recipe
- Rolling Tight, Not Overstuffed: I learned that wraps roll best when the filling is spread thinly and evenly, avoiding any breakage or mess.
- Creative Garnishes: Try different veggies or cheese colors for hair and face parts; the gimmick makes it super fun!
- Keep Toothpicks Visible: Always remind guests about toothpicks to avoid any surprise bites — safety first!
- Wrap Storage: Store wrapped and garnished wraps gently, preferably in a flat container with parchment on top to keep everything intact.
How to Serve Monster Wraps Recipe
Garnishes
I love adding a sprinkle of fresh herbs like parsley or chives for an extra pop of color around the monsters; it softens the look and gives a nice fresh flavor. If you want to get playful, a little drizzle of your favorite dressing around the wrap plating adds flair and taste.
Side Dishes
Monster wraps go perfectly with crunchy veggie sticks like carrots and celery or a crisp salad with a tangy vinaigrette. I also like serving them alongside kettle-cooked chips for that satisfying crunch contrast.
Creative Ways to Present
For Halloween parties, I’ve placed these monster wraps standing upright in a platter surrounded by “graveyard” decorations like edible dirt (crushed crackers) and gummy worms. It’s a massive hit! Or try slicing wraps into smaller pinwheels for bite-sized fun at kids’ lunchboxes or potlucks.
Make Ahead and Storage
Storing Leftovers
I wrap the monster wraps tightly in plastic wrap and place them in an airtight container to keep everything fresh. They last well in the fridge for up to 2 days, but I recommend eating them sooner so the wraps don’t get soggy.
Freezing
In my experience, freezing wraps with fillings is tricky because of moisture content. I usually avoid freezing the fully assembled Monster Wraps Recipe, but if you want to freeze fillings separately, that works great for meal prep.
Reheating
If your filling needs warming, I suggest unwrapping and heating separately, then reassembling. Otherwise, eat cold to enjoy that fresh, crisp texture. You can also toast the wraps briefly in a pan for a warm, melty twist.
FAQs
-
Can I use different types of wraps for the Monster Wraps Recipe?
Absolutely! While I prefer spinach wraps for the color and flavor, you can use flour tortillas, whole wheat wraps, or even gluten-free versions depending on what you have or dietary needs.
-
What are some good sandwich filling options?
Some of my favorites include turkey with avocado, roasted veggies with hummus, chicken salad, or even egg salad. The key is to keep fillings moist but not overly wet to avoid soggy wraps.
-
How do I keep the wraps from falling apart?
Rolling the wrap tightly but gently is essential. Don’t overfill, and use toothpicks to secure decorative elements and hold the wraps together if needed.
-
Can I prepare Monster Wraps Recipe ahead of time?
Yes! Just assemble them a few hours before serving and store tightly wrapped in the fridge. Avoid making them too far in advance to keep the wrap texture fresh and prevent garnishes from wilting.
Final Thoughts
This Monster Wraps Recipe holds a special place in my kitchen because it brings together creativity, quick prep, and tasty results — all wrapped in one fun package. If you want to impress kids, surprise friends, or just enjoy a delicious meal with a playful twist, give this one a try. I promise, once you make these, they’ll become a regular in your rotation too!
PrintMonster Wraps Recipe

These Monster Wraps are a fun and spooky twist on traditional wraps, perfect for Halloween or themed parties. Using large spinach wraps filled with your favorite sandwich ingredients, these wraps are decorated with sliced cheese or nori to mimic monster hair, olives for eyes, and pickles for bolts and facial features. Quick to assemble and visually playful, they are ideal for a festive snack or light meal.
- Prep Time: 8 mins
- Cook Time: 0 mins
- Total Time: 10 mins
- Yield: 1 wrap
- Category: Snack
- Method: No-Cook
- Cuisine: American
Ingredients
Wrap and Filling
- 1 large spinach wrap
- Favorite sandwich filling (e.g., deli meats, veggies, spreads)
Decorations
- Sliced Cheddar cheese and/or nori (seaweed wraps) for hair and mouth
- Sliced pimiento-stuffed olives for eyes
- Whole olives for bolts
- Cornichon pickles, whole for bolts, halved lengthwise for eyebrows and nose
Instructions
- Prepare the wrap: Fill the large spinach wrap with your desired sandwich filling and roll it tightly like a burrito.
- Cut the hair and mouth pieces: Slice cheese and/or nori sheets into halves; cut triangle shapes from one half to create hair and arrange these on one half of the wrap. Cut the remaining half into long strips to form the monster’s mouth on the wrap.
- Add the facial features: Halve the smallest cornichon pickles lengthwise to create eyebrows and a thin slice for the nose. Position the sliced pimiento-stuffed olives on the wrap for eyes.
- Attach the bolts: Use toothpicks to fasten two olives or whole cornichons to the sides of the wrap to resemble Frankenstein’s bolts.
Notes
- You can customize the sandwich filling to suit different dietary preferences and tastes.
- Using nori as hair or mouth adds a fun texture and is suitable for a vegetarian twist.
- Secure toothpicks carefully to avoid hazards while eating.
- These wraps are best served fresh to maintain the crispness of the vegetables and pickles.

