
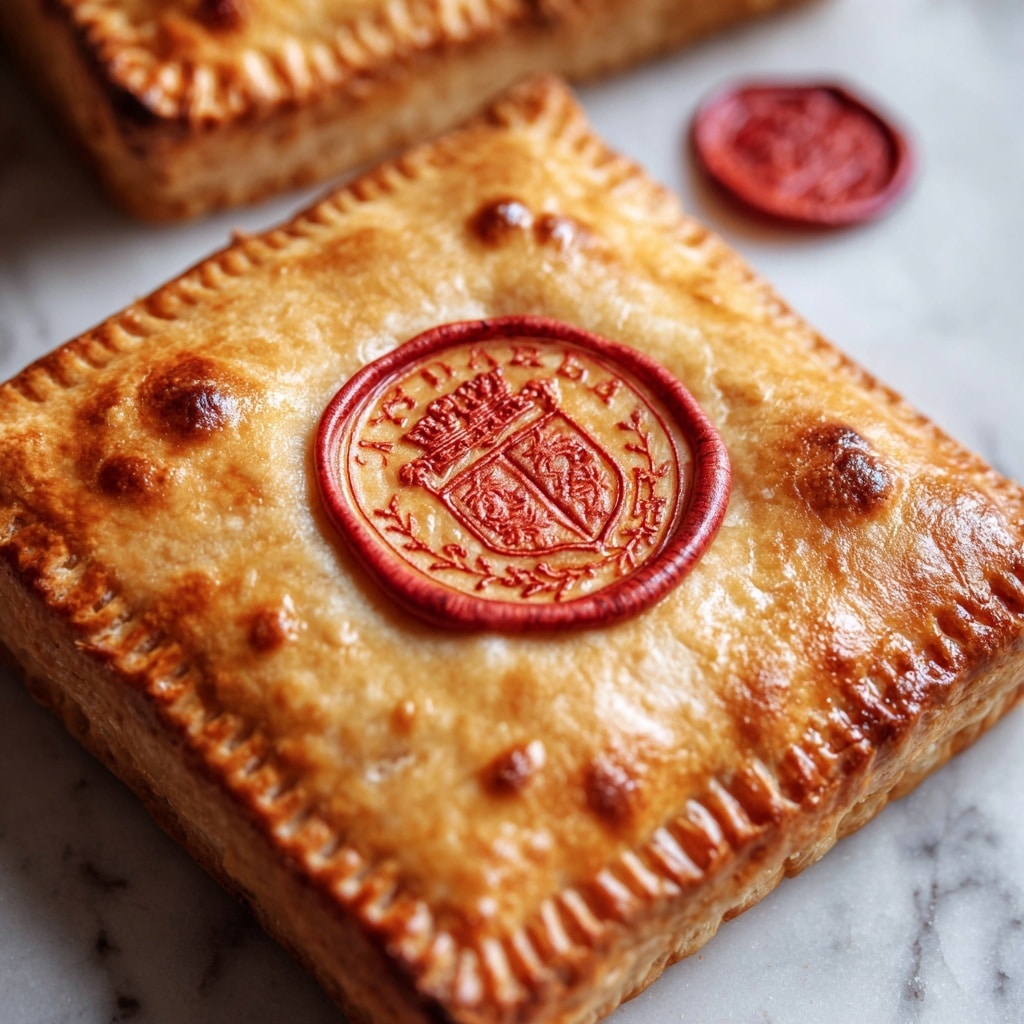
If you’re a Harry Potter fan and love sweet treats, you’re in for a magical delight! The Harry Potter Letter Caramel Apple Pies Recipe combines the cozy warmth of caramel apple pie with the whimsical charm of Hogwarts letters sealed with candy wax. These adorable little pies are perfect for a themed party or anytime you want to sprinkle a bit of enchantment on your dessert table.
Why You’ll Love This Recipe
- Magical Presentation: Each pie looks like a tiny Hogwarts acceptance letter, complete with a candy wax seal that’s as fun to make as it is to eat.
- Quick & Easy: Ready in just 20 minutes, this recipe uses simple packaged ingredients for a fuss-free baking adventure.
- Delicious Comfort: Classic caramel apple filling inside flaky pie crust makes every bite a warm, sweet hug.
- Perfect for Any Occasion: Whether it’s a Harry Potter party, autumn gathering, or just a treat-yourself day, these pies never disappoint.
Ingredients You’ll Need
Grab these simple yet essential ingredients to bring the magic of the Harry Potter Letter Caramel Apple Pies Recipe to life. Nearly everything can be found in your pantry or grocery store, making this recipe super approachable for bakers of all levels.
- Pillsbury Premade Refrigerated Pie Crusts (2 boxes): Using premade dough saves time and makes sure you get perfectly flaky pies every time.
- Apple Pie Filling (1 cup): Packed with tender apple chunks and spices, this forms the delicious, fruity base of your pies.
- Caramel Sauce (2 tablespoons): Adds that gooey, buttery sweetness everyone adores in a caramel apple dessert.
- Apple Pie Seasoning (1/4 teaspoon): Enhances the warm, cozy spices and takes the flavor up a notch.
- Egg (1): For the egg wash that gives the crust a golden, shiny finish and helps seal the pies.
- Water (1 tablespoon): Mixed with egg to create the perfect wash.
- Red Chocolate Candy Melts (1 cup): For crafting the striking candy wax seals that make these pies truly enchanting.
Note: Exact ingredients and measurements are listed in the recipe card below.
Variations
The beauty of the Harry Potter Letter Caramel Apple Pies Recipe is how easy it is to personalize. Whether you want to switch up the filling or tweak it to suit dietary needs, small changes can make it your very own magical creation.
- Use Homemade Apple Filling: If you prefer fresh apples, cook down diced apples with cinnamon, nutmeg, and a bit of sugar to create your own luscious filling.
- Chocolate or Butterscotch Drizzle: Swap out caramel sauce for a decadent chocolate or butterscotch drizzle for a different flavor twist.
- Gluten-Free Pie Crust: Pick your favorite gluten-free refrigerated pie dough to make these pies friendly for gluten sensitivities.
- Vegan Version: Use vegan pie crust and substitute egg wash with almond milk or aquafaba to keep it plant-based.
How to Make Harry Potter Letter Caramel Apple Pies Recipe
Step 1: Make the Candy Wax Seals
This enchanting step is what sets these pies apart! Start by chilling your wax seal stamp for about 15 minutes so it leaves a crisp impression. Meanwhile, melt your red candy melts following the package instructions. Drop small circles of melted candy onto parchment paper and carefully press the chilled stamp into the center. Keep it there until the chocolate hardens, then gently peel off your beautifully detailed wax seal. Repeat until you have enough seals for all your pies — it’s like crafting tiny edible badges of magic!
Step 2: Prepare the Pie Dough
Preheat your oven to 350°F. Thaw the refrigerated pie dough as per package instructions and roll it out on a clean, flat surface. Cut out rectangles approximately 3 by 5 inches — these are your “letters.” Use the leftover dough to cut as many rectangles as you can until both boxes are fully utilized. These shapes will be the base and top of each little pie letter.
Step 3: Mix the Filling and Assemble
In a bowl, combine apple pie filling, caramel sauce, and apple pie seasoning—give it a good stir and mash if the apple chunks are large. Spoon about one tablespoon of this luscious mixture onto half of your dough rectangles. Use a brush dipped in the egg wash (egg + water) to moisten the edges of these rectangles, then top each with the remaining rectangles. Press the edges with a fork to seal them tightly, creating a charming, crimped edge that looks like a sealed envelope.
Step 4: Add the Envelope Details
Use the scraps of dough to cut small strips and arrange them across each pie to resemble the flaps on a letter envelope. Place your pies on parchment-lined baking sheets and brush the tops gently with more egg wash for that golden finish. Don’t forget to cut two small vents in the center to release steam while baking — these will also be where your wax seals will go later.
Step 5: Bake and Seal
Bake the pies for about 10 minutes or until they turn a gorgeous golden brown. After they’ve cooled completely, use a dab of melted candy coating to ‘glue’ your red candy wax seals to the center vent spot, sealing your magical letters like the real deal. It’s a finishing touch that truly brings these pies into the wizarding world.
Pro Tips for Making Harry Potter Letter Caramel Apple Pies Recipe
- Chill the Wax Seal Stamp: Freezing your stamp makes the candy seal imprint sharper and prevents the chocolate from sticking.
- Don’t Overfill the Pies: Too much filling can cause leaks — keep it to around one tablespoon for tidy, perfectly sealed pies.
- Use an Egg Wash Generously: This not only browns your pie but also ensures the top and bottom dough stick firmly together.
- Cool Completely Before Sealing: Attaching your candy wax seals only works well if the pies are cool so the melts don’t slide off.
How to Serve Harry Potter Letter Caramel Apple Pies Recipe

Garnishes
These pies are already stars of the show, but a sprinkle of cinnamon sugar or a light dusting of powdered sugar adds a pretty, festive touch. For a little extra flair, serve with a dollop of whipped cream or a drizzle of caramel sauce to mimic that magical sweetness inside.
Side Dishes
Serve these pies with warm spiced cider or a mug of creamy hot chocolate to keep your guests cozy and content, especially on chilly evenings. A simple bowl of vanilla ice cream alongside the pie amplifies the dessert experience, making it even more indulgent and comforting.
Creative Ways to Present
Arrange the pies on parchment lined wooden boards or trays and scatter autumn leaves, fairy lights, or small Hogwarts-themed props around for full magical ambiance. Wrap individual pies in parchment with twine to mimic secret letters delivered directly from King’s Cross station — pure whimsy and charm!
Make Ahead and Storage
Storing Leftovers
Store any leftover pies in an airtight container at room temperature for up to two days. Because of the caramel and apple filling, they stay moist and delicious without drying out too quickly.
Freezing
You can freeze unbaked pies fully assembled (but without the candy seals). Wrap them tightly in plastic wrap and foil, then freeze for up to 1 month. When ready, bake straight from frozen, adding a few extra minutes to the baking time.
Reheating
To reheat, place the pies in a preheated 350°F oven for about 5-7 minutes until warm. Avoid the microwave if you want to keep the crust crispy. Add the candy seals back on if you removed them before storing.
FAQs
-
Can I make these pies without the candy wax seals?
Absolutely! The candy seals are a charming touch but optional. Your caramel apple pies will still taste wonderful without them — just skip the wax seal step and enjoy.
-
What’s the best type of apple pie filling to use?
Store-bought apple pie filling works great for convenience, but if you prefer fresh, look for fillings with tender apple chunks and balanced sweetness. Alternatively, homemade filling lets you control spices and texture.
-
Can I prepare these pies in advance for a party?
Yes! Assemble the pies and store them refrigerated for a day or freeze them unbaked. Add the candy wax seals just before serving to keep them fresh and pristine.
-
How do I store leftover pies to maintain their freshness?
Keep leftover pies in an airtight container at room temperature for up to two days or refrigerate for longer storage—just be aware the crust may lose some crispness.
Final Thoughts
I hope you feel inspired to dive into this delightful Harry Potter Letter Caramel Apple Pies Recipe. It’s one of those joyfully easy recipes that brings a touch of magic to your kitchen and smiles to anyone who bites in. Whether you’re baking with friends or making a whimsical treat just for yourself, these pies are sure to enchant. Happy baking — and don’t forget your wand!
PrintHarry Potter Letter Caramel Apple Pies Recipe

These Harry Potter Letter Caramel Apple Pies are charming, mini hand pies designed to look like magical sealed envelopes. Made with buttery pie crust, spiced caramel apple filling, and topped with a whimsical red chocolate candy wax seal, these treats are perfect for a themed party or cozy dessert. The pies bake quickly to a golden finish and are decorated with delicate details to resemble a Hogwarts acceptance letter.
- Prep Time: 10 minutes
- Cook Time: 10 minutes
- Total Time: 20 minutes
- Yield: 10 apple pies
- Category: Dessert
- Method: Baking
- Cuisine: American
Ingredients
Pie Crust and Filling
- 2 box (14.1 oz each) Pillsbury Premade Refrigerated Pie Crusts
- 1 cup apple pie filling
- 2 tablespoons caramel sauce
- 1/4 teaspoon apple pie seasoning
- 1 egg
- 1 tablespoon water
Candy Wax Seal
- 1 cup red chocolate candy melts
Instructions
- Prepare Candy Wax Seals: Place the wax seal stamp into the freezer for 15 minutes to chill. Meanwhile, melt the red chocolate candy melts according to package directions. Lay out a piece of parchment paper, then spoon small circles of melted candy onto the parchment. Remove the chilled wax seal stamp from the freezer and press it gently into the center of each melted candy circle, leaving the stamp there until the chocolate hardens. Remove the stamp carefully once the candy is set. Repeat to make enough seals for the pies.
- Preheat Oven: Set your oven to 350°F (176°C) to warm up while you prepare the pies.
- Prepare Pie Dough: Thaw the pie dough according to the package instructions and roll it out on a flat surface. Cut out rectangles approximately 3×5 inches. Continue rolling and cutting rectangles until all dough is used.
- Mix Apple Filling: In a bowl, combine 1 cup apple pie filling with 2 tablespoons caramel sauce and 1/4 teaspoon apple pie seasoning. Stir well and gently mash to break down any large apple chunks, creating a uniform filling.
- Assemble Pies: Place half of the rectangles on a parchment-lined surface. Spoon about 1 tablespoon of the apple filling onto the center of each rectangle. Whisk together the egg and water to create an egg wash, and brush the edges of the rectangles with it.
- Seal Pies: Place the remaining rectangles on top of the filled ones. Use a fork to press down around the edges, crimping the pies closed. Utilize any dough scraps to create small strips resembling an envelope’s sealing design, and place them atop the pies.
- Prepare for Baking: Arrange 4 to 5 pies on a baking sheet lined with parchment paper. Brush each pie gently with egg wash. Cut two small vents in the center of each pie, where the wax seal will later be placed.
- Bake: Bake the pies for about 10 minutes, or until the crust turns golden and toasty.
- Finish and Decorate: Allow the pies to cool completely. Then, use a small amount of melted red candy coating as ‘glue’ to attach the prepared candy wax seals to the center vents of each pie, completing the magical letter look.
Notes
- Make sure to chill the wax seal stamp before pressing into the candy melts to get a clean impression.
- Use parchment paper for easy cleanup and to prevent sticking when making candy seals and baking pies.
- If apple pie filling is too chunky, mashing slightly helps with easier filling and baking.
- Be gentle when applying the candy seals to avoid breaking the delicate chocolate.
- These mini pies are best enjoyed within a couple of days for optimal freshness.


