

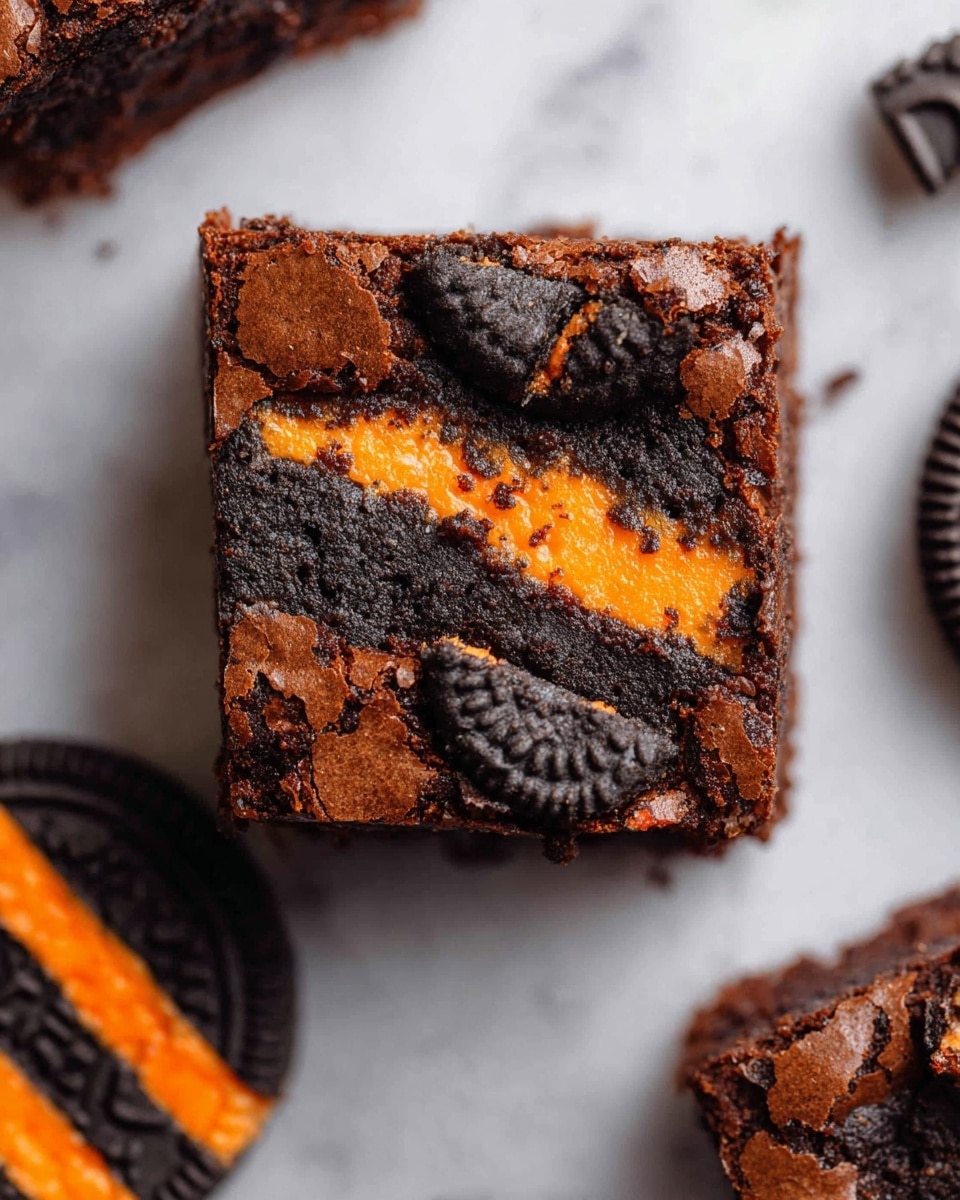
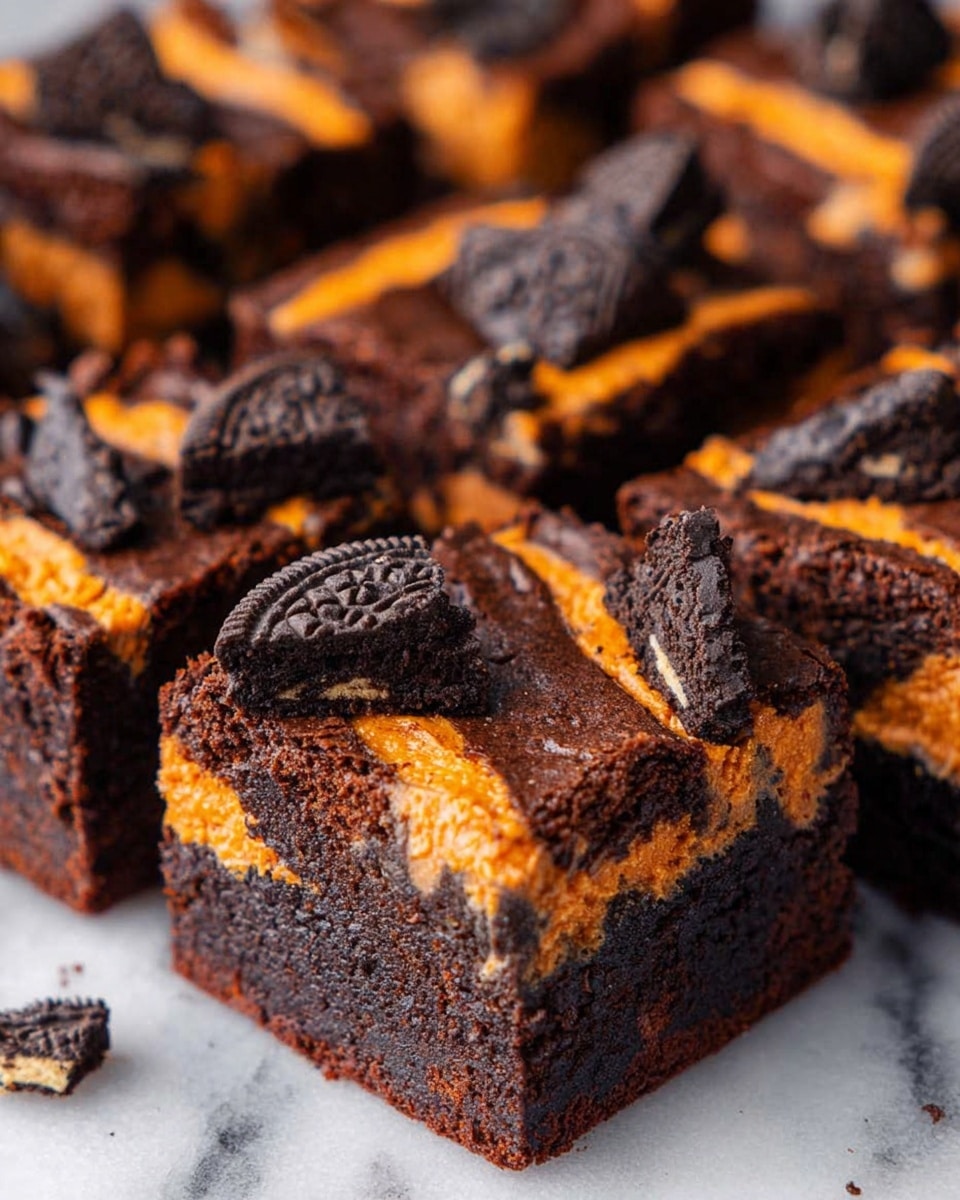
If you’re anything like me, you’ll find the Halloween Oreo Stuffed Brownies Recipe to be the perfect mix of spooky fun and irresistible chocolatey goodness. I absolutely love how these brownies surprise you with a hidden layer of Oreos inside — it’s like a little treat within a treat every time you bite in. Whether you’re baking for a Halloween party, classroom event, or just want to impress your family with something festive, this recipe always steals the show.
When I first tried this Halloween Oreo Stuffed Brownies Recipe, I was blown away by how simple it was to get bakery-quality results right at home. The fudgy texture combined with crunchy Oreos creates a magical contrast, and the ease of throwing this together means you don’t have to stress when the sweet tooth hits. Trust me, once you try this, it’ll be your go-to Halloween recipe every year!
Why You’ll Love This Recipe
- Hidden Oreo Surprise: The stuffed Oreos give the brownies a fabulous and unexpected center that’s always exciting to discover.
- Simple Ingredients: You only need a handful of pantry staples plus Oreos, making this recipe super accessible for last-minute baking.
- Perfect Texture: Fudgy and rich brownies paired with crunchy cookies create a dreamy contrast that everyone raves about.
- Festive & Fun: It’s ideal for Halloween gatherings but delicious enough to enjoy all year round.
Ingredients You’ll Need
Each ingredient here works beautifully to build rich, fudgy brownies that hug those Oreos perfectly. I always recommend using high-quality cocoa powder and fresh eggs for the best results. Let me tell you about some of these ingredients and why they’re essential.
- Butter: This adds richness and helps create a tender crumb; melting it fully is key for smooth batter.
- Vegetable oil: Combining oil with butter keeps brownies moist and fudgy without being greasy.
- Granulated sugar: Provides sweetness and helps develop that nice crusty top we all love.
- Brown sugar: Adds a hint of molasses flavor that deepens the overall taste.
- Cocoa powder: I use unsweetened cocoa to get that deep chocolate flavor; Dutch-processed works well too.
- Eggs: Using cold eggs helps with texture; they bind everything without making it cakey.
- Vanilla extract: This little addition boosts flavor complexity in such a subtle, wonderful way.
- Salt: Just a pinch pulls all the flavors together and balances the sweetness.
- All-purpose flour: Just enough flour to keep brownies dense but not dry—don’t overmix!
- Oreos: The star players here! I like to stuff 15 whole Oreos and crush 5 for topping for that extra crunch.
Note: Exact ingredients and measurements are listed in the recipe card below.
Variations
One of my favorite things about this Halloween Oreo Stuffed Brownies Recipe is how easy it is to put your own spin on it. Whether you want to change up the festive factor or adjust for dietary needs, there’s plenty of room to get creative.
- Use Flavored Oreos: I once tried mint or pumpkin spice Oreos and loved the seasonal twist they brought to the brownies — it’s a fun way to mix things up.
- Gluten-Free Option: Swapping all-purpose flour for a gluten-free blend works well if you make sure not to overmix the batter to keep texture just right.
- Nutty Addition: Adding chopped walnuts or pecans to the batter gives the brownies a nice crunch and complements the Oreos beautifully.
- Frosting Finish: For an extra festive look, you could top the cooled brownies with orange or purple cream cheese frosting and sprinkles.
How to Make Halloween Oreo Stuffed Brownies Recipe
Step 1: Prepare Your Baking Pan and Preheat Oven
Start by preheating your oven to 350°F — I like to give it enough time so it’s perfectly hot when I’m ready to bake. Line an 8×8 inch baking pan with parchment paper, making sure to cover the sides too, so your brownies come out effortlessly without sticking. This little prep goes a long way in preserving those perfect brownie edges we all crave.
Step 2: Melt Butter, Oil, and Sugars
In a microwave-safe bowl, combine the butter, vegetable oil, granulated sugar, and brown sugar. Heat in 30-second bursts, stirring between each, until everything is melted and well mixed. Then microwave it one last minute and stir vigorously—it might sound fussy, but this step helps dissolve the sugar for a silky smooth batter that bakes up beautifully.
Step 3: Add Eggs and Vanilla
Next, whisk in the eggs one by one, making sure they’re fully incorporated before adding the next. The batter will start to pull from the sides of the bowl a bit — that’s exactly what you want! Finally, stir in the vanilla extract to brighten those chocolate flavors.
Step 4: Stir in Dry Ingredients
Add the salt, cocoa powder, and flour to the wet mix. Fold gently just until everything is combined — don’t overdo it or your brownies might get cakey. You want that perfect fudgy texture, and careful mixing is the secret.
Step 5: Layer the Batter and Oreos
Pour half of your brownie batter into the prepared pan and spread it evenly. Now for the fun part: arrange 15 Oreos in a neat layer right in the center of that batter. This creates the delicious Oreo-stuffed surprise! Top them gently with the remaining batter and smooth out the surface to cover all the cookies.
Step 6: Add Crushed Oreos and Bake
Sprinkle 5 crushed Oreos over the top for an irresistible finish that adds texture and looks festive. Pop the pan into your preheated oven and bake for 30 minutes — keep an eye on the edges; they should look set while the center remains fudgy. A toothpick inserted near the edge should come out with a few moist crumbs, not wet batter.
Step 7: Cool Completely Before Slicing
This step is key: let the brownies cool all the way on a wire rack so they set nicely. When you slice them, you’ll notice that perfect crinkle top and sharp squares every time. I used to rush this part and end up with sticky slices — patience really pays off!
Pro Tips for Making Halloween Oreo Stuffed Brownies Recipe
- Use Quality Cocoa: I’ve found that using good quality unsweetened cocoa powder really boosts the chocolate depth without extra bitterness.
- Don’t Overmix: Overworking the batter leads to cakey brownies, so mix just until no dry streaks remain.
- Chill Eggs Work Best: Adding cold eggs helps the batter achieve that perfect fudgy texture without being too dense.
- Always Cool Completely: Cooling fully before slicing ensures neat squares and prevents crumbly edges.
How to Serve Halloween Oreo Stuffed Brownies Recipe
Garnishes
I love topping these brownies with a light dusting of powdered sugar or a drizzle of melted white chocolate to add a pretty contrast. For Halloween flair, decorating with orange or black sprinkles or edible glitter really makes them pop visually. If you’re feeling extra festive, a swirl of whipped cream and a mini candy corn on top is a crowd-pleaser every time.
Side Dishes
Serve these rich brownies alongside a scoop of vanilla ice cream for the ultimate indulgence, or pair with a hot cup of coffee or spiced pumpkin latte to balance the sweetness. At parties, I’ve found that a bright fruit platter helps cleanse the palate between bites and refresh guests.
Creative Ways to Present
For Halloween events, I like placing individual brownie squares in mini cupcake liners and arranging them on a themed platter with fake spider webs and tiny plastic spiders for spooky fun. You might also consider stacking them into brownies ‘sandwiches’ with cream cheese frosting in the middle for an extra-special dessert twist. Little presentation touches really add to the festive vibe!
Make Ahead and Storage
Storing Leftovers
Once completely cooled, I store leftovers in an airtight container at room temperature — they stay fudgy and soft for up to 3 days, which is perfect for sharing or nibbling over time. If your kitchen’s warm, keeping them in the fridge can help, but bring them back to room temperature before serving for best flavor.
Freezing
If you want to make these ahead of time, freezing works wonderfully. I wrap individual brownie squares tightly in plastic wrap and then place them in a freezer bag. They keep well for up to 2 months, making these treats great for prepping before the Halloween rush.
Reheating
To reheat, I pop the brownies in the microwave for about 15 seconds, just enough to wake up the fudgy texture without drying them out. Alternatively, warming a piece briefly in a low oven (around 300°F for 5 minutes) revives those fresh-baked vibes perfectly.
FAQs
-
Can I use a different type of cookie instead of Oreos?
Absolutely! While Oreos are classic and hold up well inside these brownies, you can experiment with other sandwich cookies or even chocolate chip cookies for a different flavor and texture. Just make sure the cookies aren’t too soft, or they might get overly soggy during baking.
-
How do I know when the brownies are done baking?
Look for the edges to appear set and starting to pull away slightly from the pan. The center should still look a tiny bit soft — when you insert a toothpick near the edge, it should come out with moist crumbs but no raw batter. Overbaking can make them dry, so check at around 28-30 minutes.
-
Can I make these brownies dairy-free?
Yes! You can substitute the butter for a dairy-free margarine or coconut oil. Just keep in mind the texture might be slightly different, but still delicious. Make sure your Oreos or chosen cookies are dairy-free if you want to keep it fully vegan.
-
What’s the best way to cut these brownies without them crumbling?
Wait until the brownies have cooled completely, then use a sharp knife. For cleaner cuts, wipe the knife blade with a warm damp cloth between slices. This trick helps keep those squares neat and pretty every time.
Final Thoughts
I can’t recommend the Halloween Oreo Stuffed Brownies Recipe enough if you want an easy, show-stopping dessert that captures all the fun and flavor of the season. Baking these feels like a little celebration in itself, and watching friends and family get excited over the Oreo surprise inside is incredibly rewarding. So grab your ingredients, put on some Halloween tunes, and get ready to enjoy a batch of brownies that’s as delicious as it is festive — you won’t be sorry!
PrintHalloween Oreo Stuffed Brownies Recipe

Delight in these Halloween Oreo Stuffed Brownies that combine rich, fudgy chocolate with crunchy Oreo cookies for a festive, irresistible treat perfect for spooky celebrations or any chocolate lover’s craving.
- Prep Time: 15 minutes
- Cook Time: 30 minutes
- Total Time: 45 minutes
- Yield: 16 servings
- Category: Dessert
- Method: Baking
- Cuisine: American
Ingredients
Wet Ingredients
- 2/3 cup butter
- 1/4 cup vegetable oil
- 1 cup granulated sugar
- 1/3 cup brown sugar
- 2 cold eggs
- 1 tsp vanilla extract
Dry Ingredients
- 2/3 cup cocoa powder
- 1/2 cup all purpose flour
- 1/2 tsp salt
Additional
- 15 Oreos (for stuffing)
- 5 Oreos (crushed for topping)
Instructions
- Preheat and Prepare Pan: Preheat your oven to 350°F (175°C). Line an 8×8 inch baking pan with parchment paper and set it aside for easy removal of the brownies later.
- Melt Butter and Sugars: In a microwave-safe bowl, combine the butter, vegetable oil, granulated sugar, and brown sugar. Microwave in 30-second intervals, stirring in between, until fully melted and combined. After fully melted, microwave an additional 1 minute and stir vigorously to ensure the sugars dissolve completely. Using a hand or stand mixer at this stage yields the best results for a smooth texture.
- Add Eggs and Vanilla: Whisk in the eggs one at a time to the warm sugar mixture, ensuring each is fully incorporated before adding the next. Then stir in the vanilla extract. The batter should be slightly thick and pull away from the sides of the bowl.
- Combine Dry Ingredients: Add the cocoa powder, all-purpose flour, and salt to the wet ingredients. Gently fold everything together just until combined, taking care not to overmix to maintain a tender brownie texture.
- Layer the Batter and Oreos: Pour half of the brownie batter into the prepared baking pan and spread it evenly. Arrange the 15 whole Oreos in the center over the batter in a single layer. Top with the remaining batter and spread carefully to cover the Oreos completely.
- Add Crushed Oreos and Bake: Sprinkle the 5 crushed Oreos evenly over the top of the batter. Place the baking pan in the preheated oven and bake for 30 minutes, or until a toothpick inserted near the edges comes out with moist crumbs but no wet batter.
- Cool and Serve: Remove the brownies from the oven and allow them to cool completely on a wire rack to set. Once cooled, slice into 16 squares for perfectly crinkled tops and gooey Oreo-stuffed centers.
Notes
- For an extra fudgy texture, avoid overmixing the batter once the flour is added.
- Allow the brownies to cool fully before slicing to prevent crumbling and maintain clean cuts.
- You can substitute regular Oreos with any flavored variety to customize your brownies.
- Storing brownies in an airtight container at room temperature keeps them fresh for up to 3 days.
- For thicker brownies, use a smaller baking pan or increase the baking time slightly, checking periodically.


