- Frozen margherita pizza: A quick base that already has delicious tomato sauce and melted mozzarella, saving you prep time.
- Red capsicum (deseeded, finely chopped): Adds sweetness and a pop of color to contrast the ghostly cheese.
- Mozzarella cheese ball: Perfect for cutting out the ghost shapes because it melts wonderfully and stays gooey.
- Black olives (pitted): These make the ideal spooky eyes and mouths with their deep color and smooth texture.
- Spring onion (thinly sliced): Fresh garnish to sprinkle on top, adding a slight crunch and a splash of green.
Note: Exact ingredients and measurements are listed in the recipe card below.
Variations
I like mixing things up to keep this Ghost Halloween Pizza Recipe fresh every year. Feel free to swap in your favorite veggies or cheeses to suit your mood.
- Different cheese: I’ve tried using provolone or even a smoked mozzarella for a richer flavor that pairs wonderfully with the capsicum.
- Vegetarian tweak: Add some sautéed mushrooms or spinach for extra earthiness—my family loved that twist during last Halloween!
- Make it gluten-free: Use a gluten-free frozen pizza base and you’re all set without missing a beat.
- Spicy kick: Adding a light drizzle of chili oil after baking gives it a surprising, delicious heat.
How to Make Ghost Halloween Pizza Recipe
Step 1: Prepare Your Pizza Base for Spookiness
First things first, preheat your oven to 230°C (that’s 210°C for fan-forced ovens). While the oven gets hot, unwrap your frozen margherita pizza and place it on a baking tray—don’t forget to toss away all that packaging. This step is where the magic begins because you’re setting the stage for your ghostly decorations.
Step 2: Create Your Ghostly Toppings
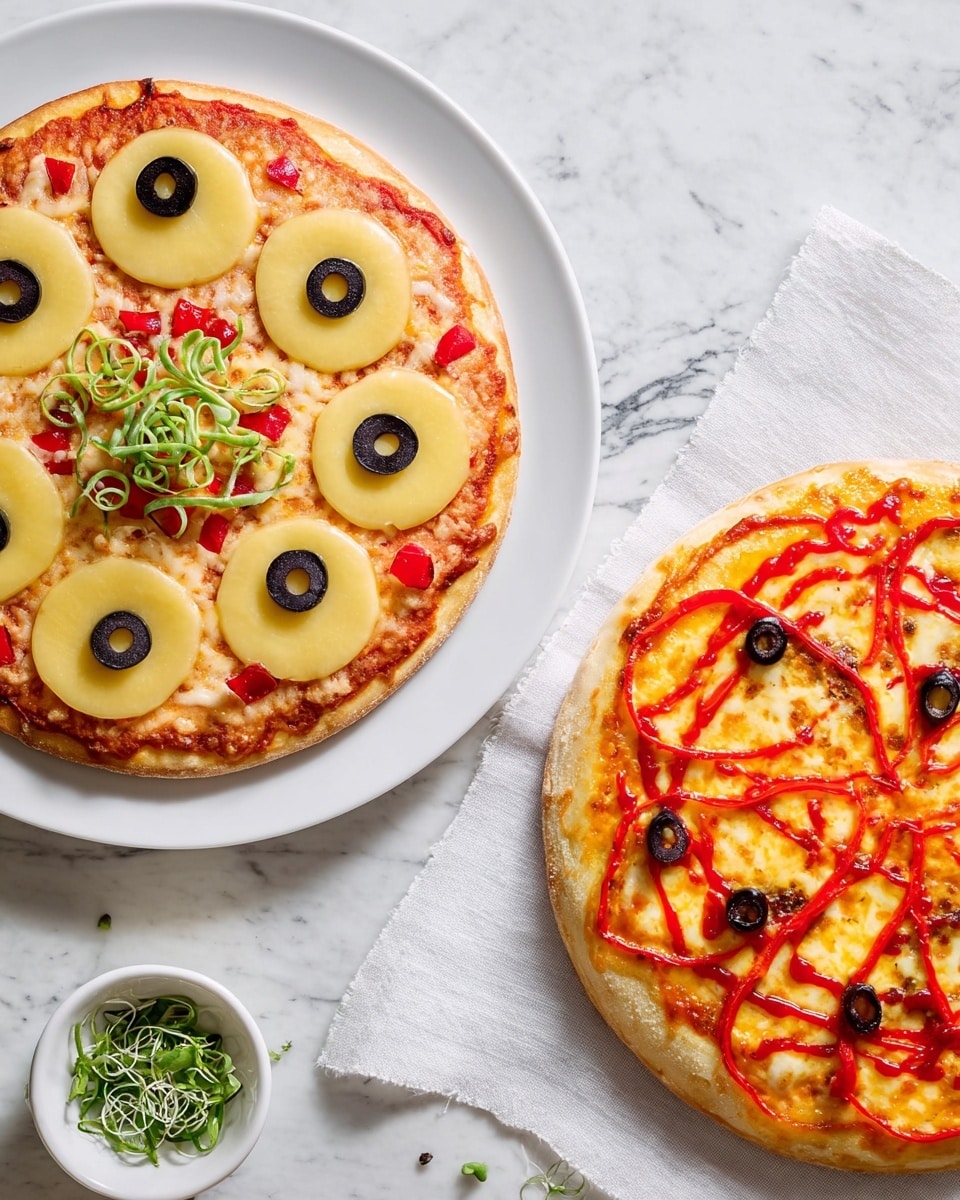
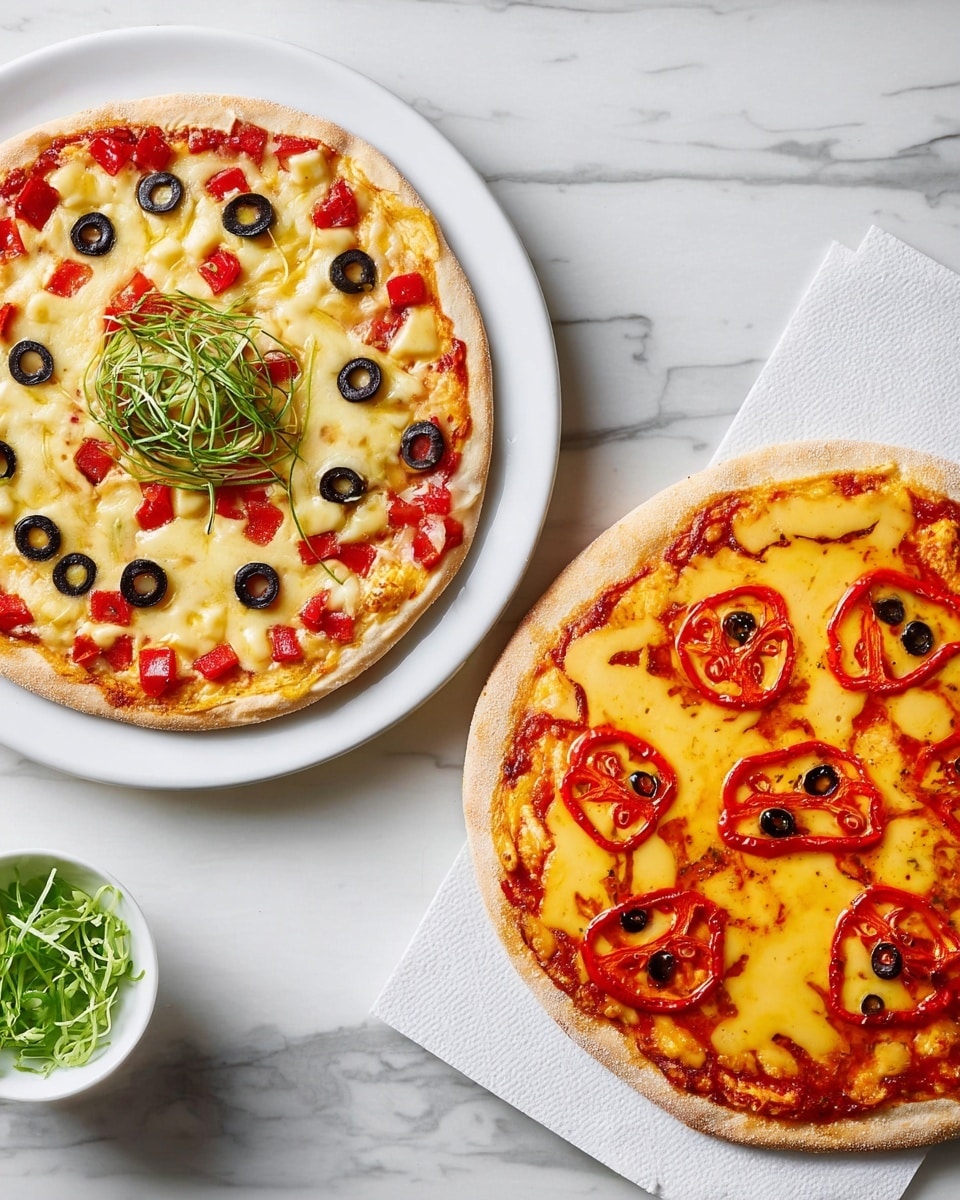
Scatter that finely chopped red capsicum evenly over the pizza base for color and sweetness. Now for the fun part: take your mozzarella ball and slice it lengthwise into oval-shaped pieces. Then, carefully cut out about seven ghost shapes roughly 7 x 7.5 cm. It doesn’t have to be perfect—that’s part of the charm! Place your cheese ghosts strategically across the pizza, spacing them out evenly.
Next, slice your black olives to create tiny eyes and scary little mouths. I like to use one olive slice for each eye and just a slight curve for a mouth, really bringing those ghost faces to life. Arrange these olive features right on each cheese ghost.
Step 3: Bake and Serve with a Fresh Touch
Bake your ghostly masterpiece for about 12 minutes or until the cheese has fully melted and the base is cooked through — just like the instructions say, but keeping an eye on it is key! Once out of the oven, sprinkle the thinly sliced spring onion on top for that lovely splash of freshness and a little bite. Cut, serve, and prepare for all the happy ooohs and aaahs from your friends and family!
Pro Tips for Making Ghost Halloween Pizza Recipe
- Cutting Cheese Shapes: Chill the mozzarella slightly before cutting—this helps keep the ghost shapes intact and less gooey to handle.
- Olive Eyes Precision: Use a small sharp knife or kitchen scissors for neat olive eyes and mouths; it makes the faces surprisingly easy to form.
- Avoid Soggy Bases: Don’t overload the capsicum or cheese; too much moisture can make the crust soft instead of crispy.
- Serve Quickly: This pizza is best enjoyed hot—reheating can soften those fun ghost shapes, so plan to eat right away for maximum effect.
How to Serve Ghost Halloween Pizza Recipe
Garnishes
I love adding a sprinkle of fresh spring onion at the end—it adds the perfect zing and a little crunch that balances the rich cheese. Sometimes, a pinch of chili flakes gives a nice touch of heat if your crew enjoys that. A drizzle of balsamic glaze can also add a lovely tangy sweetness that contrasts with the creamy mozzarella ghosts.
Side Dishes
My go-to sides with this pizza are simple and light: a crisp green salad with lemon vinaigrette or a vibrant roasted veggie platter. These keep the meal balanced and add color to your Halloween spread without stealing the spotlight from the star pizza.
Creative Ways to Present
One fun idea is to serve each pizza on a black or dark-colored platter to make those white cheese ghosts really pop visually. I’ve even placed little paper vampire teeth or plastic spiders around the pizza on the tray for a totally immersive spooky vibe. You could also let kids help cut out ghost shapes for a super fun pre-bake activity!
Make Ahead and Storage
Storing Leftovers
If you have leftovers, wrap your pizza slices tightly in plastic wrap or store them in an airtight container in the fridge. I’ve found that eating them within 2 days keeps the texture and flavors just right, though the ghost shapes won’t be as striking once refrigerated.
Freezing
Freezing this pizza after baking isn’t my favorite because the cheese ghosts tend to lose their detail once thawed. However, if you’re in a pinch, freezing before baking is possible—just wrap the unbaked pizza tightly and bake it straight from frozen, adding a few extra minutes to the baking time.
Reheating
To reheat, I recommend using a hot oven or toaster oven at around 180°C (350°F) for 5–7 minutes. This crisps the crust back up nicely without making the pizza soggy. Microwaving can make the base chewy and the cheese rubbery, so avoid if possible.
FAQs
-
Can I use fresh pizza dough instead of frozen pizza for this Ghost Halloween Pizza Recipe?
Absolutely! If you prefer making your own pizza base, just roll it out and bake it slightly before adding your toppings. This gives you a blank canvas for the ghost mozzarella shapes. Just keep an eye on the baking times since fresh dough might cook differently from frozen bases.
-
What’s the best way to cut the ghost shapes cleanly?
Chill the mozzarella cheese ball in the fridge for 10-15 minutes before slicing to make it firmer and easier to cut. Use a sharp knife or even cookie cutters in a ghost shape if you want perfectly uniform shapes – but freehand cutting works wonderfully, too!
-
Can I prepare the pizza in advance for a party?
You can prepare the topping assembly a few hours ahead and keep the pizza covered in the fridge. However, I suggest baking it shortly before serving so it stays crispy and the cheese ghosts keep their fresh, melty texture.
-
Is this recipe kid-friendly?
Definitely! Kids love the playful ghost shapes and might even enjoy helping to arrange the olive eyes and mouths. It’s a great way to make Halloween cooking fun and interactive for the whole family.
-
What can I serve as a beverage with Ghost Halloween Pizza Recipe?
I usually recommend a refreshing sparkling water with a splash of fruit juice or a fruity iced tea to cut through the richness of the cheese. For adults, a light red wine or a craft beer pairs beautifully with the flavors.
Final Thoughts
This Ghost Halloween Pizza Recipe has definitely become one of my favorite go-to ideas every October. It’s playful enough to impress guests of all ages, yet simple enough that you won’t stress in the kitchen. Cooking it reminds me of cozy Halloween nights with my family, laughing as we create those spooky cheese ghosts together. I really hope you give it a try—you’ll enjoy not just the taste but the fun it brings to your Halloween festivities!
Halloween just got a whole lot yummier with this Ghost Halloween Pizza Recipe that I can’t wait to share with you! It’s such a fun way to bring a spooky vibe right to your kitchen without any complicated steps or unusual ingredients. Whether you’re hosting a kids’ party or just want to jazz up a casual night with a bit of festive cheer, this pizza brings that perfect blend of playful Halloween spirit and deliciousness.
What makes the Ghost Halloween Pizza Recipe especially delightful is how easily you can transform a simple frozen margherita pizza into a Halloween masterpiece. I love this recipe because it’s quick but impressive—imagine the smiles when the pizza comes out all cheesy and ghostly with little olive eyes staring back at you. Plus, you’ll find that it’s super forgiving, so even if you’re not a pizza pro, you’ll have no trouble pulling off this eerie treat!
Why You’ll Love This Recipe
- Effortless Halloween Fun: You can whip this up in under 40 minutes without baking dough from scratch.
- Deliciously Approachable: Uses familiar, tasty ingredients that everyone loves, making it family-friendly.
- Creative & Customizable: The ghost shapes and olive eyes let you get playful and personalize your spooky pizza.
- Great for All Skill Levels: You don’t need to be a kitchen whiz – I learned some tricks that make it foolproof!

Ingredients You’ll Need
The ingredients here work brilliantly together because they keep the focus on simplicity and flavor. I always keep frozen margherita pizza on hand for emergencies like this one!
- Frozen margherita pizza: A quick base that already has delicious tomato sauce and melted mozzarella, saving you prep time.
- Red capsicum (deseeded, finely chopped): Adds sweetness and a pop of color to contrast the ghostly cheese.
- Mozzarella cheese ball: Perfect for cutting out the ghost shapes because it melts wonderfully and stays gooey.
- Black olives (pitted): These make the ideal spooky eyes and mouths with their deep color and smooth texture.
- Spring onion (thinly sliced): Fresh garnish to sprinkle on top, adding a slight crunch and a splash of green.
Note: Exact ingredients and measurements are listed in the recipe card below.
Variations
I like mixing things up to keep this Ghost Halloween Pizza Recipe fresh every year. Feel free to swap in your favorite veggies or cheeses to suit your mood.
- Different cheese: I’ve tried using provolone or even a smoked mozzarella for a richer flavor that pairs wonderfully with the capsicum.
- Vegetarian tweak: Add some sautéed mushrooms or spinach for extra earthiness—my family loved that twist during last Halloween!
- Make it gluten-free: Use a gluten-free frozen pizza base and you’re all set without missing a beat.
- Spicy kick: Adding a light drizzle of chili oil after baking gives it a surprising, delicious heat.
How to Make Ghost Halloween Pizza Recipe
Step 1: Prepare Your Pizza Base for Spookiness
First things first, preheat your oven to 230°C (that’s 210°C for fan-forced ovens). While the oven gets hot, unwrap your frozen margherita pizza and place it on a baking tray—don’t forget to toss away all that packaging. This step is where the magic begins because you’re setting the stage for your ghostly decorations.
Step 2: Create Your Ghostly Toppings
Scatter that finely chopped red capsicum evenly over the pizza base for color and sweetness. Now for the fun part: take your mozzarella ball and slice it lengthwise into oval-shaped pieces. Then, carefully cut out about seven ghost shapes roughly 7 x 7.5 cm. It doesn’t have to be perfect—that’s part of the charm! Place your cheese ghosts strategically across the pizza, spacing them out evenly.
Next, slice your black olives to create tiny eyes and scary little mouths. I like to use one olive slice for each eye and just a slight curve for a mouth, really bringing those ghost faces to life. Arrange these olive features right on each cheese ghost.
Step 3: Bake and Serve with a Fresh Touch
Bake your ghostly masterpiece for about 12 minutes or until the cheese has fully melted and the base is cooked through — just like the instructions say, but keeping an eye on it is key! Once out of the oven, sprinkle the thinly sliced spring onion on top for that lovely splash of freshness and a little bite. Cut, serve, and prepare for all the happy ooohs and aaahs from your friends and family!
Pro Tips for Making Ghost Halloween Pizza Recipe
- Cutting Cheese Shapes: Chill the mozzarella slightly before cutting—this helps keep the ghost shapes intact and less gooey to handle.
- Olive Eyes Precision: Use a small sharp knife or kitchen scissors for neat olive eyes and mouths; it makes the faces surprisingly easy to form.
- Avoid Soggy Bases: Don’t overload the capsicum or cheese; too much moisture can make the crust soft instead of crispy.
- Serve Quickly: This pizza is best enjoyed hot—reheating can soften those fun ghost shapes, so plan to eat right away for maximum effect.
How to Serve Ghost Halloween Pizza Recipe

Garnishes
I love adding a sprinkle of fresh spring onion at the end—it adds the perfect zing and a little crunch that balances the rich cheese. Sometimes, a pinch of chili flakes gives a nice touch of heat if your crew enjoys that. A drizzle of balsamic glaze can also add a lovely tangy sweetness that contrasts with the creamy mozzarella ghosts.
Side Dishes
My go-to sides with this pizza are simple and light: a crisp green salad with lemon vinaigrette or a vibrant roasted veggie platter. These keep the meal balanced and add color to your Halloween spread without stealing the spotlight from the star pizza.
Creative Ways to Present
One fun idea is to serve each pizza on a black or dark-colored platter to make those white cheese ghosts really pop visually. I’ve even placed little paper vampire teeth or plastic spiders around the pizza on the tray for a totally immersive spooky vibe. You could also let kids help cut out ghost shapes for a super fun pre-bake activity!
Make Ahead and Storage
Storing Leftovers
If you have leftovers, wrap your pizza slices tightly in plastic wrap or store them in an airtight container in the fridge. I’ve found that eating them within 2 days keeps the texture and flavors just right, though the ghost shapes won’t be as striking once refrigerated.
Freezing
Freezing this pizza after baking isn’t my favorite because the cheese ghosts tend to lose their detail once thawed. However, if you’re in a pinch, freezing before baking is possible—just wrap the unbaked pizza tightly and bake it straight from frozen, adding a few extra minutes to the baking time.
Reheating
To reheat, I recommend using a hot oven or toaster oven at around 180°C (350°F) for 5–7 minutes. This crisps the crust back up nicely without making the pizza soggy. Microwaving can make the base chewy and the cheese rubbery, so avoid if possible.
FAQs
-
Can I use fresh pizza dough instead of frozen pizza for this Ghost Halloween Pizza Recipe?
Absolutely! If you prefer making your own pizza base, just roll it out and bake it slightly before adding your toppings. This gives you a blank canvas for the ghost mozzarella shapes. Just keep an eye on the baking times since fresh dough might cook differently from frozen bases.
-
What’s the best way to cut the ghost shapes cleanly?
Chill the mozzarella cheese ball in the fridge for 10-15 minutes before slicing to make it firmer and easier to cut. Use a sharp knife or even cookie cutters in a ghost shape if you want perfectly uniform shapes – but freehand cutting works wonderfully, too!
-
Can I prepare the pizza in advance for a party?
You can prepare the topping assembly a few hours ahead and keep the pizza covered in the fridge. However, I suggest baking it shortly before serving so it stays crispy and the cheese ghosts keep their fresh, melty texture.
-
Is this recipe kid-friendly?
Definitely! Kids love the playful ghost shapes and might even enjoy helping to arrange the olive eyes and mouths. It’s a great way to make Halloween cooking fun and interactive for the whole family.
-
What can I serve as a beverage with Ghost Halloween Pizza Recipe?
I usually recommend a refreshing sparkling water with a splash of fruit juice or a fruity iced tea to cut through the richness of the cheese. For adults, a light red wine or a craft beer pairs beautifully with the flavors.
Final Thoughts
This Ghost Halloween Pizza Recipe has definitely become one of my favorite go-to ideas every October. It’s playful enough to impress guests of all ages, yet simple enough that you won’t stress in the kitchen. Cooking it reminds me of cozy Halloween nights with my family, laughing as we create those spooky cheese ghosts together. I really hope you give it a try—you’ll enjoy not just the taste but the fun it brings to your Halloween festivities!

