- Pancetta: Adds salty, crispy texture—feel free to substitute with bacon if pancetta is hard to find.
- Dried Pasta: Use sturdy shapes like rotini or penne that hold onto the dressing well.
- Mayo: Provides creaminess and richness to the dressing.
- Sour Cream: Brings a pleasant tang and smooth texture.
- Dill Pickle Juice: The magic ingredient that infuses that unmistakable pickle flavor.
- Dijon Mustard: Adds a subtle sharpness to balance the creamy dressing.
- Fresh Dill Leaves: Brightens and reinforces the dill flavor in the salad.
- Dried Dill Leaves: For an extra layer of dill aroma and taste.
- Onion Powder & Garlic Powder: Gives a gentle savoriness without overpowering the dish.
- Sugar: Just a touch to balance the tang and acidity.
- Kosher Salt: Enhances all the flavors beautifully.
- Diced Red Onions: Offers a bit of bite and crunch.
- Chopped Dill Pickles: The crunchy, delicious centerpiece of this salad.
- Cubed Cheeses: Use a mix like cheddar and Monterey Jack for great flavor contrast.
- Chopped Salami: Adds savory, meaty richness for a hearty boost.
Note: Exact ingredients and measurements are listed in the recipe card below.
Variations
I love how flexible this Dill Pickle Pasta Salad Recipe is—you can tweak it easily to suit your tastes or dietary needs. Don’t be afraid to swap out ingredients or add your own flair.
- Vegetarian Version: Skip the pancetta and salami, and add extra cheese or some roasted chickpeas for protein—my vegetarian friends still rave about it!
- Low-Fat Option: Use Greek yogurt instead of sour cream and mayo, but keep the pickle juice for that signature tang.
- Spicy Kick: Stir in a dash of hot sauce or some chopped jalapeños for a fun spicy twist.
- Seasonal Twist: Swap out red onions for green onions or add fresh peas in spring for a sweet bite.
How to Make Dill Pickle Pasta Salad Recipe
Step 1: Cook Your Pasta and Crisp Your Pancetta
Start by cooking the pasta in plenty of salted boiling water following the package instructions—usually around 10-12 minutes for al dente. While that’s happening, pan-fry your pancetta cubes over medium heat until the edges turn beautifully golden and crisp. I like to keep stirring so none burn. Once done, remove the pancetta and let it cool on a paper towel to drain the excess fat while your pasta finishes cooking.
Step 2: Mix the Creamy Dressing
In a big mixing bowl, whisk together the mayo, sour cream, dill pickle juice, and Dijon mustard until the dressing is smooth and loose. If it feels too thick, add a little more pickle juice—you want something easy to coat all the pasta and add moisture. Next, whisk in fresh dill, dried dill, onion powder, garlic powder, sugar, and kosher salt. This is where the flavors really start to come alive.
Step 3: Add the Mix-Ins
Fold in red onions and chopped dill pickles first, then the cooled pancetta, salami, and cubed cheeses. I found it helpful to add ingredients gradually, folding gently so the mixture stays creamy and nothing gets crushed. This step is all about building layers of flavor and texture, so take your time to mix everything well.
Step 4: Combine Pasta with Dressing
Drain the pasta and rinse it under cold water to stop cooking and cool it down. You can leave it in the strainer while you work. Using a large spoon, fold the pasta into your dressing mixture in three separate batches. Scoop up from the bottom and bring spoonfuls to the top to ensure every piece is well coated without breaking the pasta. If your pasta shape is smaller like elbows, stirring gently works fine too.
Step 5: Chill Before Serving
Cover the bowl and pop it into the fridge for at least two hours. This rest time lets all the flavors meld together and the salad become nice and chilled. Just before serving, give it a few gentle folds to loosen it up—you’ll see how the dressing clings to every bite perfectly.
Pro Tips for Making Dill Pickle Pasta Salad Recipe
- Use Fresh Dill: I always use fresh dill when I can—it makes a noticeable difference in freshness and brightness.
- Don’t Overcook the Pasta: Al dente pasta keeps the salad from becoming mushy after chilling.
- Add Pickle Juice Slowly: Adding the juice bit by bit helps you get the perfect tang without overpowering the salad.
- Fold Gently: To maintain that lovely texture, fold in ingredients carefully rather than stirring aggressively.
How to Serve Dill Pickle Pasta Salad Recipe
Garnishes
I like to sprinkle a little extra fresh dill on top just before serving for that fresh herbal pop. Sometimes I add a few extra diced pickles or a few red onion rings to make it look pretty and give your guests a hint of what’s inside.
Side Dishes
This pasta salad pairs beautifully with grilled chicken, pulled pork sandwiches, or even a simple platter of fresh veggies and dip. It’s super versatile, so I often serve it alongside BBQ ribs or baked salmon for a hearty summer meal.
Creative Ways to Present
For special occasions, I like to serve the Dill Pickle Pasta Salad Recipe in a hollowed-out bread bowl or individual mason jars for a charming picnic vibe. You can also layer it in a clear trifle dish to show off all those colorful mix-ins—it’s a real conversation starter!
Make Ahead and Storage
Storing Leftovers
I store any leftovers in an airtight container in the fridge where it stays fresh and flavorful for up to 3 days. Just give it a quick stir before serving again—the pasta soaks up the dressing and tastes even better the next day.
Freezing
Freezing isn’t my favorite for this pasta salad since the mayo and sour cream don’t always freeze well, and the texture can get a bit watery when thawed. I recommend enjoying it fresh or within a few days in the fridge instead.
Reheating
You really want to serve this salad cold or at room temperature, so reheating isn’t necessary. If you do prefer it slightly warmer, let it sit out for 20 minutes after taking it from the fridge and give it a gentle toss.
FAQs
-
Can I use a different type of pasta for this Dill Pickle Pasta Salad Recipe?
Absolutely! I recommend pasta shapes that hold dressing well such as rotini, penne, or bowtie. Avoid very small or thin pasta types that might get lost in the salad or become mushy after chilling.
-
How important is the dill pickle juice in the recipe?
It’s the secret ingredient that packs the distinctive tang and depth of flavor. You can’t really substitute it with anything else and still get the same signature taste, so I suggest using real pickle juice from your favorite jar.
-
Can I make this recipe vegan or dairy-free?
Yes! Replace mayo and sour cream with vegan or dairy-free alternatives, and skip the cheeses and meats or use plant-based substitutes. The pickle juice and dill still keep the flavor lively.
-
How long should I chill the pasta salad before serving?
I recommend at least 2 hours in the fridge to allow the flavors to meld and the salad to chill properly. If you can prepare it the day before, it tastes even better!
Final Thoughts
I really hope you give this Dill Pickle Pasta Salad Recipe a try because it’s become such a beloved dish in my kitchen. It’s different, delicious, and surprisingly easy to make, perfect for standing out at any gathering or just enjoying a fresh, flavorful meal at home. Once you make it, I’m sure you’ll keep coming back to this recipe—just like my family does!
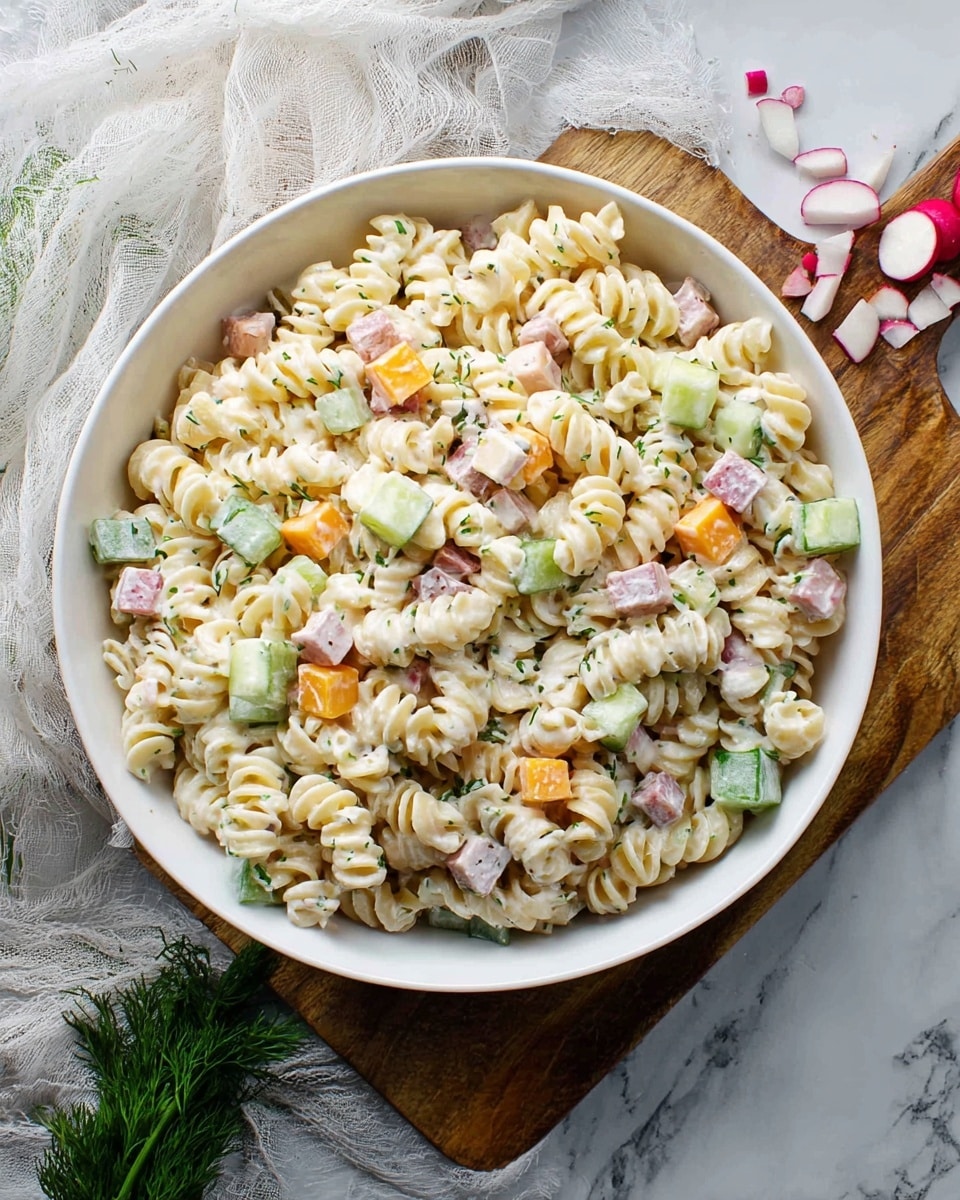
I absolutely love this Dill Pickle Pasta Salad Recipe because it takes a classic pasta salad to next-level deliciousness with the briny tang of dill pickles and pickle juice. It’s so refreshing and different from anything you usually find at a picnic or potluck, and the pancetta adds a wonderful crispy texture that makes every bite interesting. Whenever I bring this along to a summer BBQ or a casual family gathering, people always ask for seconds — it’s that good!
When you try this Dill Pickle Pasta Salad Recipe, you’ll find that the creamy dressing is perfectly balanced with the fresh dill and a little bit of sweetness to round it all out. It’s quick to whip up but so flavorful that it feels special. I love how versatile the salad is; it can stand alone or be a fantastic side to grilled meats, sandwiches, or even on its own as a light meal. Trust me, once you make it, this pasta salad will become one of your go-to recipes for easy entertaining.
Why You’ll Love This Recipe
- Unique Flavor Twist: The addition of dill pickle juice gives it a tangy, savory twist unlike any pasta salad you’ve tasted before.
- Easy to Prep Ahead: This recipe tastes even better after a couple of hours in the fridge, making it perfect for meal prep or entertaining.
- Loaded with Texture: Crispy pancetta, creamy cheese, and crunchy pickles create a delightful combination in every forkful.
- Crowd-Pleaser: It’s always a hit at family gatherings and potlucks, and I bet your friends will be craving this Dill Pickle Pasta Salad Recipe too.
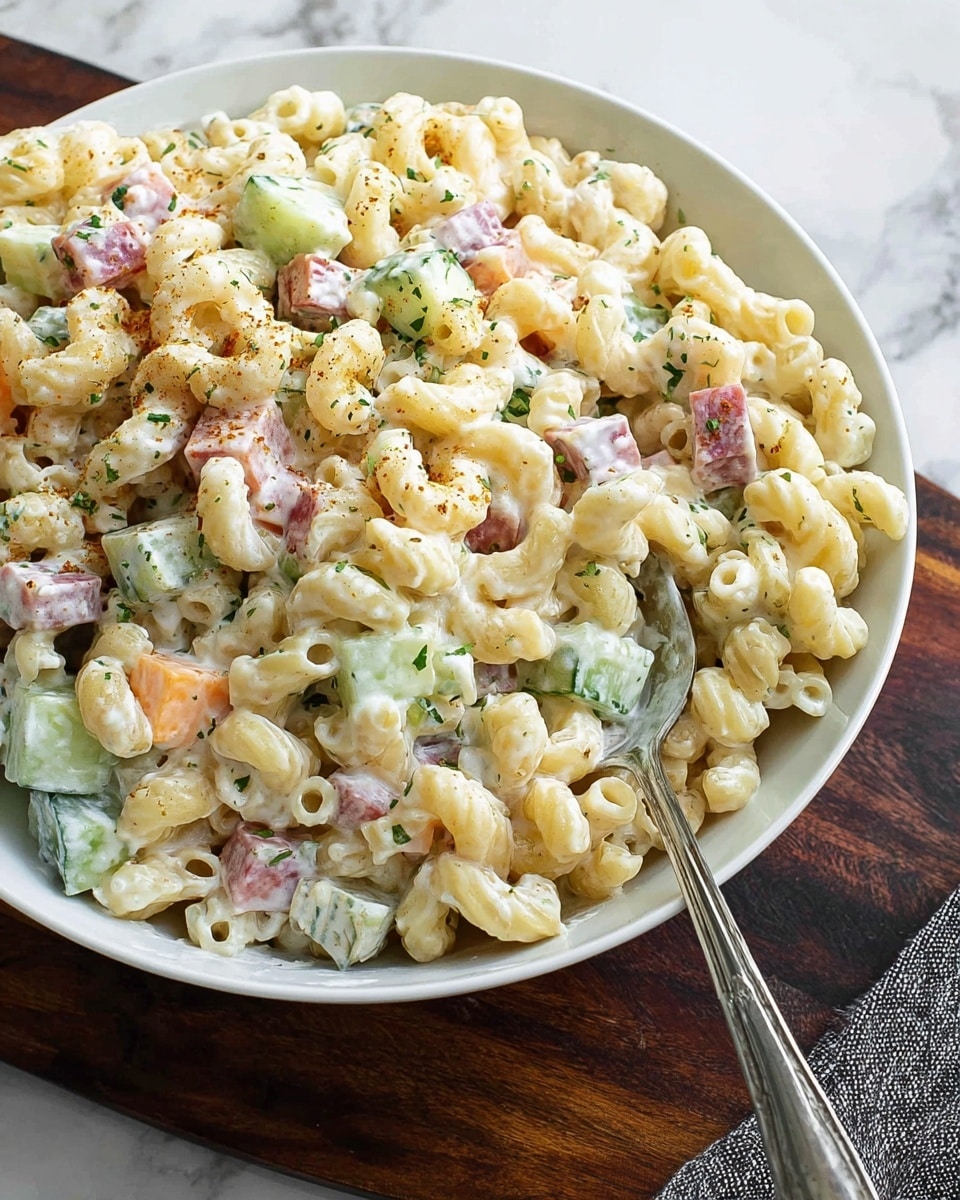
Ingredients You’ll Need
These ingredients come together to create a creamy, tangy salad with an exciting crunch and savory depth. Don’t worry if some ingredients sound unusual for pasta salad; the dill pickles and juice really brighten the taste beautifully.
- Pancetta: Adds salty, crispy texture—feel free to substitute with bacon if pancetta is hard to find.
- Dried Pasta: Use sturdy shapes like rotini or penne that hold onto the dressing well.
- Mayo: Provides creaminess and richness to the dressing.
- Sour Cream: Brings a pleasant tang and smooth texture.
- Dill Pickle Juice: The magic ingredient that infuses that unmistakable pickle flavor.
- Dijon Mustard: Adds a subtle sharpness to balance the creamy dressing.
- Fresh Dill Leaves: Brightens and reinforces the dill flavor in the salad.
- Dried Dill Leaves: For an extra layer of dill aroma and taste.
- Onion Powder & Garlic Powder: Gives a gentle savoriness without overpowering the dish.
- Sugar: Just a touch to balance the tang and acidity.
- Kosher Salt: Enhances all the flavors beautifully.
- Diced Red Onions: Offers a bit of bite and crunch.
- Chopped Dill Pickles: The crunchy, delicious centerpiece of this salad.
- Cubed Cheeses: Use a mix like cheddar and Monterey Jack for great flavor contrast.
- Chopped Salami: Adds savory, meaty richness for a hearty boost.
Note: Exact ingredients and measurements are listed in the recipe card below.
Variations
I love how flexible this Dill Pickle Pasta Salad Recipe is—you can tweak it easily to suit your tastes or dietary needs. Don’t be afraid to swap out ingredients or add your own flair.
- Vegetarian Version: Skip the pancetta and salami, and add extra cheese or some roasted chickpeas for protein—my vegetarian friends still rave about it!
- Low-Fat Option: Use Greek yogurt instead of sour cream and mayo, but keep the pickle juice for that signature tang.
- Spicy Kick: Stir in a dash of hot sauce or some chopped jalapeños for a fun spicy twist.
- Seasonal Twist: Swap out red onions for green onions or add fresh peas in spring for a sweet bite.
How to Make Dill Pickle Pasta Salad Recipe
Step 1: Cook Your Pasta and Crisp Your Pancetta
Start by cooking the pasta in plenty of salted boiling water following the package instructions—usually around 10-12 minutes for al dente. While that’s happening, pan-fry your pancetta cubes over medium heat until the edges turn beautifully golden and crisp. I like to keep stirring so none burn. Once done, remove the pancetta and let it cool on a paper towel to drain the excess fat while your pasta finishes cooking.
Step 2: Mix the Creamy Dressing
In a big mixing bowl, whisk together the mayo, sour cream, dill pickle juice, and Dijon mustard until the dressing is smooth and loose. If it feels too thick, add a little more pickle juice—you want something easy to coat all the pasta and add moisture. Next, whisk in fresh dill, dried dill, onion powder, garlic powder, sugar, and kosher salt. This is where the flavors really start to come alive.
Step 3: Add the Mix-Ins
Fold in red onions and chopped dill pickles first, then the cooled pancetta, salami, and cubed cheeses. I found it helpful to add ingredients gradually, folding gently so the mixture stays creamy and nothing gets crushed. This step is all about building layers of flavor and texture, so take your time to mix everything well.
Step 4: Combine Pasta with Dressing
Drain the pasta and rinse it under cold water to stop cooking and cool it down. You can leave it in the strainer while you work. Using a large spoon, fold the pasta into your dressing mixture in three separate batches. Scoop up from the bottom and bring spoonfuls to the top to ensure every piece is well coated without breaking the pasta. If your pasta shape is smaller like elbows, stirring gently works fine too.
Step 5: Chill Before Serving
Cover the bowl and pop it into the fridge for at least two hours. This rest time lets all the flavors meld together and the salad become nice and chilled. Just before serving, give it a few gentle folds to loosen it up—you’ll see how the dressing clings to every bite perfectly.
Pro Tips for Making Dill Pickle Pasta Salad Recipe
- Use Fresh Dill: I always use fresh dill when I can—it makes a noticeable difference in freshness and brightness.
- Don’t Overcook the Pasta: Al dente pasta keeps the salad from becoming mushy after chilling.
- Add Pickle Juice Slowly: Adding the juice bit by bit helps you get the perfect tang without overpowering the salad.
- Fold Gently: To maintain that lovely texture, fold in ingredients carefully rather than stirring aggressively.
How to Serve Dill Pickle Pasta Salad Recipe
Garnishes
I like to sprinkle a little extra fresh dill on top just before serving for that fresh herbal pop. Sometimes I add a few extra diced pickles or a few red onion rings to make it look pretty and give your guests a hint of what’s inside.
Side Dishes
This pasta salad pairs beautifully with grilled chicken, pulled pork sandwiches, or even a simple platter of fresh veggies and dip. It’s super versatile, so I often serve it alongside BBQ ribs or baked salmon for a hearty summer meal.
Creative Ways to Present
For special occasions, I like to serve the Dill Pickle Pasta Salad Recipe in a hollowed-out bread bowl or individual mason jars for a charming picnic vibe. You can also layer it in a clear trifle dish to show off all those colorful mix-ins—it’s a real conversation starter!
Make Ahead and Storage
Storing Leftovers
I store any leftovers in an airtight container in the fridge where it stays fresh and flavorful for up to 3 days. Just give it a quick stir before serving again—the pasta soaks up the dressing and tastes even better the next day.
Freezing
Freezing isn’t my favorite for this pasta salad since the mayo and sour cream don’t always freeze well, and the texture can get a bit watery when thawed. I recommend enjoying it fresh or within a few days in the fridge instead.
Reheating
You really want to serve this salad cold or at room temperature, so reheating isn’t necessary. If you do prefer it slightly warmer, let it sit out for 20 minutes after taking it from the fridge and give it a gentle toss.
FAQs
-
Can I use a different type of pasta for this Dill Pickle Pasta Salad Recipe?
Absolutely! I recommend pasta shapes that hold dressing well such as rotini, penne, or bowtie. Avoid very small or thin pasta types that might get lost in the salad or become mushy after chilling.
-
How important is the dill pickle juice in the recipe?
It’s the secret ingredient that packs the distinctive tang and depth of flavor. You can’t really substitute it with anything else and still get the same signature taste, so I suggest using real pickle juice from your favorite jar.
-
Can I make this recipe vegan or dairy-free?
Yes! Replace mayo and sour cream with vegan or dairy-free alternatives, and skip the cheeses and meats or use plant-based substitutes. The pickle juice and dill still keep the flavor lively.
-
How long should I chill the pasta salad before serving?
I recommend at least 2 hours in the fridge to allow the flavors to meld and the salad to chill properly. If you can prepare it the day before, it tastes even better!
Final Thoughts
I really hope you give this Dill Pickle Pasta Salad Recipe a try because it’s become such a beloved dish in my kitchen. It’s different, delicious, and surprisingly easy to make, perfect for standing out at any gathering or just enjoying a fresh, flavorful meal at home. Once you make it, I’m sure you’ll keep coming back to this recipe—just like my family does!