

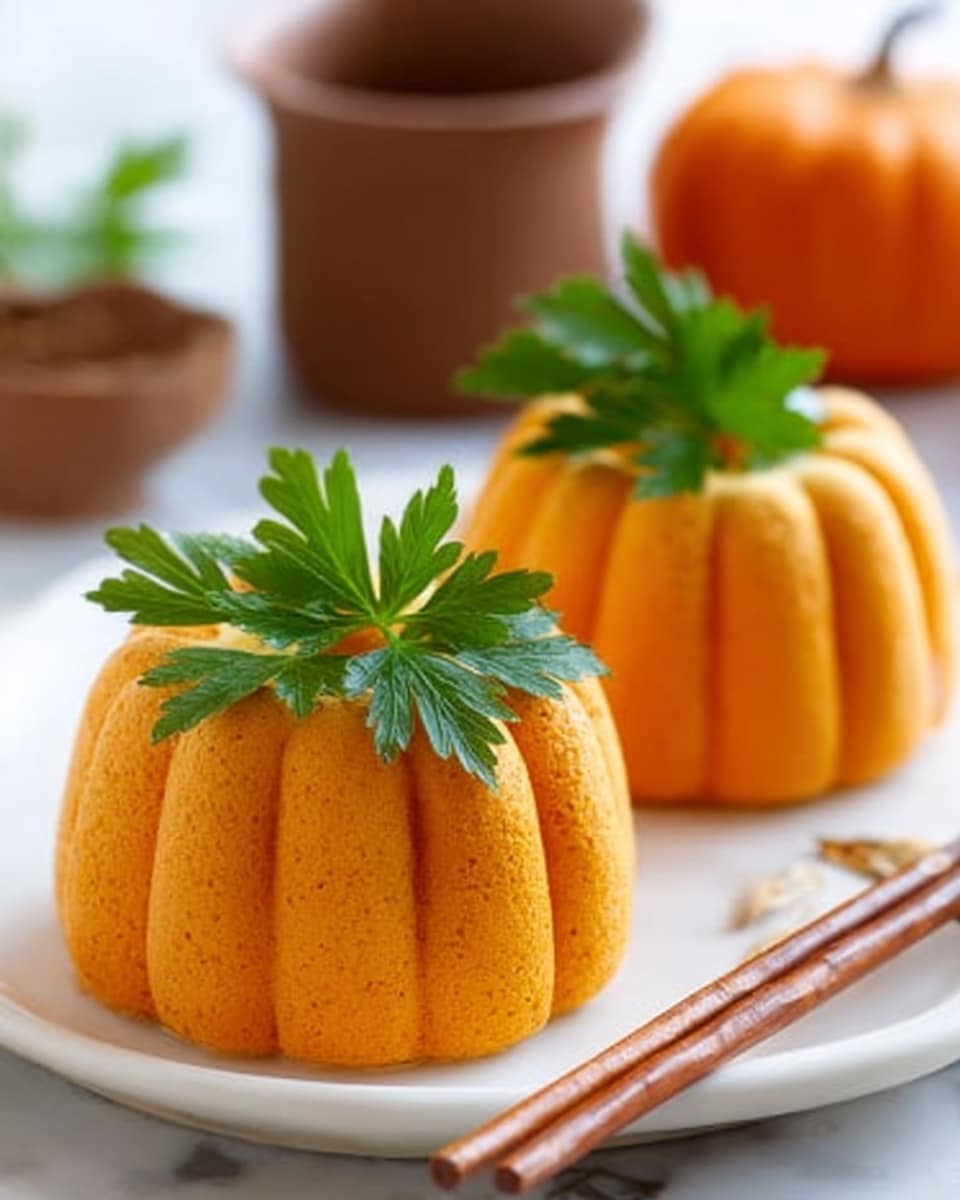
I absolutely love this Cheese Pumpkins Recipe because it’s such a playful and tasty way to serve a cheese spread that everyone adores. When I first tried making these mini pumpkins, the combination of sharp cheddar and creamy cream cheese blended with a little garlic salt and dry mustard knocked my socks off. They’re perfect for fall gatherings, holiday parties, or anytime you want to impress guests with something cute and delicious.
You’ll find that this Cheese Pumpkins Recipe works wonders as an appetizer or a fun snack you can nibble on with crackers or toasted pumpernickel bread. Plus, it’s so easy to make—you dump everything into a food processor, pack it into a pumpkin mold, and let it chill overnight. Honestly, it’s become a go-to whenever I host because my family goes crazy for these cheesey little pumpkins!
Why You’ll Love This Recipe
- Super Simple Prep: You only need a handful of ingredients and a food processor to whip this up quickly.
- Fun Presentation: The mini pumpkin shapes make your appetizer table instantly festive and eye-catching.
- Crowd-Pleaser Flavor: The sharp cheddar and cream cheese blend creates a rich, creamy bite everyone will ask about.
- Make-Ahead Friendly: You can prepare these the day before and enjoy stress-free entertaining.
Ingredients You’ll Need
Choosing the right ingredients makes all the difference for this Cheese Pumpkins Recipe. Sharp cheddar brings that classic tang, while cream cheese gives it a buttery smooth texture. Adding garlic salt and dry mustard amps up the flavor with just the right hint of spice.
- Shredded cheddar: I always grab sharp cheddar for bold flavor, and shredding it yourself fresh can boost meltiness.
- Cream cheese: Full-fat cream cheese is best for creaminess and structure—don’t skip this!
- Garlic salt: This adds a gentle garlic note and seasoning all in one go.
- Dry mustard: Just a teaspoon goes a long way in brightening up the cheese mixture.
- Parsley sprigs (for garnish): They look adorable as pumpkin stems and add a fresh pop of green.
- Toast or crackers (for serving): Pumpernickel bread makes a fantastic nutty pairing, but any crunchy cracker works.
- Wilton Dimensions Multi-Cavity Mini Pumpkins Pan: This specialized pan shapes the cheese mixture into perfect pumpkin halves.
Note: Exact ingredients and measurements are listed in the recipe card below.
Variations
I love making this Cheese Pumpkins Recipe my own depending on the season or my guests. You can easily tweak it to include your favorite cheeses or add in extras to surprise your crowd!
- Use Different Cheeses: I sometimes swap half the cheddar with smoked gouda for a deeper flavor profile that really impresses.
- Add Herbs or Spices: Try mixing in chives, paprika, or even a touch of cayenne if you like a little kick.
- Make It Vegan: Use vegan cream cheese and cheddar-style shreds to accommodate plant-based diets while keeping the charm.
- Seasonal Garnishes: Tiny rosemary sprigs or chive stems can substitute parsley and add festive flair.
How to Make Cheese Pumpkins Recipe
Step 1: Blend Your Cheesy Goodness
Start by putting your shredded cheddar, cream cheese, garlic salt, and dry mustard all into a food processor. Pulse until the mixture is completely smooth and creamy. I like to scrape down the sides a couple of times to make sure everything blends evenly — this way, you won’t get any lumps when you bite in.
Step 2: Pack the Pumpkin Pan
Next, spray your Wilton Dimensions Mini Pumpkins Pan lightly with nonstick spray—this really helps with removing the cheese later. Then, spoon the cheese mixture into each cavity and press it down firmly with the back of the spoon. It’s important to pack it tightly so the pumpkins hold their shape well. Once filled, cover the pan with plastic wrap and pop it into the fridge overnight. Trust me, the chilling step is crucial for getting those clean pumpkin shapes.
Step 3: Unmold Your Cheesy Pumpkins
When you’re ready to serve, briefly dip the bottom of the pan into a larger bowl or pan filled with hot water for a few seconds. This loosens the cheese just enough without melting it. Then, tap the pan firmly on a flat surface and gently pop out the pumpkin halves. If they don’t come out right away, a little more time in the warm water usually does the trick.
Step 4: Assemble and Garnish
Pair up the matching pumpkin halves and press them together to create your adorable cheese pumpkins. Add a sprig of parsley on top for the “stem,” which gives them a perfectly festive finishing touch. Serve alongside toasted pumpernickel bread or your favorite crackers and watch your guests’ faces light up.
Pro Tips for Making Cheese Pumpkins Recipe
- Use Sharp Cheddar: I found that mild cheddar makes the pumpkins too soft and bland, so sharp cheddar is a game-changer for flavor and firmness.
- Don’t Skip Overnight Chilling: Letting the cheese chill for several hours—or ideally overnight—ensures the pumpkins unmold cleanly and keep their shape.
- Press Firmly Into the Mold: When you spoon the mixture in, pack it tightly with the back of a spoon to avoid air pockets that cause crumbling later.
- Warm Water Dip Trick: I learned that quickly dipping the pan’s bottom in hot water loosens the cheese edges perfectly without melting or messing up the texture.
How to Serve Cheese Pumpkins Recipe

Garnishes
I always go with fresh parsley sprigs to mimic pumpkin stems because they add a lovely visual touch and a subtle fresh flavor. Sometimes, I dress things up by adding a little smoked paprika on top for color contrast and a smoky zing. It’s amazing how such small details can elevate the entire appetizer.
Side Dishes
Cheese pumpkins pair beautifully with toasted pumpernickel bread or assorted crackers—something with a bit of crunch and a neutral flavor to balance the creamy cheese. I love serving it alongside fresh veggies like sliced cucumbers or sweet bell peppers to add some freshness and crunch.
Creative Ways to Present
For a party, I’ve layered the cheese pumpkins on a rustic wooden board surrounded by autumn leaves and nuts for a harvest-themed platter. You can also serve paired with small bowls of jams or honey for guests to dollop onto their crackers. Presentation is key—it makes these cheese pumpkins even more irresistible!
Make Ahead and Storage
Storing Leftovers
I store leftover cheese pumpkins covered tightly in the original mold or wrapped well with plastic wrap in the fridge. They keep well for up to 3 days and still maintain their shape and flavor if properly chilled. Just make sure to avoid too much air exposure to keep the cheese fresh.
Freezing
Freezing this Cheese Pumpkins Recipe isn’t my favorite since the texture can get a bit crumbly once thawed. However, if you need to, I’d recommend freezing individual pumpkin halves wrapped tightly in plastic and then thawing them overnight in the fridge. They’re best eaten fresh, though.
Reheating
Since these cheese pumpkins are meant to be served cold, I usually just let them sit out at room temperature for about 15 minutes before serving. If they’re too cold, the flavors can seem muted, but warming them isn’t necessary and can actually soften the structure too much.
FAQs
-
Can I use a different mold if I don’t have the Wilton Mini Pumpkins Pan?
Absolutely! While the Wilton pumpkins pan gives the best shape, you can use any silicone mold or small ramekins to shape the cheese mixture. Just remember to pack the cheese tightly and chill thoroughly to hold the form.
-
How long can I prep the cheese pumpkins ahead of time?
You can prepare the cheese pumpkins up to 24 hours in advance. Chilling overnight actually improves their texture and flavor, so it’s a great make-ahead appetizer.
-
What are good accompaniments to serve with cheese pumpkins?
Toasted pumpernickel bread and a variety of crackers work wonderfully. Fresh veggies and small bowls of fruit preserves or honey can also elevate the experience for your guests.
-
Can I make this recipe vegan or dairy-free?
Definitely! Swap out the cheddar and cream cheese for your favorite dairy-free alternatives. Just be sure to pick brands that melt and blend well for smooth texture in the Cheese Pumpkins Recipe.
Final Thoughts
This Cheese Pumpkins Recipe is one of those little kitchen gems I love sharing with friends because it’s delicious, adorable, and super simple to make. Whether you’re a seasoned host or just want something fun and tasty to serve, these pumpkins bring smiles and great flavors to the table. Give it a try—you’ll enjoy the process and absolutely love the results as much as I do!
PrintCheese Pumpkins Recipe
Cheese Pumpkins are a festive and creamy appetizer perfect for fall gatherings. Made with a smooth blend of cheddar and cream cheese seasoned with garlic salt and dry mustard, these bite-sized cheese shapes are molded in a mini pumpkin pan for an adorable presentation. Served with toasted pumpernickel bread or crackers and garnished with fresh parsley, they offer a savory and fun way to celebrate the season.
- Prep Time: 15 minutes
- Cook Time: 0 minutes
- Total Time: 8 hours 15 minutes
- Yield: Approximately 24 mini cheese pumpkins
- Category: Appetizer
- Method: No-Cook
- Cuisine: American
- Diet: Vegetarian
Ingredients
Cheese Mixture
- 3 3/4 cups shredded cheddar cheese
- 3 packages (8 oz each) cream cheese, softened
- 1 1/2 tsp garlic salt
- 1 tsp dry mustard
Garnish
- Parsley sprigs
Accompaniments
- Toasted pumpernickel bread or crackers
Instructions
- Prepare Cheese Mixture: In a food processor, combine shredded cheddar cheese, softened cream cheese, garlic salt, and dry mustard. Process until the mixture is completely smooth and creamy, ensuring all ingredients are well blended.
- Fill and Chill Pumpkin Mold: Lightly coat the Wilton Dimensions Multi-Cavity Mini Pumpkins Pan with nonstick spray. Spoon the cheese mixture into each cavity, using the back of the spoon to firmly press and pack the cheese tightly. Cover the filled pan with plastic wrap and refrigerate overnight to allow the mixture to set properly.
- Unmold Cheese Pumpkins: To release the cheese pumpkins from the mold, briefly dip the bottom of the pan into a larger pan filled with hot water. This heats slightly to loosen the cheese shapes. Then, tap the pan firmly on a flat surface to help loosen them further. Carefully unmold the pumpkin halves.
- Assemble and Garnish: Press matching halves of the cheese pumpkins together to form whole pumpkin shapes. Garnish the tops with fresh parsley sprigs for a festive touch. Serve the cheese pumpkins alongside toasted pumpernickel bread or crackers for guests to enjoy.
Notes
- Ensure cream cheese is softened to achieve a smooth blend with cheddar in the food processor.
- Press the cheese mixture firmly into the mold cavities to help the pumpkins hold their shape when unmolded.
- Dipping the mold briefly in hot water is key to loosening the cheese shapes without melting them.
- Can be made a day ahead and kept chilled until serving to save time on party day.
- Substitute cheddar with other favorite cheese blends as desired for different flavors.


