

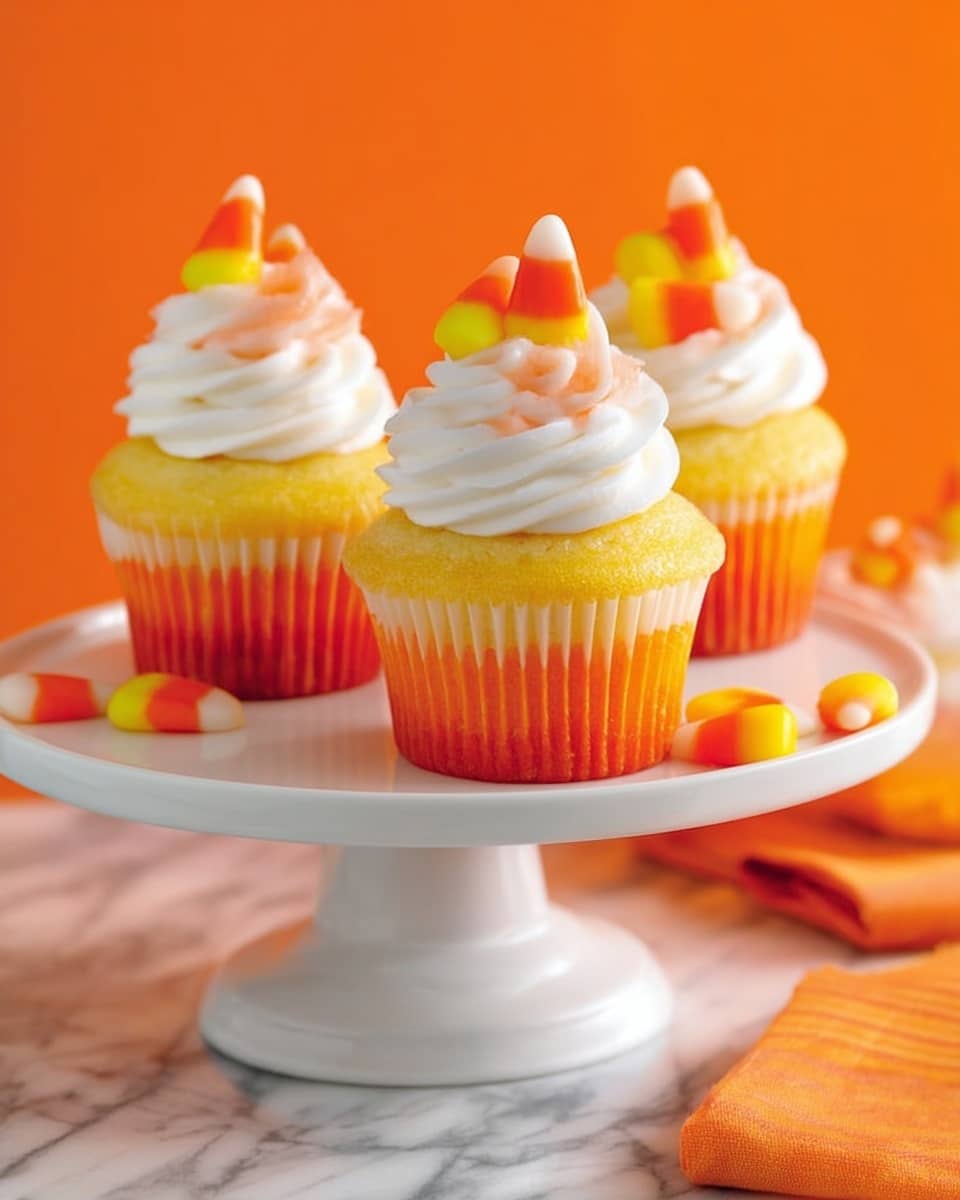
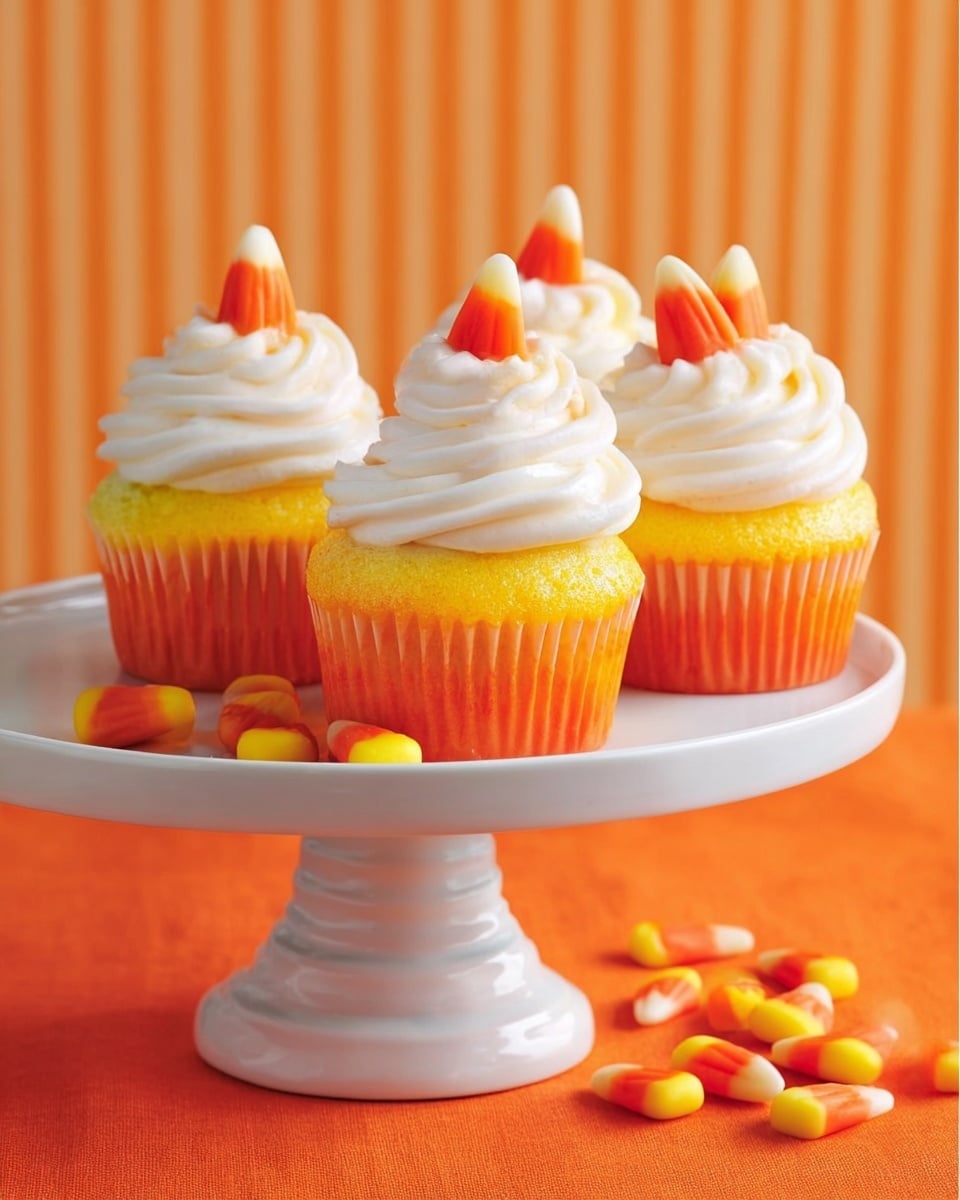
I absolutely love how this Candy Corn Cupcakes Recipe brings a burst of festive fun and flavor to any gathering. It’s a perfect treat for Halloween parties or when you want to surprise your family with something cheerful and colorful. The two-toned cupcakes mimic the iconic candy corn colors, and the creamy marshmallow frosting adds the perfect sweet finish.
When I first tried this recipe, I was amazed at how easy it was to get those vibrant layers just right without any fancy techniques. You’ll find that the fluffy cake combined with the luscious frosting and a candy corn garnish makes these cupcakes not just adorable but irresistibly delicious—perfect for sharing or keeping all to yourself!
Why You’ll Love This Recipe
- Festive and Fun: These cupcakes capture the spirit of fall with bright candy corn colors and a playful vibe.
- Simple Yet Impressive: You don’t need to be a pro baker to create layers that pop with color and flavor.
- Deliciously Creamy Frosting: The marshmallow cream cheese frosting adds a dreamy, fluffy texture that keeps everyone coming back for more.
- Great for Sharing or Gifting: These cupcakes make a fantastic treat to pack up for neighbors, friends, or school parties.
Ingredients You’ll Need
To nail this Candy Corn Cupcakes Recipe, you’ll want to gather some basic baking staples plus a few colorful extras. Each ingredient plays a key role in creating those vibrant layers and that ultra-creamy frosting everyone loves.
- White cake mix: A convenient base for moist, fluffy cupcakes—no need to start from scratch.
- Eggs: They help bind the batter and give structure to your cupcakes.
- Water: Keeps the batter light and pourable.
- Vegetable oil: For tenderness and a moist crumb.
- Pure vanilla extract: Adds warmth and depth of flavor.
- Yellow food coloring: Essential for that bright, cheerful candy corn look.
- Orange food coloring: The other half of the candy corn color scheme — bright and inviting!
- Candy corn: For garnish—adds a cute, thematic finishing touch.
- Cream cheese: The base of the creamy marshmallow frosting for smooth richness.
- Confectioners’ sugar: Sweetens the frosting while keeping it silky smooth.
- Marshmallow crème: The secret ingredient that makes the frosting fluffy and light.
- Frozen whipped topping: Helps lighten the frosting even more and keeps it airy.
Note: Exact ingredients and measurements are listed in the recipe card below.
Variations
I love that this Candy Corn Cupcakes Recipe is so versatile—you can easily swap ingredients to fit your taste or dietary needs. Feel free to make it your own by tweaking colors or the frosting texture!
- Chocolate Twist: I sometimes swap half the cake mix for chocolate for a fun flavor contrast, and my family goes crazy for it!
- Dairy-Free Frosting: Replace cream cheese and whipped topping with dairy-free alternatives—I’ve tried coconut cream, and it works surprisingly well.
- Spiced Version: Add a pinch of cinnamon or pumpkin pie spice to the batter to bring in cozy fall flavors.
- Mini Cupcakes: Make bite-sized cupcakes for easy party snacking—baking time is shorter, so keep an eye on them.
How to Make Candy Corn Cupcakes Recipe
Step 1: Prepare your pans and preheat
Start by preheating your oven to 350°F. Line two 12-cup muffin pans with paper liners to keep your cupcakes from sticking and make cleanup easier. This little step saves you from cupcake trouble later, trust me!
Step 2: Mix your batter with a splash of color
In a large bowl, beat your white cake mix with eggs, water, vegetable oil, and vanilla extract on medium speed for one minute, then crank it up to high for two minutes to get the batter nice and smooth. Split the batter into two bowls—add yellow food coloring to one and orange to the other, mixing each until the colors are vibrant and even.
Step 3: Layer the batters and bake
Carefully spoon the yellow batter evenly into each cupcake liner first, then gently top with the orange batter. This layering creates that perfect candy corn gradient. Pop the pans into your preheated oven and bake for about 18 to 22 minutes, or until a toothpick poked in the center comes out clean. Let them cool in the pan for 10 minutes before transferring to a wire rack to cool completely—this cooling step helps the cupcakes set perfectly and prevents the frosting from melting later.
Step 4: Whip up the creamy marshmallow frosting
Beat softened cream cheese until smooth (about 3 minutes), then add in confectioners’ sugar and vanilla, mixing until everything blends nicely. Next, fold in the marshmallow crème and beat for about 2 minutes until creamy. Finally, stir in the thawed whipped topping until combined and fluffy. If you prepare the frosting ahead, just bring it to room temperature and give it a quick beating before piping.
Step 5: Frost and decorate
Fill a pastry bag fitted with a large round tip with your luscious marshmallow frosting, and pipe generous swirls onto your cooled cupcakes. Top each one with a candy corn piece to nail that festive look. Store your cupcakes covered in the refrigerator and enjoy within three days for best flavor and texture.
Pro Tips for Making Candy Corn Cupcakes Recipe
- Perfect Layering: Spoon batter slowly and evenly to keep the two colors distinct and prevent swirling.
- Room Temperature Ingredients: Make sure your eggs and cream cheese are at room temp for smooth, lump-free batter and frosting.
- Use a Pastry Bag: It helps you pipe smooth, professional-looking frosting without any hassle.
- Cool Completely Before Frosting: Frost the cupcakes only after they’re fully cooled to avoid melting the frosting.
How to Serve Candy Corn Cupcakes Recipe
Garnishes
I like to keep it simple and sprinkle a candy corn piece on each cupcake—it’s such a cute statement and instantly brings that classic candy vibe. Sometimes I add a light dusting of edible glitter or a few mini sprinkles for a festive extra sparkle, especially when we have kids around.
Side Dishes
Pair these cupcakes with a warm cup of spiced apple cider or hot chocolate for a cozy autumn vibe. I’ve also served them alongside fresh fruit platters or simple popcorn mixes for a balanced party snack table.
Creative Ways to Present
For Halloween, I’ve arranged these cupcakes on tiered trays decorated with autumn leaves and mini pumpkins—guests always complement the display! Another fun idea is placing them in individual clear boxes tied with ribbon for easy gifting or party favors.
Make Ahead and Storage
Storing Leftovers
I store leftover cupcakes in an airtight container in the fridge to keep that frosting fresh and the cake moist. They stay great for up to three days, but honestly, they rarely last that long in my house!
Freezing
You can freeze unfrosted cupcakes wrapped tightly in plastic wrap and placed in a freezer bag for up to two months. When you’re ready to enjoy, thaw them overnight in the fridge, then frost as usual for the best results. I’ve tried freezing frosted cupcakes before, but the frosting can get a bit weepy, so I recommend frosting fresh.
Reheating
Since these are cupcakes, reheating usually isn’t necessary. If you want to warm one up just a bit, removing the frosting first and giving the plain cupcake 10-15 seconds in the microwave does the trick. Then add your frosting back or enjoy plain and warm!
FAQs
-
Can I use homemade cake batter instead of box mix?
Absolutely! Homemade white cake batter works great here. Just split the batter and add your food coloring as directed. The key is to keep the batter consistency similar so that the layers bake evenly.
-
What if I don’t have yellow and orange food coloring?
You can use gel food coloring or natural alternatives like turmeric for yellow and carrot juice or pumpkin puree mixed with orange food coloring. Just add enough to get the desired vibrant colors without affecting the batter texture.
-
How do I prevent the frosting from melting?
The secret is to make sure your cupcakes are completely cool before frosting and to keep the frosting chilled until you’re ready to serve. Also, frosting with a thick, creamy texture like this marshmallow cream cheese version helps it hold its shape.
-
Can I make this recipe vegan or allergy-friendly?
Yes! Swap out eggs for flax eggs, use dairy-free cream cheese and whipped topping, and choose a vegan-friendly cake mix. There are plenty of allergen-free cake mixes and frosting alternatives available or easy to make at home.
Final Thoughts
This Candy Corn Cupcakes Recipe is one I keep coming back to because it’s as delightful to make as it is to eat. The cheerful colors, the marshmallow frosting, and those little candy corn toppers come together to create a treat that’s perfect for celebrations or just brightening an ordinary day. Give it a try—you’ll enjoy the smiles and compliments that come your way, and I guarantee it’ll become a favorite in your recipe box!
PrintCandy Corn Cupcakes Recipe
These Candy Corn Cupcakes are a festive and colorful treat perfect for Halloween or fall celebrations. Featuring a moist white cake base divided into vibrant yellow and orange layers, topped with a creamy marshmallow frosting and garnished with candy corn, they combine classic flavors and a fun presentation that kids and adults alike will enjoy.
- Prep Time: 20 mins
- Cook Time: 22 mins
- Total Time: 1 hr 5 mins
- Yield: 24 servings
- Category: Dessert
- Method: Baking
- Cuisine: American
- Diet: Vegetarian
Ingredients
For Cupcakes
- 1 16.5–oz box white cake mix
- 3 large eggs
- 1 cup water
- 1/4 cup vegetable oil
- 2 tsp pure vanilla extract
- 1 Tbsp yellow food coloring
- 1 Tbsp orange food coloring
- Candy corn, for topping
For Creamy Marshmallow Frosting
- 1 8–oz package cream cheese, softened
- 1 cup confectioners’ sugar
- 1 tsp pure vanilla extract
- 1 7–oz container marshmallow crème
- 1 8–oz container frozen whipped topping, thawed
Instructions
- Prepare Oven and Pans: Preheat your oven to 350°F (175°C). Line two 12-cup muffin pans with paper liners and set them aside to prepare the batter.
- Mix Cake Batter: In a large bowl, use an electric mixer on medium speed to beat together the white cake mix, eggs, water, vegetable oil, and vanilla extract for 1 minute. Increase the speed to high and continue beating for 2 more minutes until smooth.
- Create Colored Batters: Divide the batter evenly into two separate bowls. Mix yellow food coloring into one bowl and orange food coloring into the other, stirring until fully combined and vibrant.
- Fill Muffin Cups: Evenly spoon the yellow batter into each muffin cup, then gently layer the orange batter on top of the yellow in each cup to create a two-tone effect.
- Bake Cupcakes: Place the pans in the oven and bake for 18 to 22 minutes, or until a wooden pick inserted into the center of a cupcake comes out clean. Remove the pans from the oven and let the cupcakes cool in the pans for 10 minutes before transferring them to wire racks to cool completely.
- Make Creamy Marshmallow Frosting: In a large bowl, beat the softened cream cheese on medium speed for about 3 minutes until smooth and creamy. Add the confectioners’ sugar and vanilla extract, then beat to combine. Stir in the marshmallow crème and beat for around 2 minutes until creamy. Finally, fold in the thawed whipped topping and beat until just combined.
- Frost Cupcakes and Garnish: Transfer the frosting into a pastry bag fitted with a large round tip. Pipe the frosting onto the cooled cupcakes generously. Top each with candy corn pieces for decoration.
- Store Properly: Store the frosted cupcakes covered in the refrigerator for up to 3 days. Before serving refrigerated cupcakes, let them warm at room temperature for about 30 minutes if needed for the best texture and flavor.
Notes
- Ensure cream cheese is fully softened before making the frosting to avoid lumps.
- Use gel food coloring for more vibrant colors without thinning the batter.
- Be careful not to overfill the muffin cups to prevent batter overflow during baking.
- You can substitute frozen whipped topping with homemade whipped cream if preferred.
- If cupcakes are refrigerated before frosting, allow them to come to room temperature to achieve the best frosting adherence.
- Candy corn decoration is optional but adds a festive touch great for Halloween.

