- Unsalted Butter: Using unsalted butter lets you control the saltiness; look for high-quality butter for the best creamy flavor.
- Sugar: Regular granulated sugar works great here, helping create that delightful sweetness that balances the syrup.
- Buttermilk: This is the star ingredient — fresh is best for that tangy punch that makes this syrup stand out.
- Vanilla Extract: Pure vanilla really elevates the flavor profile, adding warm, aromatic notes.
- Light Corn Syrup: This adds shine and helps keep the syrup smooth and pourable without crystallizing.
- Baking Soda: Adding this at the end creates a gentle foaming that lightens the syrup’s texture — don’t skip it!
Note: Exact ingredients and measurements are listed in the recipe card below.
Variations
I like to tweak this Buttermilk Syrup Recipe every now and then depending on what I have on hand or the occasion. Don’t be afraid to make it your own — that’s what I love most about homemade recipes!
- Maple Twist: Sometimes I add a splash of real maple syrup for a deeper, woodsy flavor that pairs beautifully with pancakes.
- Dairy-Free Version: You can substitute the butter with vegan butter and use a dairy-free cultured buttermilk alternative — it works surprisingly well.
- Spiced-Up Syrup: I’ve stirred in a pinch of cinnamon or nutmeg for a cozy autumn vibe that my family adores.
How to Make Buttermilk Syrup Recipe
Step 1: Combine Ingredients in a Large Pot
Start by adding the butter, sugar, buttermilk, vanilla, and light corn syrup into a large saucepan over medium heat. I like to use a big pot because the syrup rises quickly once the baking soda is added — trust me, you want some extra room to avoid a messy boil-over! Stir gently as the butter melts and everything combines.
Step 2: Bring to a Boil
Keep stirring until the mixture is well blended, then let it come to a steady boil. This usually takes a few minutes. Watch closely here — this is when the magic begins!
Step 3: Add Baking Soda Off Heat
Remove the pot from the heat immediately and stir in the baking soda. The syrup will bubble up and grow significantly in volume, so this is why your large pot is essential. Once the fizzing settles slightly, put the pot back on low heat and stir gently for about 30 seconds. If it looks like it’s about to spill over, take it off and keep stirring until it calms down.
Step 4: Serve Immediately
I usually serve this syrup right away because it’s best warm and fresh. It thickens a little as it cools but is still delicious. Pour it over your favorite breakfast and enjoy that golden, tangy-sweet goodness!
Pro Tips for Making Buttermilk Syrup Recipe
- Use a Large Pot: I learned the hard way that this syrup foams up dramatically after adding baking soda — bigger pot equals less stress and fewer spills.
- Monitor Heat Closely: Keeping the heat medium or low prevents the syrup from scorching or boiling over too quickly.
- Add Baking Soda Off Heat: This prevents the syrup from bubbling out of control and lets you manage the foaming comfortably.
- Immediate Serving: Serve while warm; reheated syrup can separate if overheated, so gentle warming is key if you need leftovers.
How to Serve Buttermilk Syrup Recipe
Garnishes
I love topping my pancakes or waffles with a handful of fresh berries or sliced bananas alongside the Buttermilk Syrup — the fruity freshness cuts through the richness beautifully. A sprinkle of toasted nuts adds a wonderful crunch that my family always asks for.
Side Dishes
This syrup pairs perfectly with fluffy buttermilk pancakes, crisp bacon, or even fried chicken for a sweet-and-savory brunch treat. I like serving it with scrambled eggs or fresh fruit salad to round out the meal.
Creative Ways to Present
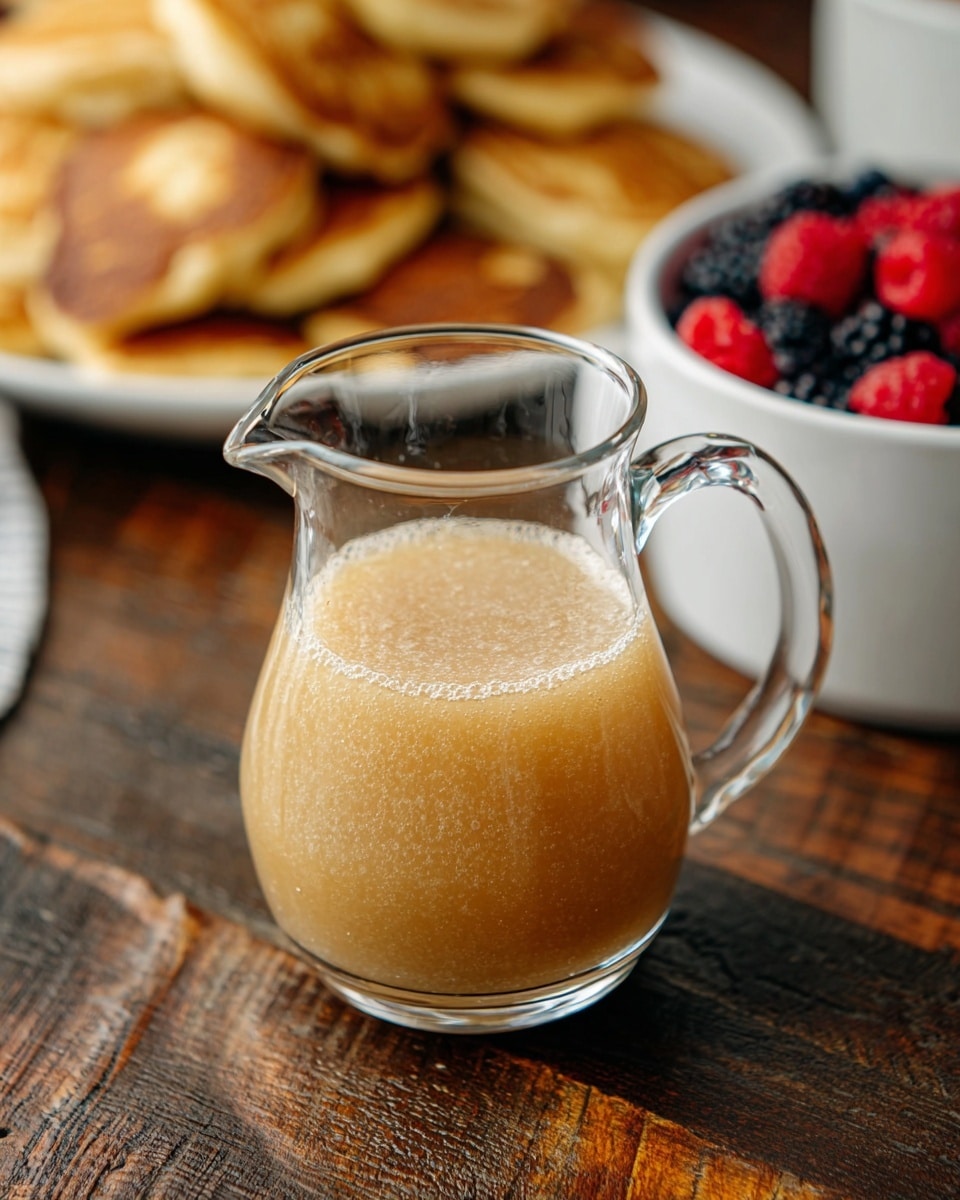
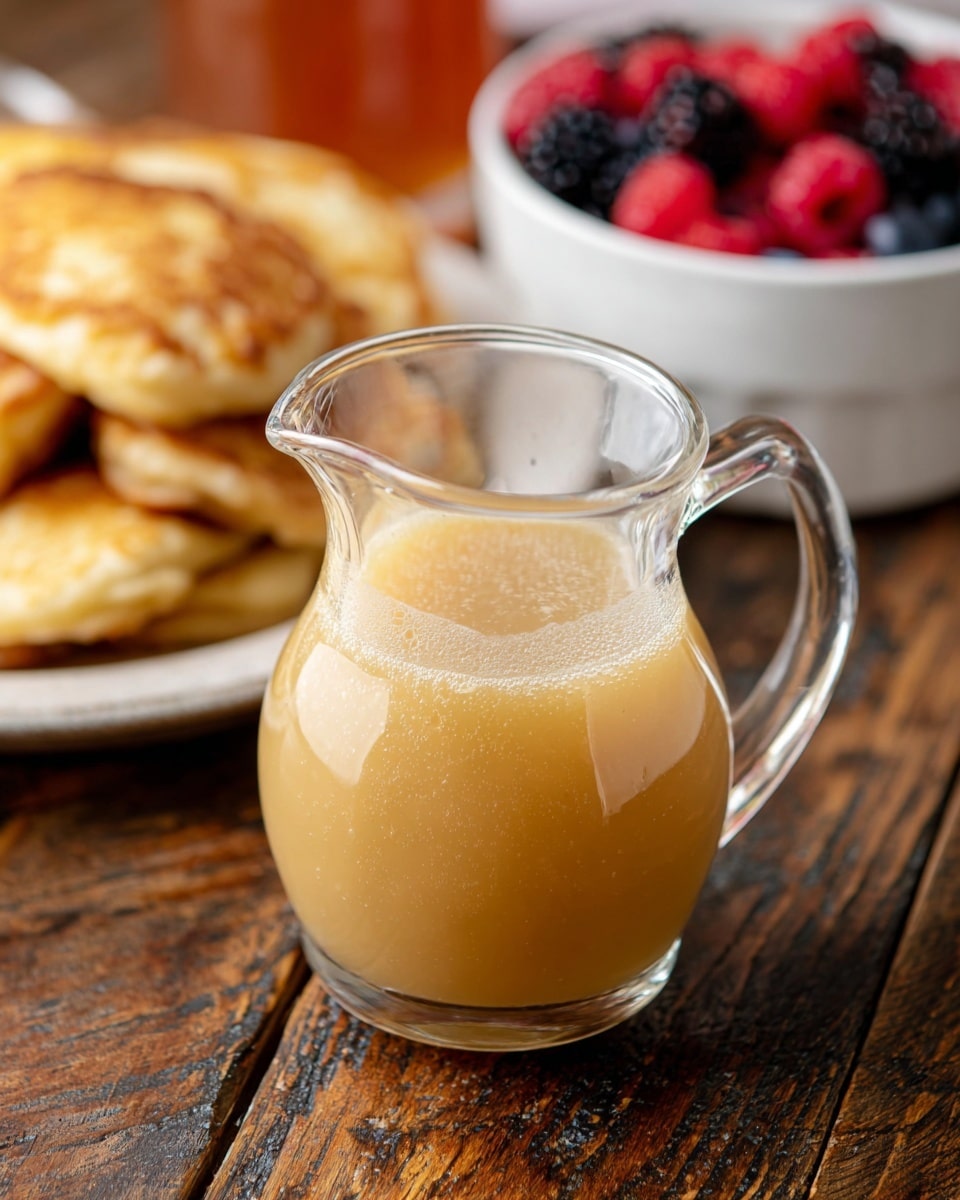
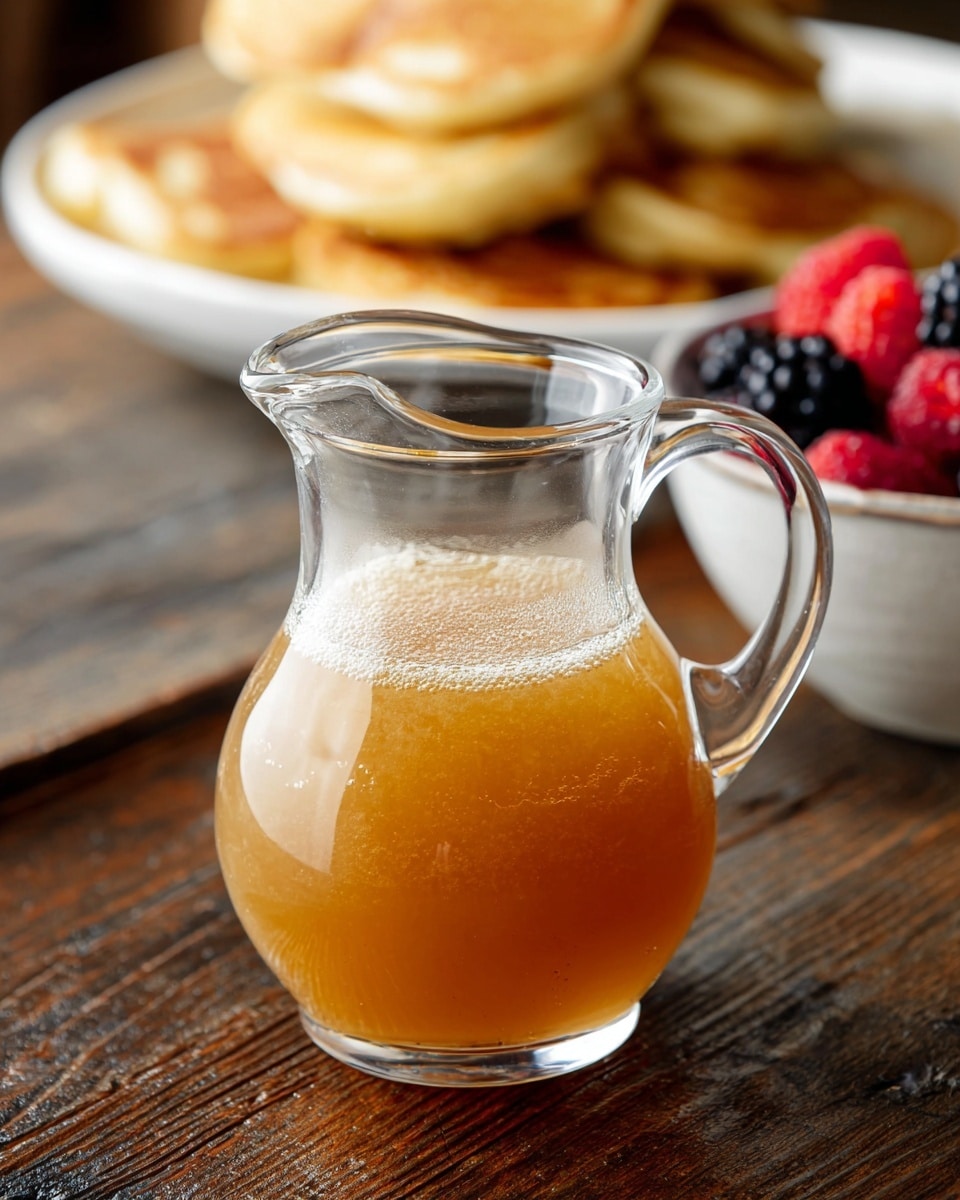
For special occasions, I like to drizzle this Buttermilk Syrup over French toast stacks garnished with edible flowers or a dusting of powdered sugar. Sometimes, I serve it warm in a pretty glass pitcher alongside a brunch spread to add an elegant touch.
Make Ahead and Storage
Storing Leftovers
If you have any syrup left (which is rare in my house!), store it in an airtight container in the fridge for up to a week. When I do this, I usually bring it to room temperature before gently reheating it on low heat to keep it smooth.
Freezing
I haven’t tried freezing this syrup because it’s so quick to make fresh, but if you want to experiment, freezing in small portions might work. Just be sure to thaw it slowly in the fridge and warm gently to avoid separation.
Reheating
Reheat leftovers gently over low heat while stirring constantly to avoid burning or curdling. I recommend adding a teaspoon of water or milk if the syrup seems too thick after refrigeration; that restores the original silky texture nicely.
FAQs
-
What if I don’t have buttermilk on hand?
You can create a simple buttermilk substitute by adding 1 tablespoon of lemon juice or white vinegar to 1 cup of milk. Let it sit for about 5 minutes before using—it won’t be exactly the same but will work well in this syrup.
-
Can I make this syrup ahead of time?
Absolutely! While this Buttermilk Syrup Recipe is best fresh, you can store leftovers in the fridge for up to a week and gently reheat. Just be gentle warming it or the texture might change slightly.
-
Why do you add baking soda?
The baking soda reacts with the acidity in the buttermilk, creating a light foam that gives the syrup a wonderfully airy texture and balances the flavors beautifully. Skipping it will result in a denser syrup.
-
Can I use this syrup on savory dishes?
Yes! I love drizzling buttermilk syrup over fried chicken or roasted vegetables for a sweet and tangy contrast. It adds a delicious twist to many savory dishes.
Final Thoughts
This Buttermilk Syrup Recipe has become such a beloved part of my kitchen routine, and I’m excited to share it with you. It’s simple, quick, and brings that perfect balance of sweet and tangy that you didn’t know you needed. Give it a try on your next brunch or breakfast — I promise you’ll find yourself making it again and again, just like I do!
I absolutely love this Buttermilk Syrup Recipe because it transforms ordinary breakfast staples into something truly special. The richness from the butter, the tang of real buttermilk, and that perfectly sweet vanilla undertone come together in a syrup that’s silky and comforting. Whether you’re drizzling it over pancakes, waffles, or even fried chicken, this syrup adds a nostalgic, homemade touch that’s hard to beat.
When I first tried this recipe, I was hooked instantly — it’s so quick to make and really elevates your morning meal. You’ll find that once you master this Buttermilk Syrup Recipe, it becomes your go-to for weekend brunches or whenever you want a little indulgence without fuss. Plus, it’s a great way to use buttermilk that’s been lingering in the fridge!
Why You’ll Love This Recipe
- Rich and Tangy Flavor: The buttermilk gives this syrup a unique tang that balances perfectly with the butter and sugar.
- Fast and Easy: You can whip this syrup up in under 10 minutes with just a few ingredients you likely already have.
- Versatile Use: It’s fantastic on pancakes, waffles, biscuits, and even drizzled over desserts or savory dishes.
- Family Favorite: My family goes crazy for this syrup, and it’s always the star of weekend breakfasts!
Ingredients You’ll Need
Each ingredient in this Buttermilk Syrup Recipe plays a key role, making sure the flavors meld perfectly while the syrup achieves that luscious texture you want. Here’s a little about what to look for when grabbing your ingredients.
- Unsalted Butter: Using unsalted butter lets you control the saltiness; look for high-quality butter for the best creamy flavor.
- Sugar: Regular granulated sugar works great here, helping create that delightful sweetness that balances the syrup.
- Buttermilk: This is the star ingredient — fresh is best for that tangy punch that makes this syrup stand out.
- Vanilla Extract: Pure vanilla really elevates the flavor profile, adding warm, aromatic notes.
- Light Corn Syrup: This adds shine and helps keep the syrup smooth and pourable without crystallizing.
- Baking Soda: Adding this at the end creates a gentle foaming that lightens the syrup’s texture — don’t skip it!
Note: Exact ingredients and measurements are listed in the recipe card below.
Variations
I like to tweak this Buttermilk Syrup Recipe every now and then depending on what I have on hand or the occasion. Don’t be afraid to make it your own — that’s what I love most about homemade recipes!
- Maple Twist: Sometimes I add a splash of real maple syrup for a deeper, woodsy flavor that pairs beautifully with pancakes.
- Dairy-Free Version: You can substitute the butter with vegan butter and use a dairy-free cultured buttermilk alternative — it works surprisingly well.
- Spiced-Up Syrup: I’ve stirred in a pinch of cinnamon or nutmeg for a cozy autumn vibe that my family adores.
How to Make Buttermilk Syrup Recipe
Step 1: Combine Ingredients in a Large Pot
Start by adding the butter, sugar, buttermilk, vanilla, and light corn syrup into a large saucepan over medium heat. I like to use a big pot because the syrup rises quickly once the baking soda is added — trust me, you want some extra room to avoid a messy boil-over! Stir gently as the butter melts and everything combines.
Step 2: Bring to a Boil
Keep stirring until the mixture is well blended, then let it come to a steady boil. This usually takes a few minutes. Watch closely here — this is when the magic begins!
Step 3: Add Baking Soda Off Heat
Remove the pot from the heat immediately and stir in the baking soda. The syrup will bubble up and grow significantly in volume, so this is why your large pot is essential. Once the fizzing settles slightly, put the pot back on low heat and stir gently for about 30 seconds. If it looks like it’s about to spill over, take it off and keep stirring until it calms down.
Step 4: Serve Immediately
I usually serve this syrup right away because it’s best warm and fresh. It thickens a little as it cools but is still delicious. Pour it over your favorite breakfast and enjoy that golden, tangy-sweet goodness!
Pro Tips for Making Buttermilk Syrup Recipe
- Use a Large Pot: I learned the hard way that this syrup foams up dramatically after adding baking soda — bigger pot equals less stress and fewer spills.
- Monitor Heat Closely: Keeping the heat medium or low prevents the syrup from scorching or boiling over too quickly.
- Add Baking Soda Off Heat: This prevents the syrup from bubbling out of control and lets you manage the foaming comfortably.
- Immediate Serving: Serve while warm; reheated syrup can separate if overheated, so gentle warming is key if you need leftovers.
How to Serve Buttermilk Syrup Recipe
Garnishes
I love topping my pancakes or waffles with a handful of fresh berries or sliced bananas alongside the Buttermilk Syrup — the fruity freshness cuts through the richness beautifully. A sprinkle of toasted nuts adds a wonderful crunch that my family always asks for.
Side Dishes
This syrup pairs perfectly with fluffy buttermilk pancakes, crisp bacon, or even fried chicken for a sweet-and-savory brunch treat. I like serving it with scrambled eggs or fresh fruit salad to round out the meal.
Creative Ways to Present
For special occasions, I like to drizzle this Buttermilk Syrup over French toast stacks garnished with edible flowers or a dusting of powdered sugar. Sometimes, I serve it warm in a pretty glass pitcher alongside a brunch spread to add an elegant touch.
Make Ahead and Storage
Storing Leftovers
If you have any syrup left (which is rare in my house!), store it in an airtight container in the fridge for up to a week. When I do this, I usually bring it to room temperature before gently reheating it on low heat to keep it smooth.
Freezing
I haven’t tried freezing this syrup because it’s so quick to make fresh, but if you want to experiment, freezing in small portions might work. Just be sure to thaw it slowly in the fridge and warm gently to avoid separation.
Reheating
Reheat leftovers gently over low heat while stirring constantly to avoid burning or curdling. I recommend adding a teaspoon of water or milk if the syrup seems too thick after refrigeration; that restores the original silky texture nicely.
FAQs
-
What if I don’t have buttermilk on hand?
You can create a simple buttermilk substitute by adding 1 tablespoon of lemon juice or white vinegar to 1 cup of milk. Let it sit for about 5 minutes before using—it won’t be exactly the same but will work well in this syrup.
-
Can I make this syrup ahead of time?
Absolutely! While this Buttermilk Syrup Recipe is best fresh, you can store leftovers in the fridge for up to a week and gently reheat. Just be gentle warming it or the texture might change slightly.
-
Why do you add baking soda?
The baking soda reacts with the acidity in the buttermilk, creating a light foam that gives the syrup a wonderfully airy texture and balances the flavors beautifully. Skipping it will result in a denser syrup.
-
Can I use this syrup on savory dishes?
Yes! I love drizzling buttermilk syrup over fried chicken or roasted vegetables for a sweet and tangy contrast. It adds a delicious twist to many savory dishes.
Final Thoughts
This Buttermilk Syrup Recipe has become such a beloved part of my kitchen routine, and I’m excited to share it with you. It’s simple, quick, and brings that perfect balance of sweet and tangy that you didn’t know you needed. Give it a try on your next brunch or breakfast — I promise you’ll find yourself making it again and again, just like I do!