

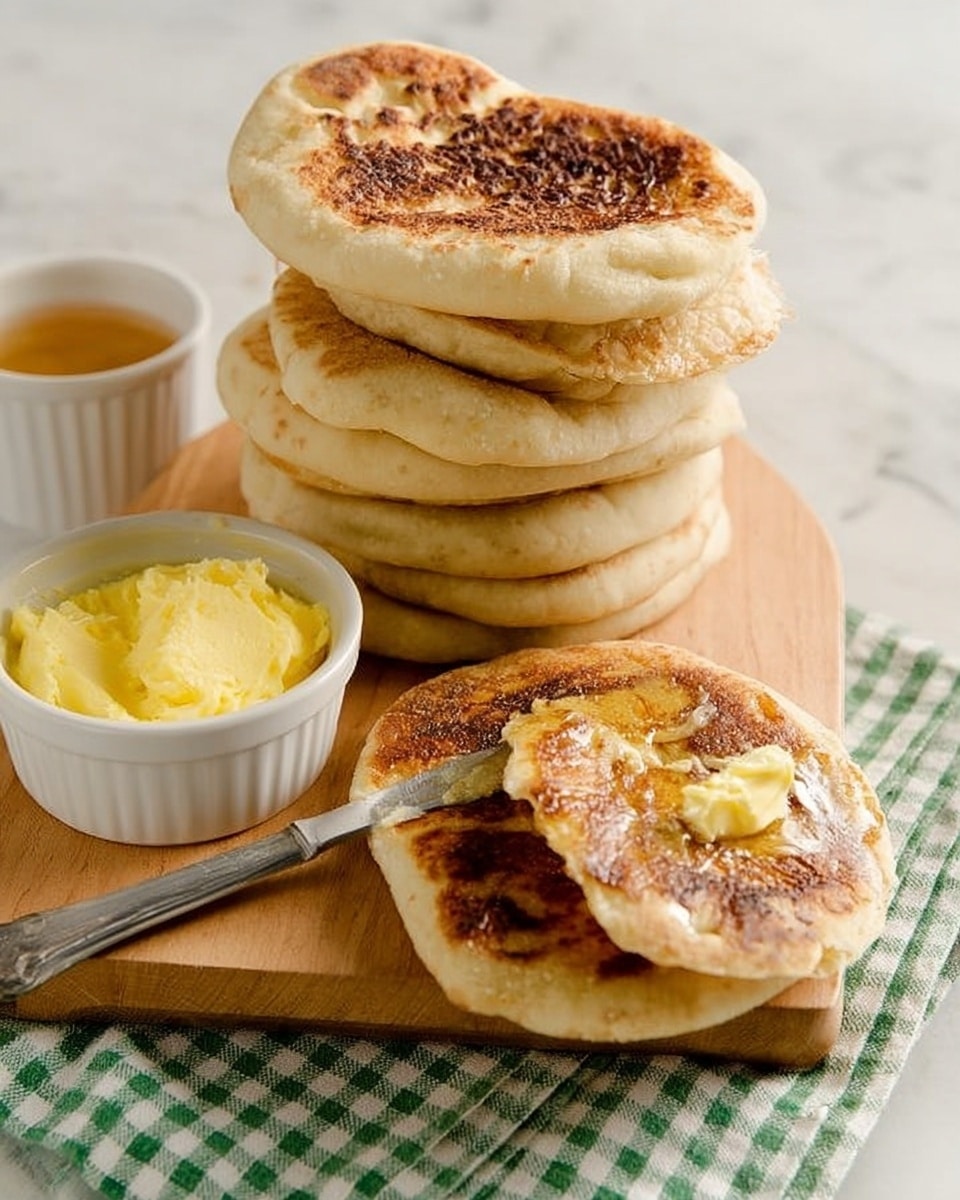
I absolutely love this Homemade English Muffins Recipe because it brings that special bakery magic right into your own kitchen. There’s something truly satisfying about pulling warm, golden English muffins fresh off the griddle and hearing that perfect crunch when you toast them. Whether you’re making breakfast for the family or prepping for a cozy brunch, these muffins are worth every minute you spend on them.
When I first tried making English muffins at home, I struggled to get that classic nooks-and-crannies texture, but this recipe nailed it for me. You’ll find that homemade versions taste way better than store-bought — plus, you can control exactly what goes in them. They’re soft, slightly chewy, and perfect for slathering with butter, jam, or layering with eggs and bacon.
Why You’ll Love This Recipe
- Authentic Texture: You get that distinctive nooks-and-crannies spongy bite made right on your stovetop.
- Simple Ingredients: No fancy extras needed—basic pantry staples come together beautifully.
- Made-From-Scratch Satisfaction: It’s incredibly rewarding to make your own muffins with love and care.
- Versatile & Delicious: Perfect for everything from breakfast sandwiches to a quick snack.

Ingredients You’ll Need
Choosing the right flours and balancing wet ingredients is key in this Homemade English Muffins Recipe. I like to use a mix of all-purpose and bread flour for that tender yet chewy crumb, and a touch of cornmeal adds the perfect rustic texture.
- Water: Warm water helps activate the yeast nicely—water that’s too hot can kill your yeast, so keep it lukewarm.
- Active Dry Yeast: This is the magic that makes your muffins rise and creates those light, airy pockets.
- Sugar: Just a little bit to feed the yeast and aid browning.
- All-Purpose Flour: Provides structure while keeping the muffins soft.
- Bread Flour: Adds extra gluten for that perfect chewiness that’s so satisfying.
- Salt: Enhances all the flavors without overpowering.
- Milk: Warm milk makes the dough rich and tender while helping it rise smoothly.
- Cornmeal: This prevents sticking and gives that classic “bite” under your fingers and teeth.
Note: Exact ingredients and measurements are listed in the recipe card below.
Variations
I love making this Homemade English Muffins Recipe my own by playing with add-ins or tweaks depending on the season or what I have in the kitchen. Feel free to get creative—you’ll enjoy customizing these muffins as much as I do!
- Whole Wheat Twist: Swap half of the all-purpose flour for whole wheat flour to add nuttiness and extra fiber—my family gobbles these up with a smear of honey.
- Herb-Infused: Add dried rosemary or thyme to the dough for a savory breakfast muffin that’s delicious with cream cheese and smoked salmon.
- Gluten-Free Version: Use a gluten-free all-purpose blend but be prepared for a slightly different texture; add xanthan gum if your blend doesn’t include it.
- Sweet Cinnamon Sugar: Sprinkle a little cinnamon sugar on the outsides before cooking for a sweeter treat perfect with butter or jam.
How to Make Homemade English Muffins Recipe
Step 1: Activate Yeast & Warm Your Flours
The first thing I do is mix the warm water, yeast, and sugar in a small bowl and let it sit until it’s bubbly and alive—about 8 minutes. Meanwhile, I combine the flours and salt in an oven-safe bowl and warm it in the oven for a few minutes; this little step helps the dough rise better by giving the flours a cozy temperature.
Step 2: Make the Dough
Once the yeast is proofed, I add it along with the milk to the warmed flour mixture in my food processor. Process the dough until it’s smooth and silky, adding a splash more water if it feels stiff—your dough should be soft but not sticky. This step is key because a smooth dough will rise beautifully and be easy to shape later.
Step 3: Let It Rise & Rest
After processing, I place the dough in a generously oiled bowl, turning it so every side gets lightly coated. Cover with a damp cloth and let it rise for about an hour, until it doubles in size. Then punch it down, knead gently on a floured surface for 3 minutes, and cover it again to rest for half an hour. These resting periods make a big difference in texture and flavor.
Step 4: Shape Your Muffins
Sprinkle cornmeal on a baking sheet so your muffins don’t stick, and gently divide the dough into eight equal pieces. Shape each into a slightly flat patty and coat both sides with cornmeal. Cover them with a damp towel and let rest another 30 minutes—you’ll notice they puff up a bit, which means they’re ready to cook.
Step 5: Cook Low & Slow
I heat a cast-iron skillet lightly oiled over low heat and cook the muffins in batches. This part requires patience because it takes about 15 minutes per side to get that beautiful golden crust without burning. Cooking them slowly ensures the inside cooks through while the outsides get just that perfect, slightly crispy finish. You’ll want to test one to make sure the heat is right before cooking the rest!
Pro Tips for Making Homemade English Muffins Recipe
- Keep the Heat Low: Patience pays off here—low and slow cooking develops flavor and texture without burning.
- Use Cornmeal Generously: It really prevents sticking and creates that classic crunchy bottom crust I adore.
- Don’t Skip the Resting: Those extra rising times give your muffins their airy structure and light crumb.
- Test Your Heat: I always do a test muffin first to avoid ruining a whole batch with too-high heat.
How to Serve Homemade English Muffins Recipe
Garnishes
Here’s where the fun really begins! I love slicing these muffins open and slathering them with butter that melts into every nook. From there, a drizzle of homemade jam, a spoonful of honey, or even a smear of cream cheese all work beautifully. For savory options, topping them with a fried egg, avocado slices, or smoked salmon always gets rave reviews from my family.
Side Dishes
These muffins pair perfectly with classic breakfast sides like crispy bacon, fresh fruit salad, or roasted potatoes. I often serve them alongside scrambled eggs or my favorite shakshuka for a hearty brunch. If you’re serving them for a snack, simple sides like a tossed green salad or a bowl of soup make great accompaniments.
Creative Ways to Present
I’ve had fun presenting these muffins stacked like mini sandwiches with layers of ham, cheese, and fresh greens for a casual lunch. For special occasions, I sometimes turn them into petite sliders or add a dusting of powdered sugar and serve with fresh berries and whipped cream for a sweet twist. A pretty platter with an array of jams, butters, and toppings lets everyone build their own masterpiece – always a crowd-pleaser!
Make Ahead and Storage
Storing Leftovers
I usually store leftover English muffins in an airtight container at room temperature for up to 3 days. This keeps them soft but still fresh enough to toast the next day. If I know I won’t eat them soon, I pop them in the fridge.
Freezing
Freezing these muffins works wonders and preserves their texture well. I slice and wrap them individually in plastic wrap, then place them in a freezer-safe bag. They thaw quickly overnight in the fridge or can be popped straight in the toaster from frozen for a quick and delicious breakfast.
Reheating
Reheating is best done by toasting or warming them in a dry skillet over medium-low heat to re-crisp the crust while heating the inside through. Avoid microwaving if you can—it tends to make muffins chewy instead of tender and crisp.
FAQs
-
Can I make this Homemade English Muffins Recipe without a food processor?
Absolutely! You can mix the dough by hand using a sturdy wooden spoon or dough whisk, then knead it on a floured surface for about 8-10 minutes until smooth. It might take a little more elbow grease but the results are just as delicious.
-
Why do these muffins need to be cooked on the stovetop instead of baked?
Cooking them low and slow on the stovetop creates that characteristic golden crust and the signature chewy texture with those wonderful nooks and crannies. Baking alone tends to produce a different texture and misses that classic English muffin charm.
-
How do I get the nooks and crannies inside the muffins?
The secret lies in the slow rising process, the mix of flours, and the gentle cooking method. Letting the dough rest multiple times allows the gluten to develop and the yeast to create those airy pockets that become the signature texture.
-
Can I use instant yeast instead of active dry yeast?
Yes, but reduce the amount slightly (about 25% less) because instant yeast is more potent. Also, you can add it directly to the dry ingredients without proofing first.
-
What’s the best way to slice homemade English muffins?
Use a fork to gently split the muffins instead of a knife. Running the tines around the edge helps open up those nooks and crannies for maximum butter absorption and texture.
Final Thoughts
Making homemade English muffins might seem like a project at first, but once you try this recipe, you’ll wonder why you ever bought them pre-made. I love how fresh and flavorful they are, and honestly, you get bonus satisfaction knowing exactly what’s inside. Next time you want a cozy breakfast or a unique sandwich base, give this Homemade English Muffins Recipe a go—you’ll be so glad you did!
PrintHomemade English Muffins Recipe

These homemade English muffins are light, fluffy, and perfectly golden with a slightly crisp exterior. Made from a tender dough that’s gently cooked on the stovetop, they are ideal for breakfast sandwiches or enjoyed toasted with butter and jam. This recipe yields 8 muffins and uses a combination of all-purpose and bread flour for a chewy texture, with cornmeal adding a classic crunch.
- Prep Time: 2 hours 15 minutes
- Cook Time: 1 hour
- Total Time: 3 hours 15 minutes
- Yield: 8 English muffins
- Category: Breakfast
- Method: Stovetop
- Cuisine: American
- Diet: Vegetarian
Ingredients
Yeast Mixture
- 1/2 cup water
- 2 1/4 tsp active dry yeast
- 1 tsp sugar
Flour Mixture
- 2 1/2 cups all-purpose flour
- 1 cup bread flour
- 1 tsp salt
Other
- 3/4 cup milk
- 2 tsp cornmeal (for dusting)
- Oil (for greasing skillet and bowl)
Instructions
- Make the dough: Preheat your oven to 250°F. In a small bowl, combine the water, active dry yeast, and sugar, then let it rest until it becomes bubbly, about 8 minutes. Meanwhile, mix the all-purpose and bread flours with salt in a large ovenproof bowl and warm it in the oven for 5 minutes. Add the warmed flour mixture and yeast mixture to a food processor fitted with a metal blade, then slowly stream in the milk while processing. Continue until the dough is smooth and rides around the blade smoothly. If the dough feels dry, add water one teaspoon at a time until it reaches a supple consistency. Transfer the dough to a large oiled bowl and turn to coat completely. Cover with a damp kitchen towel and allow to rise in a warm, draft-free spot until doubled in size, approximately 1 hour. Punch down the dough, place it on a clean surface, and knead gently for 3 minutes. Cover and rest for another 30 minutes.
- Shape the muffins: Lightly sprinkle a baking sheet with cornmeal. Divide the rested dough into 8 equal portions and gently shape each into a patty. Place these patties on the prepared baking sheet, turning them over to coat both sides lightly with cornmeal. Cover again with a damp towel and let them rest for 30 more minutes to puff slightly.
- Cook the muffins: Heat a cast-iron skillet over low heat and lightly oil it. Cook 4 muffins at a time, placing them gently in the skillet. Let them cook until the bottoms develop a golden brown color, roughly 15 minutes, then flip and cook the other side for the same amount of time. Repeat the process with the remaining muffins. Once cooked, store them in an airtight container for up to 3 days or freeze for up to 1 month. Serve warm and toasted for best flavor.
Notes
- Use low heat to prevent burning the muffins before they cook through.
- Be patient when cooking; the muffins need slow, even heat to develop their signature texture.
- The cornmeal is crucial for the classic crunch and to prevent sticking.
- For a nuttier flavor, substitute part of the all-purpose flour with whole wheat flour.
- Store in an airtight container at room temperature for up to 3 days or freeze leftover muffins.


