

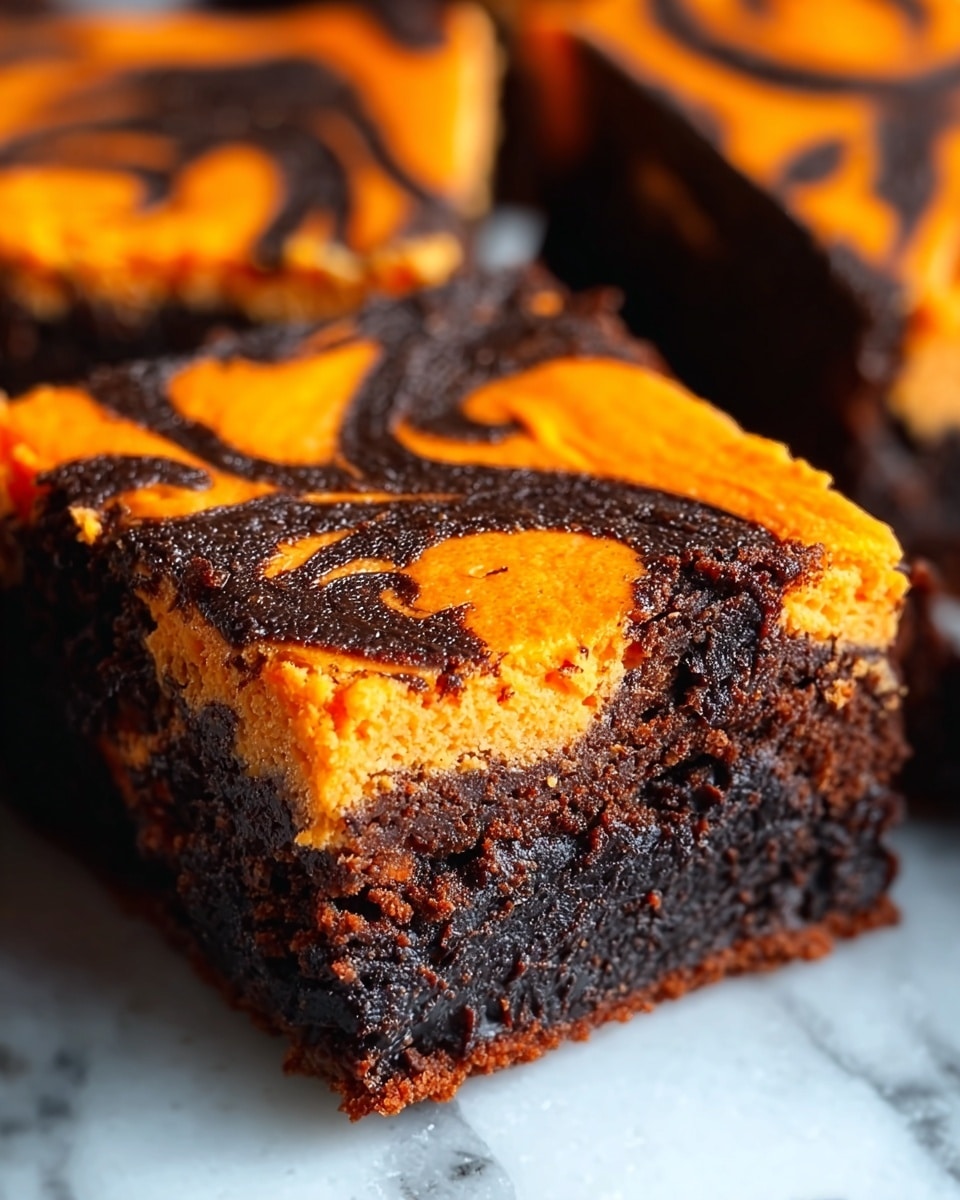
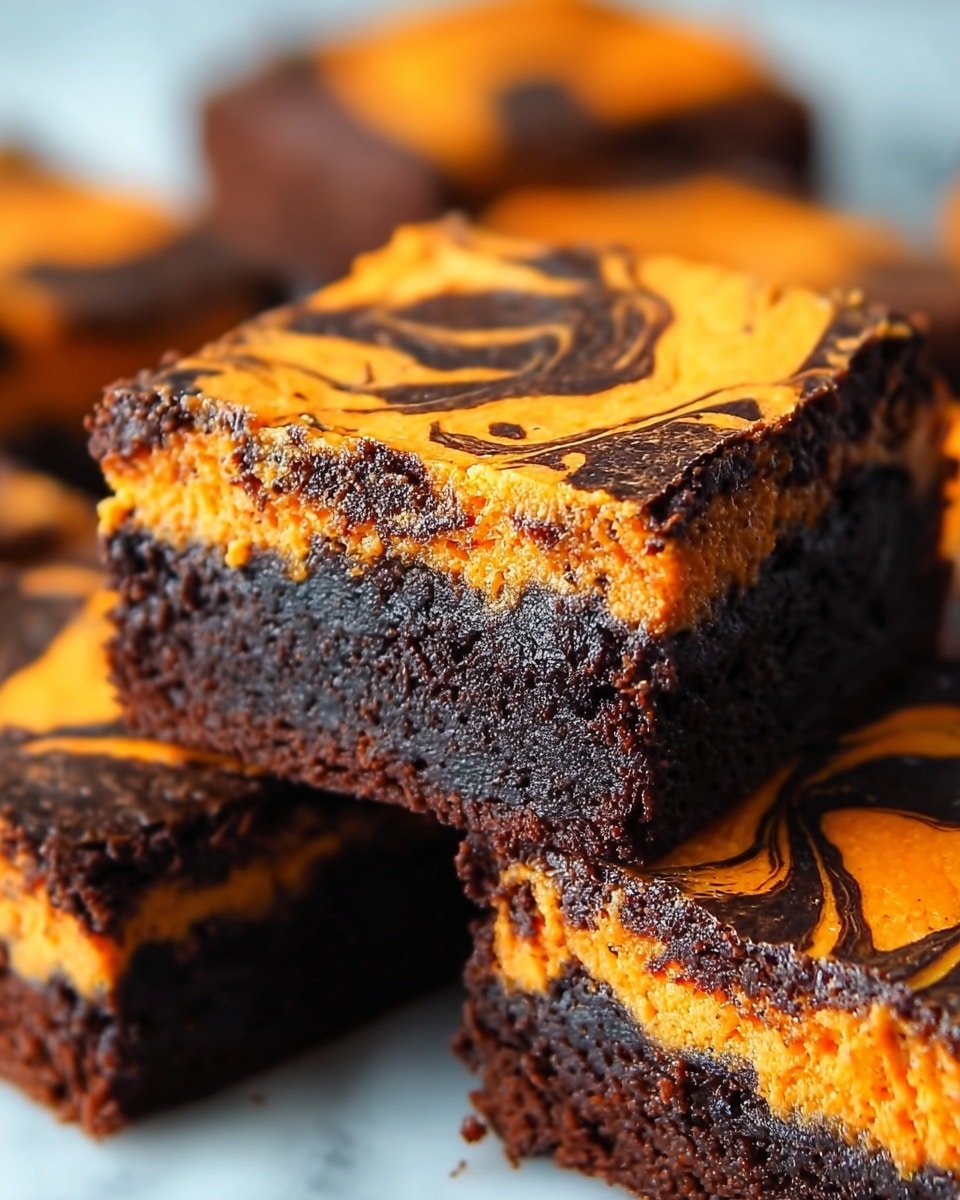
I absolutely love how this Halloween Cream Cheese Swirl Brownies Recipe combines rich, fudgy chocolate with a creamy, tangy swirl that just feels perfect for spooky season. The vibrant orange cream cheese layer not only looks festive but offers a luscious contrast to the deep cocoa flavor, making these brownies a real crowd-pleaser. Whether you’re bringing them to a Halloween party or just craving a special treat to celebrate the season, these brownies never disappoint.
When I first tried this recipe, I was surprised at how simple it is—just two batters swirled together for that stunning marbled effect. If you love brownies with a bit of creamy richness, you’ll find that this Halloween Cream Cheese Swirl Brownies Recipe strikes the perfect balance. Plus, it’s a great recipe that even beginner bakers can master with a little patience and some fun swirling creativity.
Why You’ll Love This Recipe
- Festive and Fun: The bright orange cream cheese swirl makes it an instant Halloween showstopper.
- Rich, Balanced Flavor: Deep cocoa brownies perfectly complemented by creamy, slightly tangy swirl.
- Simple Technique: Easy layering and swirling makes it doable even for novice bakers.
- Perfect for Sharing: These brownies stay moist and flavorful, great for parties or gifts.
Ingredients You’ll Need
Each ingredient in this Halloween Cream Cheese Swirl Brownies Recipe plays a key role in creating that perfect fudgy texture and creamy swirl. I always recommend using good-quality cocoa powder and real cream cheese for the best flavor and consistency.
- Granulated white sugar: Adds sweetness and helps create that shiny brownie crust we all love.
- All purpose flour: Provides structure without making the brownies too cakey.
- Hershey’s Special Dark cocoa powder: Gives the brownies a rich, intense chocolate flavor—you can substitute with unsweetened cocoa powder if needed.
- Salt: Balances the sweetness and enhances the chocolate.
- Baking powder: Helps give just a little lift—don’t skip it or the brownies might end up too dense.
- Eggs: Binder for both brownie and cream cheese layers, adding moisture and richness.
- Vegetable oil: Keeps the brownies moist and tender; you can use melted butter for a slightly different flavor.
- Vanilla extract: Adds warmth and depth to both layers.
- Cream cheese: The star of the swirl layer—use room temperature cream cheese for smooth mixing.
- Orange food coloring: For that perfect festive Halloween pop—you can adjust the amount for your preferred intensity.
Note: Exact ingredients and measurements are listed in the recipe card below.
Variations
I love playing around with this Halloween Cream Cheese Swirl Brownies Recipe! It’s flexible, so you can tailor it to your taste or dietary needs without losing any of that festive charm.
- Nutty Swirl: Add chopped pecans or walnuts into the brownie batter—I find it adds a nice crunch and depth to the texture.
- Spiced Swirl: Mix a pinch of cinnamon or pumpkin pie spice into the cream cheese layer for an autumn twist.
- Gluten-Free Option: Swap all-purpose flour for a gluten-free blend—I tried it once, and the texture was just as rich.
- Chocolate Chips: Fold in mini chocolate chips into the brownie batter before baking for extra bursts of chocolatey goodness.
How to Make Halloween Cream Cheese Swirl Brownies Recipe
Step 1: Prep Your Pan and Ingredients
Preheat your oven to 350°F (175°C). Line an 8×8-inch baking dish with parchment paper or foil, making sure to leave some overhang on the sides for easy removal later, and spray it with non-stick spray. This simple prep step helps keep your brownies from sticking and saves cleanup time.
Step 2: Mix the Dry Ingredients for the Brownie Layer
In a medium bowl, whisk together the sugar, all-purpose flour, cocoa powder, salt, and baking powder. I like to sift the cocoa powder first to avoid lumps, but if you don’t have a sifter, just mixing really well works too. This ensures your brownies have a smooth, even chocolate base.
Step 3: Combine Wet Ingredients for the Brownies
In a separate small bowl, beat the eggs, vegetable oil, and vanilla extract with a fork until fully combined. I find this step quick and easy, and mixing gently means you’re less likely to overwork the batter, so your brownies stay moist and tender.
Step 4: Combine Wet and Dry Ingredients
Pour the wet ingredients into the bowl with dry ingredients and mix using a spatula until just combined. The trick here is to avoid overmixing—you want to see a few streaks of flour here and there rather than a super smooth batter, which means the brownies will be perfectly chewy and soft.
Step 5: Reserve Batter for Swirls and Layer the Brownie Base
Take about 1/4 cup of the brownie batter and set it aside for creating the swirls later. Pour the remaining batter into your prepared baking pan and spread it out evenly with a spatula. This forms the luscious brownie base that supports the cream cheese layer.
Step 6: Prepare the Cream Cheese Swirl Layer
In a clean medium bowl, beat together the room temperature cream cheese, sugar, egg, and vanilla extract until smooth and creamy. This is where using room-temp cream cheese really pays off—it mixes effortlessly without lumps. Then stir in a few drops of orange food coloring until you get that perfect Halloween hue.
Step 7: Assemble the Swirl Layers
Gently spread the cream cheese mixture over the brownie batter layer in the pan. Try to do this carefully so you don’t disturb the brownie base too much. Next, drop spoonfuls of the reserved brownie batter on top of the cream cheese layer. Take a knife or skewer and swirl the two batters together to create beautiful marbled patterns—this is the fun part, so don’t stress if it’s imperfect.
Step 8: Bake and Cool
Bake in your preheated oven for 30 to 35 minutes. You’ll know they’re done when the cream cheese swirl is set and doesn’t jiggle when you gently shake the pan, and a toothpick inserted near the center comes out with a few moist crumbs but no raw batter. Let the brownies cool completely in the pan before slicing—this helps the layers set and makes for cleaner pieces.
Pro Tips for Making Halloween Cream Cheese Swirl Brownies Recipe
- Use Room Temp Ingredients: My secret to smooth cream cheese swirls is warming the cream cheese before mixing to avoid lumps.
- Don’t Overmix the Brownie Batter: Mixing just until combined keeps the texture rich and fudgy rather than cakey.
- Swirl Creatively: Use a toothpick or skewer in gentle, swirling motions to create eye-catching patterns without overdoing it.
- Cool Completely Before Cutting: Cooling lets the layers set for neater slices and better presentation.
How to Serve Halloween Cream Cheese Swirl Brownies Recipe
Garnishes
I love sprinkling a little festive Halloween-themed colored sugar or edible glitter on top right after swirling and before baking, which adds sparkle without compromising texture. For extra fun, you could top with mini candy pumpkins or candy eyes once cooled for a playful vibe.
Side Dishes
These brownies pair beautifully with a glass of cold milk or a warm mug of spiced pumpkin latte. For a party, I like to set them alongside other spooky treats like candied popcorn or caramel apples to create a themed dessert spread.
Creative Ways to Present
One of my favorite ways to present these is by cutting them into small, bite-sized squares and arranging them on a platter with Halloween decorations. You can also use cookie cutters to create spooky shapes like bats or ghosts before serving for an extra festive touch.
Make Ahead and Storage
Storing Leftovers
I usually store leftover Halloween Cream Cheese Swirl Brownies in an airtight container at room temperature if I plan to eat them within 2 days. For longer storage, keeping them refrigerated helps maintain freshness and flavor well up to a week.
Freezing
These brownies freeze really well! I wrap individual pieces tightly in plastic wrap, then place them in a freezer bag. When I’m ready to enjoy, I thaw them overnight in the fridge for best texture, and they taste almost as good as fresh.
Reheating
If you want to warm your brownies, I pop them in the microwave for about 15 seconds. This softens the cream cheese swirl and revives that fudgy texture without drying them out. Just be careful not to overheat or they’ll get chewy.
FAQs
-
Can I use regular cocoa powder instead of Hershey’s Special Dark in this recipe?
Absolutely! Regular unsweetened cocoa powder works perfectly fine. The special dark cocoa just gives a slightly richer chocolate flavor, but your brownies will still be delicious with standard cocoa.
-
How do I prevent the cream cheese layer from cracking?
Using room temperature cream cheese and mixing gently helps prevent cracking. Also, don’t overbake—the brownies are done when the cream cheese layer is set but still slightly jiggly in the center.
-
Can I make this recipe ahead for a party?
Yes! These brownies can be baked a day or two ahead. Just store them in the refrigerator and bring them to room temperature before serving for the best flavor and texture.
-
What’s the best way to swirl the batters?
Drop spoonfuls of reserved brownie batter randomly over the cream cheese layer and use a toothpick or knife to draw gentle, swirling S-shaped motions through both layers—avoid over-swizzling to keep distinct patterns.
Final Thoughts
This Halloween Cream Cheese Swirl Brownies Recipe has become one of my seasonal favorites because it’s as fun to make as it is to eat. I love how easy it is to transform simple brownie batter and cream cheese into a striking, indulgent treat that never fails to impress friends and family. If you want a dessert that feels festive yet comforting, give this recipe a try—you might just find it becoming your go-to Halloween tradition!
PrintHalloween Cream Cheese Swirl Brownies Recipe
Delight in the festive Halloween Cream Cheese Swirl Brownies, featuring a rich, fudgy dark chocolate brownie base swirled with a smooth, tangy orange cream cheese layer. These brownies combine classic cocoa flavors with a creamy twist, perfect for spooky celebrations or anytime you crave a decadent treat.
- Prep Time: 15 minutes
- Cook Time: 30-35 minutes
- Total Time: 45-50 minutes
- Yield: 16 brownies
- Category: Dessert
- Method: Baking
- Cuisine: American
Ingredients
For the Brownie Layer:
- 1 cup granulated white sugar
- 1/2 cup all purpose white flour
- 1/2 cup Hershey’s Special Dark cocoa powder
- 1/2 teaspoon salt
- 1/4 teaspoon baking powder
- 2 large eggs
- 1/3 cup vegetable oil
- 1 teaspoon vanilla extract
For the Cream Cheese Layer:
- 8 oz cream cheese, at room temperature
- 1/4 cup granulated white sugar
- 1 large egg
- 1/2 teaspoon vanilla extract
- Orange food coloring, as desired
Instructions
- Preheat and Prepare Pan: Preheat your oven to 350°F (175°C). Line an 8 x 8 inch baking dish with parchment paper or foil and lightly spray with non-stick spray to ensure easy removal of the brownies.
- Mix Dry Ingredients for Brownie Layer: In a medium bowl, combine 1 cup granulated sugar, ½ cup all-purpose flour, ½ cup Hershey’s Special Dark cocoa powder, ½ teaspoon salt, and ¼ teaspoon baking powder. Stir together until evenly mixed.
- Mix Wet Ingredients for Brownie Layer: In a small bowl, whisk together 2 large eggs, ⅓ cup vegetable oil, and 1 teaspoon vanilla extract until well combined using a fork.
- Combine Brownie Batter: Pour the wet ingredients into the dry ingredient mixture. Fold gently with a spatula until just combined; avoid overmixing to keep the brownies tender.
- Reserve Batter for Swirls: Set aside ¼ cup of this brownie batter for the swirls on top. Pour the remaining batter into the prepared baking dish, spreading it evenly.
- Prepare Cream Cheese Layer: In a medium bowl, blend 8 oz room temperature cream cheese, ¼ cup granulated sugar, 1 large egg, and ½ teaspoon vanilla extract until smooth and creamy.
- Add Color: Stir in orange food coloring to the cream cheese mixture until evenly tinted a bright orange hue, perfect for Halloween theme.
- Layer Cream Cheese: Gently spread the cream cheese layer evenly over the brownie batter in the pan, taking care not to disturb the base too much.
- Create Swirls: Drop tablespoon-sized dollops of the reserved brownie batter over the cream cheese layer. Using a knife or skewer, gently swirl the two layers together to create a marbled effect.
- Bake: Place the pan in the oven and bake for 30-35 minutes or until the brownies are set and a toothpick inserted near the center comes out with moist crumbs but no wet batter.
- Cool and Serve: Remove from oven and let cool completely in the pan before slicing into squares. This ensures clean cuts and allows flavors to meld.
Notes
- Make sure the cream cheese is at room temperature for a smooth, lump-free layer.
- Use parchment paper or foil for easy removal and clean slicing.
- Adjust orange food coloring to achieve your preferred shade for Halloween presentation.
- Check brownies around 30 minutes to avoid overbaking, which can dry them out.
- Store leftovers in an airtight container refrigerated for up to 4 days.


