
I absolutely love sharing this Ghost Taco Hand Pies Recipe because it combines the fun of Halloween vibes with the irresistible flavors of classic tacos. These little hand pies are perfect for a party appetizer, a kid-friendly snack, or even a creative weeknight dinner that comes together fast—seriously, about 40 minutes from start to finish. When I first made them, I was amazed at how the playful ghost shapes made everyone at the table smile before they even took a bite.
You’ll find that this Ghost Taco Hand Pies Recipe isn’t just cute—it’s practical, too. The filling is flexible enough to adapt, and the pie crusts make the perfect pocket to hold all that savory goodness without the mess. Plus, these pies travel well if you want to bring a spooky snack to friends or just sneak a few for lunch later.
Why You’ll Love This Recipe
- Fun and Festive: The ghost shapes bring an adorable Halloween twist that’s perfect for all ages.
- Simple Ingredients: Made with store-bought pie crusts and common taco fixings, it’s an easy recipe anyone can try.
- Versatile Filling: You can swap ground beef for turkey or chicken, or sneak in veggies like shredded carrot or spinach for extra nutrition.
- Perfect Snack Size: Mini hand pies are just right for dipping and sharing, making them great for parties or meal prep.
Ingredients You’ll Need
These ingredients come together to create that signature taco flavor you love, wrapped up in flaky, golden pie crust. I always recommend picking fresh veggies for optional mix-ins to add a little zing and color.
- Ground beef, turkey, or chicken: Choose lean meat for a healthier option and a clean, savory base.
- Taco seasoning: Store-bought works fine, but I sometimes mix my own to control the spice level.
- Shredded carrot: Optional but great for sneaking veggies in without changing the texture much.
- Chopped bell pepper or baby spinach: Adds brightness and freshness, plus a pop of color inside the pies.
- Pie crusts: Use two defrosted but unbaked pie crusts—pick a good-quality brand or make your own if you’re feeling adventurous.
- Shredded Mexican cheese blend: Melts beautifully and gives that authentic taco pie taste.
- Egg: For brushing the tops to get a beautiful golden shine as they bake.
- Salsa: Essential for dipping! Choose your favorite kind, whether spicy, mild, or chunky.
Note: Exact ingredients and measurements are listed in the recipe card below.
Variations
One of the things I love most about the Ghost Taco Hand Pies Recipe is how adaptable it is. I encourage you to tweak the fillings based on what you have on hand or dietary needs — that’s how you’ll make this recipe your own.
- Vegetarian Variation: Try using black beans, corn, and diced mushrooms instead of meat—I’ve done this and honestly, it’s just as satisfying!
- Spicy Twist: Add a dash of cayenne or chopped jalapeños to the filling for a little heat; my husband always requests this version.
- Gluten-Free Option: Use gluten-free pie crusts available at most stores—just handle them gently to avoid cracking.
- Cheese Variations: Swap Mexican cheese blend for pepper jack or even a tangy queso fresco for different flavor profiles.
How to Make Ghost Taco Hand Pies Recipe
Step 1: Cook Up That Flavorful Taco Filling
Start by heating a medium skillet over medium-high heat. If you’re using ground beef, toss it straight in and start breaking it apart. For ground turkey or chicken, add a little olive oil first to keep things moist. Sprinkle in your taco seasoning along with any shredded carrot or chopped veggies you want to sneak in. Cook for 5-6 minutes until nicely browned, stirring occasionally so everything cooks evenly. This is the heart of your Ghost Taco Hand Pies Recipe, so take your time breaking the meat down so it fits perfectly inside those little crusts.
Step 2: Prepare Your Ghostly Pie Crusts
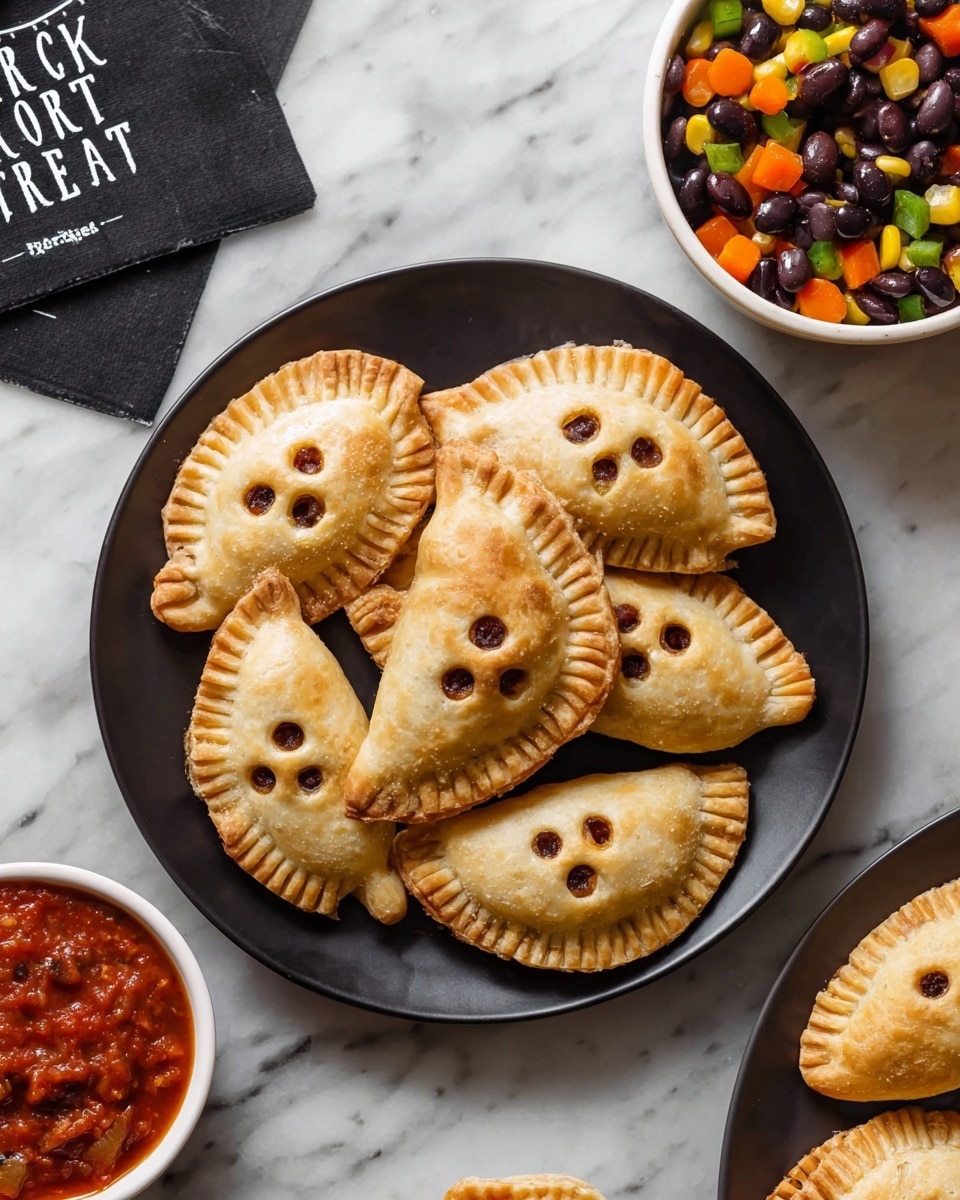
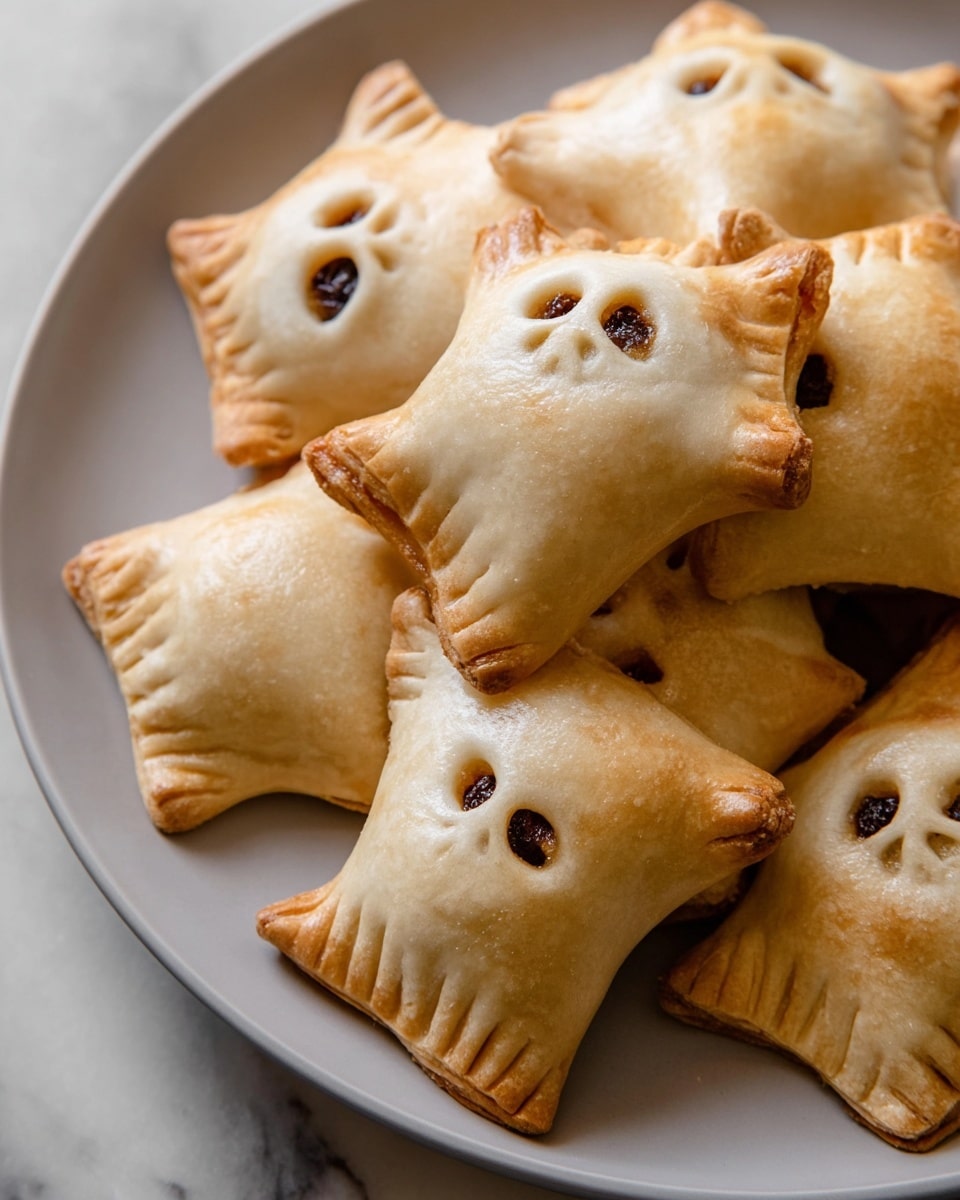
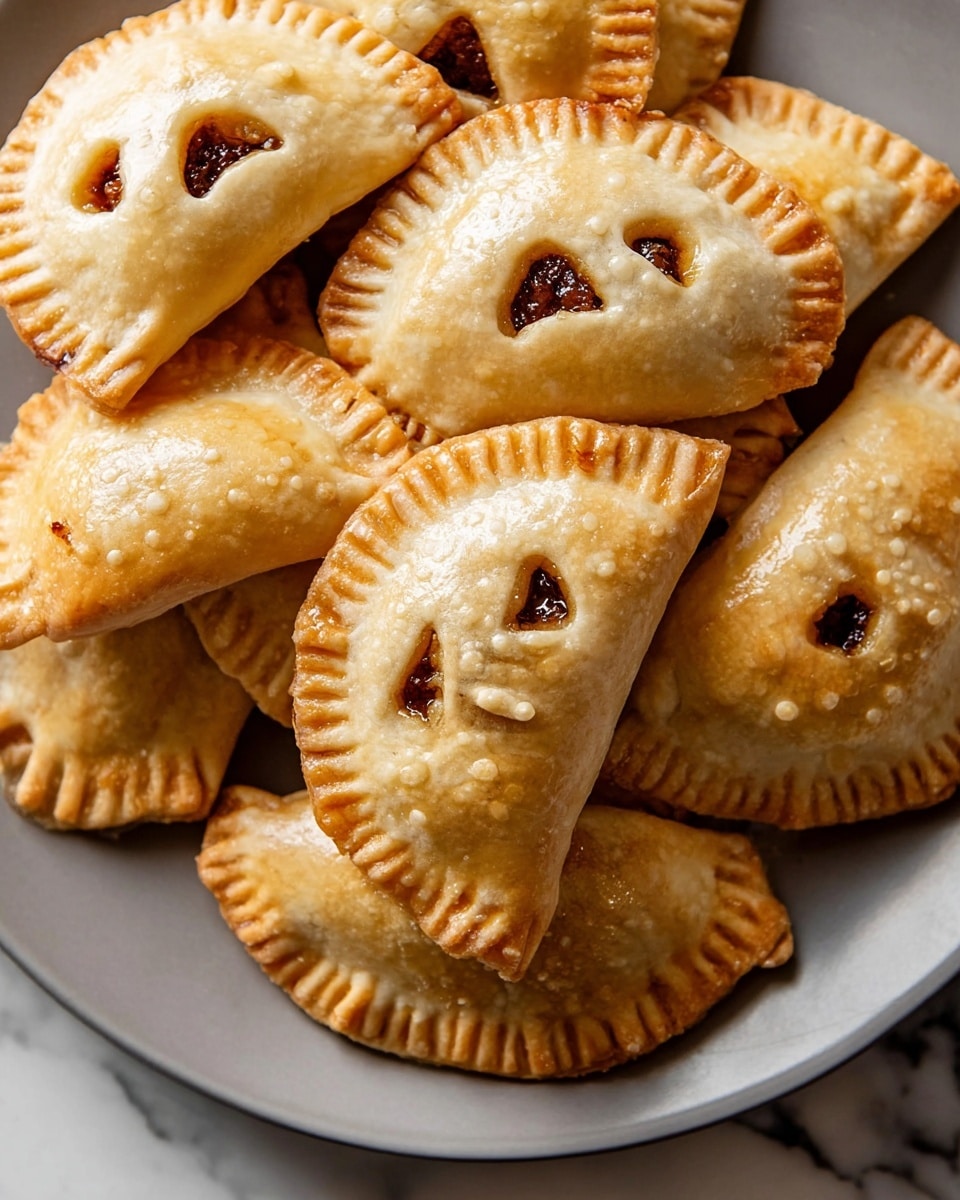
Preheat your oven to 425°F and line two baking sheets with parchment paper or silicone mats to keep things non-stick. Roll out your defrosted pie crusts on a lightly floured surface. The fun starts here—use ghost-shaped cookie cutters to cut out pairs of shapes for each mini hand pie. If you don’t have ghost cutters, any fun shape works, but I love how festive this is. Don’t throw away the scraps; just roll them out again and cut more ghosts so you use all the dough.
Step 3: Fill and Seal Your Little Ghosts
Arrange half of the ghost shapes on your work surface, leaving space between them. Spoon a small dollop of the taco filling right in the center of each, then sprinkle some shredded cheese over the filling. Now, get creative—use something small and round like a marker cap to cut out eyes and a mouth on the remaining ghost shapes. I know it sounds quirky, but it really adds to the spooky charm! Place a ghost shape with cutouts over each filled one, then use a fork’s tines to gently press around the edges and seal the pies tightly. Don’t rush this step—you want to keep your filling inside during baking.
Step 4: Brush, Bake, and Enjoy
Whisk your egg with a splash of water or milk to make an egg wash, then brush it gently over the top of each hand pie. This gives them that perfect golden glow. Bake for 10-14 minutes until the crusts are puffed and beautifully browned. Let them cool for a minute or two before serving with salsa or guacamole. Trust me, that crispy pastry paired with savory taco filling is magic—you’re going to want to make these again and again.
Pro Tips for Making Ghost Taco Hand Pies Recipe
- Avoid Soggy Bottoms: Make sure the filling isn’t too wet before filling the crusts; drain any excess liquid from the cooked meat mixture.
- Seal Edges Well: Using a fork to crimp the edges really helps prevent leaks while baking—don’t skip it!
- Use Cold Pie Crust: Keeping the dough chilled until cutting and filling helps keep the crust flaky and prevents shrinking.
- Don’t Overfill: Filling too much can cause the pies to burst open, so stick to small spoonfuls for neat results.
How to Serve Ghost Taco Hand Pies Recipe
Garnishes
I like to keep it simple and fresh when garnishing these Ghost Taco Hand Pies. A sprinkle of chopped cilantro and a dollop of sour cream or guacamole on the side really elevates the experience. Sometimes I even line them up with sliced jalapeños or a squeeze of lime to brighten every bite.
Side Dishes
To round out the meal, I often serve these hand pies with a crunchy green salad dressed in lime vinaigrette or a simple Mexican street corn salad. Chips and salsa or a creamy bean dip are excellent if you’re serving these as party snacks.
Creative Ways to Present
For a Halloween bash, I’ve arranged the Ghost Taco Hand Pies around a big bowl of salsa set in the middle of a platter lined with fresh cabbage leaves for a spooky, festive display. Kids love decorating their own pies with sour cream faces or little olive eyes, turning snack time into a fun activity.
Make Ahead and Storage
Storing Leftovers
I usually store leftover hand pies in an airtight container in the fridge and eat them within 2 days. They hold up well, but the crust is best enjoyed fresh, so I recommend reheating (more on that below) to recapture some crispness.
Freezing
This is a recipe that freezes beautifully. I freeze the unbaked pies lined on a tray first, then transfer them to a freezer bag. When I’m ready, I bake them straight from frozen—just add a few extra minutes to the baking time. It’s saved me on busy days more than once!
Reheating
To reheat, I pop the pies in a 350°F oven for about 10 minutes or so until warmed through and the crust is slightly crisp again. Microwave is doable in a pinch but tends to soften the crust too much, so the oven is my go-to method.
FAQs
-
Can I use homemade pie crust for the Ghost Taco Hand Pies Recipe?
Absolutely! Homemade pie crust will work wonderfully and can add an extra touch of flakiness and flavor. Just be sure it’s well chilled before rolling out and cutting the ghost shapes to ensure the best texture.
-
What are some good substitutions for ground beef?
You can use ground turkey or chicken for a leaner option, or even plant-based ground meat if you want to make this vegetarian-friendly. Just adjust cooking times slightly based on your protein choice.
-
How do I prevent the hand pies from leaking?
Don’t overfill the pies and make sure to press the edges firmly with a fork to seal them well. Also, draining any excess moisture from your filling before assembling helps keep everything contained during baking.
-
Can I prepare these hand pies ahead of time?
Yes! You can assemble the pies and refrigerate them for a few hours before baking, or freeze them unbaked as mentioned earlier. Just make sure to adjust baking time if baking from frozen.
Final Thoughts
Honestly, this Ghost Taco Hand Pies Recipe has become a go-to for me when I want something festive yet easy to make. Every time I serve them, the combination of that warm, cheesy filling and the flaky crust delights everyone around the table. If you love taco night but want to mix things up and impress with a little spooky charm, this recipe is your new best friend—give it a try, and I promise it’ll become a favorite in your household, too!
PrintGhost Taco Hand Pies Recipe

Ghost Taco Hand Pies are a fun and festive twist on classic tacos, perfect for parties or Halloween celebrations. These mini hand pies feature a flavorful taco filling wrapped in a flaky pie crust shaped like ghosts, baked to golden perfection and served with salsa or guacamole for dipping.
- Prep Time: 20 minutes
- Cook Time: 20 minutes
- Total Time: 40 minutes
- Yield: 15 mini hand pies
- Category: Appetizer
- Method: Baking
- Cuisine: Mexican-American Fusion
Ingredients
Filling
- 1 pound lean ground beef, ground turkey, or chicken
- 1 Tablespoon taco seasoning
- 1/4 cup shredded carrot (optional)
- 1/4 cup chopped bell pepper or baby spinach (optional)
Pie Crust
- 2 pie crusts, defrosted but unbaked
Topping
- 1/3 cup shredded Mexican cheese
- 1 egg, for brushing
To Serve
- Salsa or guacamole for dipping
Instructions
- Prepare the Taco Filling: Heat a medium skillet over medium-high heat. Add the ground beef, breaking it into crumbles as it cooks. If using ground turkey or chicken, first warm a drizzle of olive oil in the skillet. Add taco seasoning and optional shredded carrot or chopped bell pepper/spinach. Cook for 5-6 minutes until the meat is browned and cooked through. Remove from heat and set aside.
- Preheat the Oven: Preheat your oven to 425°F (220°C). Line two large baking sheets with parchment paper or silicone baking mats to prevent sticking.
- Cut Pie Crusts: Roll out the defrosted pie crusts on a lightly floured surface. Use ghost-shaped cookie cutters to cut out an even number of ghost shapes – one top and one bottom for each pie. Gather and re-roll scraps as needed to use all the dough.
- Assemble Hand Pies: Place half of the ghost shapes on your work surface. Spoon a small amount of taco filling onto the center of each ghost shape, then sprinkle a little shredded Mexican cheese over the filling.
- Create Faces and Seal: Using a small round cutter or similar tool, cut out eyes and mouth shapes from the remaining ghost cutouts. Place these cutouts over the filled ghosts. Use the tines of a fork to gently press and seal the edges of each mini pie.
- Brush with Egg Wash: Mix the egg with a splash of water or milk to make an egg wash. Brush this over the tops of the hand pies to achieve a glossy, golden finish when baked.
- Bake: Place the baking sheets in the preheated oven and bake for 10-14 minutes, or until the tops are golden brown and the crust is cooked through.
- Serve: Allow the hand pies to cool for a minute or two before serving. Serve warm with salsa or guacamole for dipping. Enjoy your festive Ghost Taco Hand Pies!
Notes
- Optional vegetables like shredded carrot or bell pepper can add extra flavor and nutrition to the filling.
- You can substitute ground beef with turkey or chicken for a leaner option.
- Be sure to seal edges well to prevent filling from leaking during baking.
- Use pizza cutters or pastry wheels if you don’t have ghost-shaped cutters to create fun shapes for the pies.
- Serve these hand pies warm for the best taste and texture.
- Leftovers can be refrigerated and reheated in the oven to maintain crispiness.


