

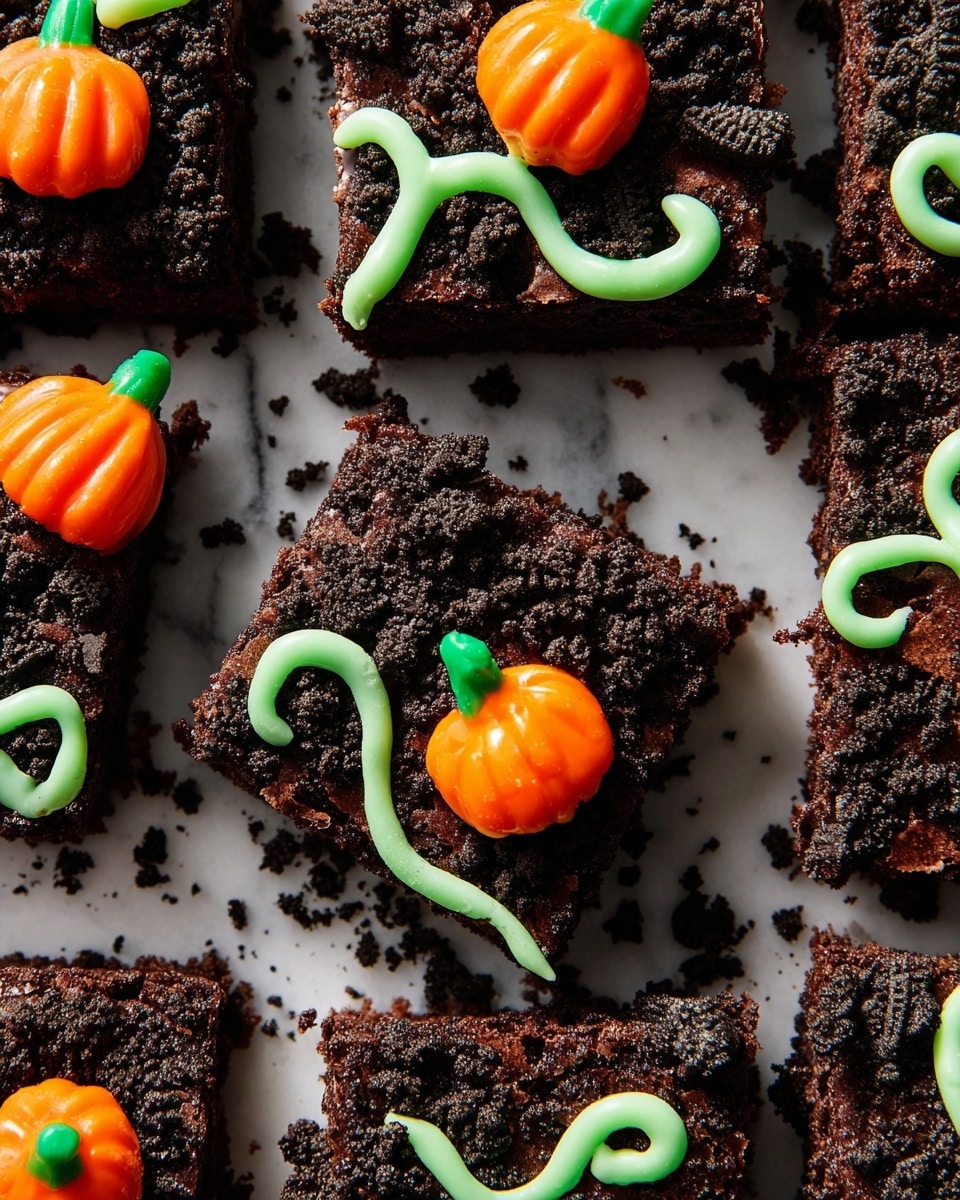
I absolutely love this Pumpkin Patch Brownies Recipe because it brings together the chocolatey goodness of classic brownies with a fun and festive pumpkin patch twist. Whether you’re making it for a fall gathering, Halloween party, or just a cozy weekend treat, these brownies never fail to impress with their unique vibe and delicious flavors.
When I first tried this recipe, I was instantly hooked by how easy it is to elevate a simple boxed brownie mix into something truly special. You’ll find that the crushed Oreos add a delightful crunch, while the green white chocolate “vines” and pumpkin candies turn it into a perfect edible decoration. It’s a great recipe to share with kids too – they love helping with the piping and decorating!
Why You’ll Love This Recipe
- Simple to Make: Uses a boxed mix with quick additions for a stress-free baking day.
- Festive Presentation: Green white chocolate vines and pumpkin candies make it a seasonal showstopper.
- Textural Contrast: Creamy frosting, crunchy Oreos, and soft brownies create an irresistible combo.
- Perfect for All Ages: Kids love the decorating part, and adults enjoy the flavor layers.
Ingredients You’ll Need
The ingredients for this Pumpkin Patch Brownies Recipe come together to create a festive dessert without complicating things. A boxed brownie mix is the base, complemented by white chocolate for the vines and chocolate frosting for richness, plus Oreos and pumpkin candies for that final themed touch.
- Brownie mix: A quality boxed mix simplifies the process and ensures deep chocolate flavor.
- White chocolate chips: Used for melting and tinting green to create piped vines; melts smoothly in the microwave.
- Vegetable oil: Helps thin the white chocolate for easier piping and a shiny finish.
- Green food coloring: A little goes a long way to achieve vibrant green vines.
- Chocolate frosting: Acts as a rich, fudgy base layer to hold toppings in place.
- Crushed Oreos: Add crunch and a touch of cookies-and-cream flavor that contrasts beautifully with the brownies.
- Pumpkin candies: The stars of the “patch,” adding color and fun to the presentation.
Note: Exact ingredients and measurements are listed in the recipe card below.
Variations
I love how flexible the Pumpkin Patch Brownies Recipe is. You can easily swap out ingredients or add your own touches to match dietary needs or personal preferences. These little changes keep the recipe feeling fresh every time I make it.
- Using Dark Chocolate: I sometimes substitute white chocolate chips with dark chocolate for the vines to add a more intense flavor and less sweetness.
- Gluten-Free Option: Try a gluten-free brownie mix if you want to cater to gluten sensitivities without losing flavor.
- Spiced Twist: Adding a teaspoon of pumpkin pie spice to the brownie mix gives a warm autumnal flavor I adore.
- Dairy-Free: Use a dairy-free frosting and substitute white chocolate with a vegan alternative – I’ve done this and it works wonderfully.
How to Make Pumpkin Patch Brownies Recipe
Step 1: Prep and Bake the Brownies
Preheat your oven to 350°F and line a 9×13-inch pan with parchment paper, making sure to grease it lightly with cooking spray to prevent sticking. Prepare your brownie batter according to the package instructions — I always like to give it a quick stir to ensure everything is well combined. Pour the batter into your prepared pan, smoothing out the top. Bake in the oven for about 28 to 30 minutes, or until a toothpick inserted in the center comes out with moist crumbs attached. Let the brownies cool completely in the pan before moving on; this part is crucial so the frosting doesn’t melt.
Step 2: Make the Green Chocolate Vines
In a small microwave-safe bowl, combine the white chocolate chips with the tablespoon of vegetable oil and add drops of green food coloring until you reach your desired vine color. Microwave the mixture in 30-second bursts, stirring well after each interval, until the chocolate is fully melted and silky smooth. Transfer this green chocolate to a small resealable bag and snip off a tiny corner to create your piping bag. When you pipe, keep your hand steady and draw playful swirls and vines across the top of the frosting for that pumpkin patch effect.
Step 3: Assemble and Decorate
Spread a generous layer of chocolate frosting evenly over your cooled brownies. Next, sprinkle the crushed Oreos to add a neatly textured surface that mimics soil in the patch. Using your green chocolate piping bag, pipe vines decoratively across the frosting. Finally, scatter the pumpkin candies around, making sure to space them out for a charming, natural look. This step is where the brownies really come to life visually — I always find it fun, and my family loves helping decorate!
Pro Tips for Making Pumpkin Patch Brownies Recipe
- Don’t Skip Cooling: I learned the hard way that letting brownies cool completely is key to clean frosting and sharp vine piping.
- Microwave White Chocolate Slowly: Heating white chocolate in short bursts prevents burning and keeps it smooth for easy piping.
- Use Parchment Paper for Easy Cleanup: This makes it a breeze to lift the entire brownies slab out for decorating and slicing.
- Pipe Carefully and Have Fun: Vine designs don’t have to be perfect — the charm is in the imperfect swirls, so relax and enjoy the decorating process!
How to Serve Pumpkin Patch Brownies Recipe

Garnishes
For garnishes, I like to stick with the pumpkin candies since they tie the whole look together so well, but you can also add mini candy corns, colored sprinkles, or even a light dusting of powdered sugar for a hint of “fall frost.” If you want to get creative, tiny edible leaves or cinnamon sticks make cute additions, especially for parties.
Side Dishes
These brownies are perfect on their own as a dessert, but I sometimes pair them with a scoop of vanilla ice cream or a dollop of whipped cream to balance the richness. A hot cup of spiced apple cider or a creamy pumpkin latte nearby completes the cozy vibe perfectly.
Creative Ways to Present
If you’re making this for a party, try cutting the brownies into fun pumpkin shapes using cookie cutters before decorating. Another idea I’ve tried is serving the brownies on a rustic wooden board with a scattering of autumn leaves and tiny pumpkins around for a festive display that guests can’t resist.
Make Ahead and Storage
Storing Leftovers
I usually store leftover Pumpkin Patch Brownies in an airtight container at room temperature for up to three days. This keeps the frosting nice and soft without drying out the brownies. If your kitchen is warm, refrigeration works too, but let them return to room temp before serving.
Freezing
I’ve had great success freezing uncut brownies—just wrap the entire pan tightly in plastic wrap and then foil. When you’re ready, thaw overnight in the fridge, then decorate and add toppings just before serving. This trick is a lifesaver when prepping for a big party.
Reheating
Reheating isn’t usually necessary, but if you want warm brownies, I pop a piece in the microwave for about 10 seconds. Be careful — don’t overheat or you risk melting the frosting and losing that perfect pumpkin patch look!
FAQs
-
Can I make the Pumpkin Patch Brownies Recipe from scratch instead of using a boxed mix?
Absolutely! While the boxed mix keeps things quick and foolproof, you can substitute your favorite homemade brownie recipe in the step where you prepare the batter. Just make sure your brownies bake up moist and not too cakey for the best texture under the frosting and toppings.
-
What type of green food coloring works best for the white chocolate vines?
I recommend using gel food coloring because it gives more vibrant color without thinning out the chocolate too much. Liquid food coloring works, but you’ll need less to avoid making the chocolate too runny for piping.
-
Can I prepare these brownies a day ahead?
Yes! I often prepare the brownies and bake them a day in advance. I frost and decorate them the next day to keep everything fresh and prevent the frosting from soaking into the brownies overnight.
-
How do I prevent the white chocolate vines from breaking once set?
Make sure your white chocolate isn’t too thick when piping; adding oil helps. Also, allow the chocolate to set at room temperature — avoid chilling them immediately, which can cause cracking. Handle the brownies gently after the chocolate sets.
Final Thoughts
This Pumpkin Patch Brownies Recipe holds a special place in my kitchen because it’s a simple way to bring a bit of festive joy to any occasion. It’s fun to make, tastes indulgent without being complicated, and truly brings smiles to everyone who tries it. I hope you’ll give it a go and enjoy the process as much as the delicious results – it’s like creating a little edible pumpkin patch right in your home!
PrintPumpkin Patch Brownies Recipe

These Pumpkin Patch Brownies combine rich, fudgy chocolate brownies with festive fall decorations. Topped with chocolate frosting, crushed Oreos that mimic soil, green-tinted white chocolate vines, and adorable pumpkin candies, these treats are perfect for Halloween parties or autumn gatherings.
- Prep Time: 20 mins
- Cook Time: 30 mins
- Total Time: 1 hr
- Yield: 8 – 10 servings
- Category: Dessert
- Method: Baking
- Cuisine: American
Ingredients
Brownie Base
- 1 box brownie mix, plus ingredients called for on box (typically eggs, oil, and water)
Toppings and Decorations
- 1 cup white chocolate chips
- 1 Tbsp. vegetable oil
- Green food coloring, amount as needed
- 1 can chocolate frosting
- 1 cup crushed Oreos
- Pumpkin candies, quantity as desired for decoration
Instructions
- Prepare Brownies: Preheat your oven to 350°F (175°C). Line a 9-x-13-inch baking pan with parchment paper and grease it lightly with cooking spray. Prepare the brownie batter according to the package instructions, then pour it evenly into the prepared pan. Bake for 28 to 30 minutes, or until a toothpick inserted in the center comes out with moist crumbs. Allow the brownies to cool completely before decorating.
- Make Green Chocolate Vines: In a small microwave-safe bowl, combine the white chocolate chips, vegetable oil, and green food coloring. Microwave in 30-second intervals, stirring in between, until completely melted and smooth. Transfer the melted green chocolate to a small zip-top bag, snip off one corner, and prepare to pipe vines onto the brownies.
- Decorate Brownies: Spread an even layer of chocolate frosting over the cooled brownies. Sprinkle the crushed Oreos evenly across the frosting to resemble garden soil. Pipe green chocolate in vine shapes over the surface. Finally, scatter pumpkin candies across the top to create a festive pumpkin patch look. Allow the chocolate to set before serving.
Notes
- Use parchment paper to make removing brownies from the pan easier and to achieve clean edges.
- Adjust the amount of green food coloring to achieve the desired shade of green for the vines.
- If desired, substitute the chocolate frosting with cream cheese frosting for a tangier flavor.
- Store brownies in an airtight container at room temperature for up to 3 days or refrigerate for longer freshness.
- Microwave times may vary; melt the white chocolate slowly to prevent burning.

