

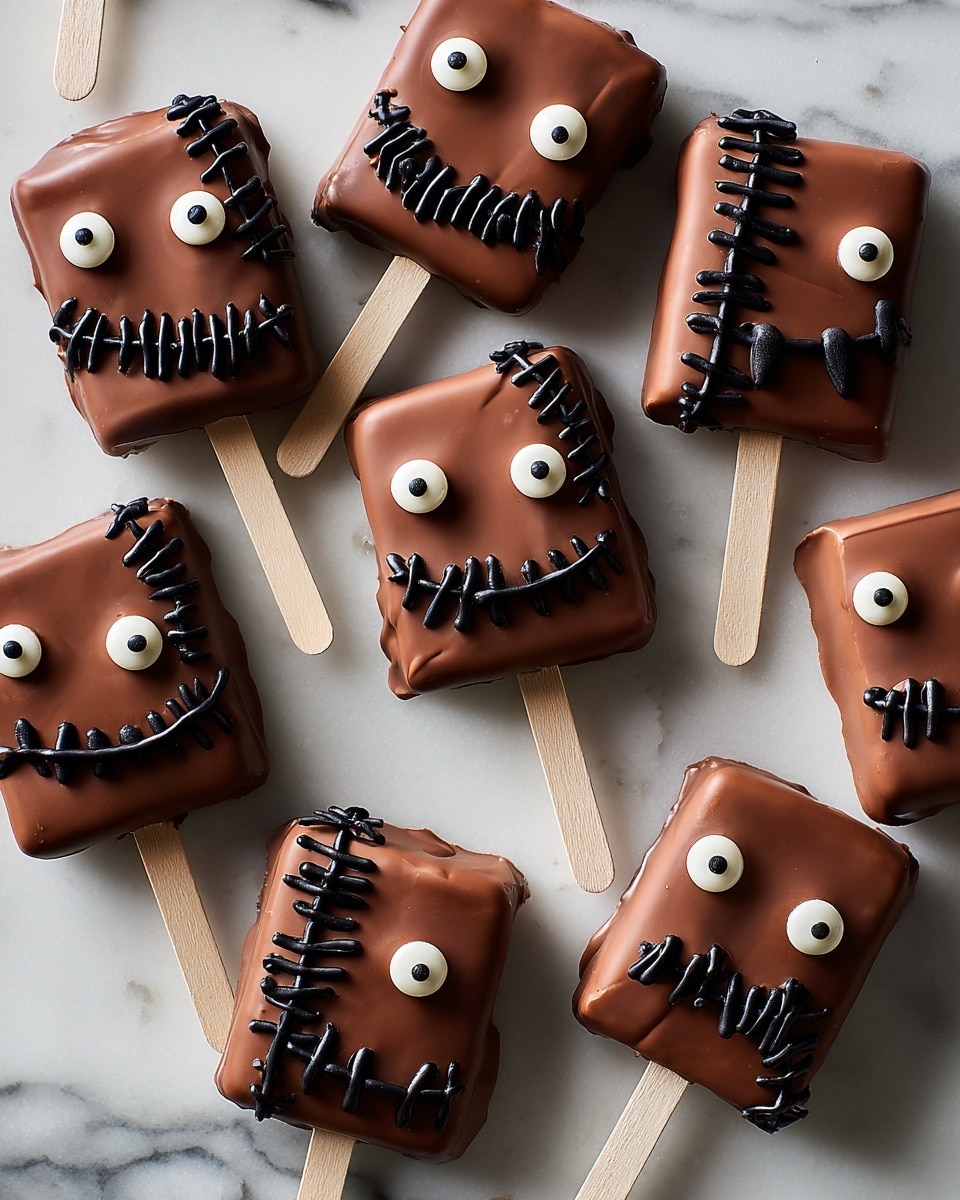
If you’re looking for a fun, spooky treat that’s as easy as it is delicious, I absolutely love how this Hocus Pocus S’mores Pops Recipe turns out every time! These cute little pops combine all the nostalgic goodness of s’mores with a playful Halloween twist — perfect for parties, cozy movie nights, or just when you want to impress your friends with minimal effort.
When I first tried this recipe, I was blown away by how simple it was to turn a classic into something festive and magical. You’ll find that the mix of creamy marshmallow, melty chocolate, and crunchy graham crackers hits all the right notes, while the candy eyes add a fun, whimsical touch that kids and adults both adore.
Why You’ll Love This Recipe
- Quick and Easy: You can whip up these s’mores pops in under 30 minutes, making them perfect for last-minute Halloween festivities.
- Kid-Friendly Fun: Decorating with candy eyes and frosting turns this into a hands-on activity your little ones will love.
- Creative Presentation: These aren’t your average s’mores — the popsicle sticks and spooky design elevate them to a festive treat.
- Versatile Snack: They’re fantastic for classroom parties, neighborhood trick-or-treaters, or just an indulgent at-home dessert.

Ingredients You’ll Need
To make these magical Hocus Pocus S’mores Pops Recipe treats, you need just a few simple ingredients that come together beautifully. Each one plays an important role in making the pops as delicious and festive as they look.
- Graham crackers: Breaking them in half gives the perfect base size for a handheld pop; look for fresh, sturdy crackers that won’t crumble easily.
- Marshmallow crème: This creamy spread melts nicely and helps hold the graham crackers and stick together perfectly.
- Semisweet chocolate chips: I always choose semisweet for that balance of rich chocolate flavor without being too bitter or too sweet.
- Coconut oil: Helps smooth out the chocolate when melting for a glossy, easy-to-dip coating.
- Candy eyes: They add that whimsical, spooky vibe — find a large bag so you have plenty to decorate multiple pops.
- Black cookie frosting: Perfect for drawing ‘stitches’ and spooky details, making the pops look extra witchy and fun.
Note: Exact ingredients and measurements are listed in the recipe card below.
Variations
I love making this Hocus Pocus S’mores Pops Recipe my own by switching up flavors and decorations—it’s super flexible, so you can customize it to your taste or dietary needs.
- Chocolate Variation: Sometimes I swap semisweet chocolate chips for white chocolate or peanut butter chips for a sweeter or nuttier twist.
- Gluten-Free Option: Use gluten-free graham crackers if you have dietary restrictions. I’ve done this and the texture still works beautifully.
- Vegan Adaptation: Look for vegan marshmallow crème and dairy-free chocolate chips — I discovered this trick to make it fit a plant-based diet without losing any flavor.
- Decorating Fun: Feel free to add sprinkles, edible glitter, or colored frosting to match a party theme or your mood!
How to Make Hocus Pocus S’mores Pops Recipe
Step 1: Assemble Your S’mores Pops
Start by spreading about one tablespoon of marshmallow crème onto half of the graham cracker halves — this acts like glue. Then, place a popsicle stick halfway into the marshmallow, so it sticks out like a handle. Top with the other graham cracker half to create a sandwich. Arrange them on a parchment-lined baking sheet and pop the whole tray in the freezer. This chilling step is crucial; it firms up the marshmallow and keeps everything together when you dip the pops later.
Step 2: Melt the Chocolate Sauce
In a medium heatproof bowl, combine your semisweet chocolate chips and coconut oil. Microwave in 20-second increments, stirring well between each, until you have a smooth, glossy chocolate sauce — usually about one minute total. Stirring between increments prevents the chocolate from burning and helps create that perfect silky texture.
Step 3: Dip and Decorate
Now for the fun part: dip each graham cracker sandwich completely into the melted chocolate. You might need to use a butter knife or silicone spatula to cover the sides thoroughly. While the chocolate is still wet, stick one candy eye on each “book,” placing it toward the far right side about halfway down. Then, put your pops back on the baking sheet and refrigerate for about 15 minutes to set the chocolate.
Step 4: Add Final Spooky Details
Using black cookie frosting, draw a circle around each candy eye to make it pop out. Then, add two semicircles on the outer corners of the graham cracker “book” to mimic animated eyes, and create cute “stitches” on the chocolate covering. This decorating step brings the whole Hocus Pocus vibe to life! Let the decorated pops chill in the fridge again for at least 15 more minutes to let the frosting set completely.
Pro Tips for Making Hocus Pocus S’mores Pops Recipe
- Keep Pops Cold: Freezing the assembled marshmallow and cracker sandwiches seals them perfectly so they don’t fall apart during dipping.
- Use Coconut Oil for Smooth Dipping: It thins the chocolate and helps it set with a beautiful shine, which makes your pops look extra professional.
- Work Quickly with Candy Eyes: The chocolate sets fast, so have your eyes close by to stick on as soon as you dip each pop.
- Frosting Details: Use a small piping tip or the opposite end of a toothpick for precise “stitches” and circles around the eyes to avoid smudging.
How to Serve Hocus Pocus S’mores Pops Recipe
Garnishes
I like to keep the garnishes simple and playful: the candy eyes and black cookie frosting really do all the work! For extra flair, sometimes I sprinkle crushed Halloween-themed candy or edible glitter over the chocolate right after dipping to add sparkle and texture. It turns these treats into tiny art pieces that everyone wants to grab.
Side Dishes
My go-to pairings are a warm cup of apple cider or a creamy pumpkin spice latte — the cozy drinks offset the melty sweetness perfectly. For parties, you could serve these alongside some fresh fruit or a light salad to balance all the indulgence.
Creative Ways to Present
One of my favorite presentation ideas is to stand the pops upright in a decorated Styrofoam block or a Halloween-themed vase filled with candy corn or mini pumpkins. I’ve also wrapped them individually in clear cellophane tied with orange and black ribbons to hand out as spooky favors. It always gets a big crowd reaction — super cute and easy!
Make Ahead and Storage
Storing Leftovers
I store leftover Hocus Pocus S’mores Pops in an airtight container in the refrigerator. That keeps the chocolate from melting and preserves the crispness of the graham crackers. In my experience, they stay fresh and delicious for up to 3 days—perfect for enjoying over a couple of days without losing any of the magic.
Freezing
Freezing works well if you want to prepare these in advance. I wrap each pop individually in plastic wrap and then place them in a freezer-safe bag. When thawed slowly in the fridge, they maintain their texture nicely, though I recommend eating them within a month for the best flavor.
Reheating
Reheating isn’t really necessary — these are best enjoyed cold or at room temperature. If you prefer slightly softer chocolate, just leave them out for 10–15 minutes, but avoid microwaving because the marshmallow can get gloopy and the graham crackers soggy.
FAQs
-
Can I use regular marshmallows instead of marshmallow crème for the Hocus Pocus S’mores Pops Recipe?
You could try using melted regular marshmallows, but marshmallow crème spreads more evenly and holds the popsicle stick securely in place. If you want to use regular marshmallows, toast them lightly first, then carefully sandwich them — just be mindful they might not stick as well.
-
What if I don’t have candy eyes? Can I decorate differently?
Absolutely! You can use small chocolate chips, colored sprinkles, or edible markers to create fun faces. The candy eyes are great for that spooky look, but feel free to get creative and personalize your pops however you like.
-
How long do these s’mores pops last?
Stored in an airtight container in the fridge, they last about 3 days. Beyond that, the graham crackers might get soggy and the chocolate can lose its shine, so best to enjoy fresh for maximum yum.
-
Can I make these without popsicle sticks?
You could skip the popsicle sticks if you prefer to serve them more like traditional s’mores on a plate, but the sticks make them much easier to handle and give that fun “pop” presentation, especially for parties or kids.
Final Thoughts
Honestly, this Hocus Pocus S’mores Pops Recipe has become a staple for me every Halloween season — it’s such a joyful treat to make and share. I love how it brings out my playful side in the kitchen and delights everyone who tries it. If you want a quick, festive, and downright charming dessert that’s as fun to make as to eat, this is the one you’ve got to try. Trust me, you’ll be the hero at your next spooky gathering!
PrintHocus Pocus S’mores Pops Recipe

Hocus Pocus S’mores Pops are a fun and festive Halloween treat featuring graham cracker sandwiches filled with marshmallow crème, dipped in rich semisweet chocolate, and decorated with candy eyes and spooky frosting details. These no-bake, freezer-set pops offer a playful twist on classic s’mores, perfect for parties or seasonal celebrations.
- Prep Time: 15 minutes
- Cook Time: 5 minutes
- Total Time: 35 minutes
- Yield: 12 pops
- Category: Dessert
- Method: No-Cook
- Cuisine: American
Ingredients
Graham Cracker Sandwiches
- 12 graham crackers, halved
- 1/2 cup marshmallow crème
- 12 popsicle sticks
Chocolate Coating
- 2 cups semisweet chocolate chips
- 3 Tbsp. coconut oil
Decorations
- 1 bag candy eyes
- 1 container black cookie frosting
Instructions
- Prepare S’mores Pops: Spread about 1 tablespoon of marshmallow crème on one half of each graham cracker. Place a popsicle stick halfway into the marshmallow crème, allowing it to stick out as a handle. Top with the other half of the graham cracker to form a sandwich. Arrange the sandwiches on a parchment-lined baking sheet and freeze them while preparing the chocolate coating.
- Melt Chocolate Coating: In a medium heatproof bowl, microwave the semisweet chocolate chips and coconut oil in 20-second increments, stirring thoroughly after each, until the mixture is melted and smooth, about 1 minute total.
- Dip S’mores Pops: Remove the frozen graham cracker sandwiches from the freezer and dip each completely into the melted chocolate. Use a butter knife or silicone spatula to ensure the sides are fully coated. Immediately stick one candy eye on each pop about halfway down on the far right side. Place the coated pops back on the baking sheet and refrigerate for about 15 minutes until the chocolate hardens.
- Decorate S’mores Pops: Use black cookie frosting to draw a circle around each candy eye, two semicircles on the outer corners of the graham cracker “book,” and stitch-like lines on the chocolate for a spooky effect.
- Set the Pops: Refrigerate the finished pops for at least 15 minutes to let the frosting set and firm up before serving.
Notes
- For easier handling, place the pops on a cooling rack placed over a baking sheet during the dipping process to catch drips.
- Use parchment paper to prevent sticking during freezing and refrigerating.
- These s’mores pops are best enjoyed within 1-2 days of preparation for optimal freshness.
- Substitute vegan chocolate chips and marshmallow crème to make a vegan version.
- Ensure popsicle sticks are sturdy enough to hold the weight of the pops.

